Should you replace your Apple Watch’s battery or upgrade to a new model?
Leopatrizi/Getty Images
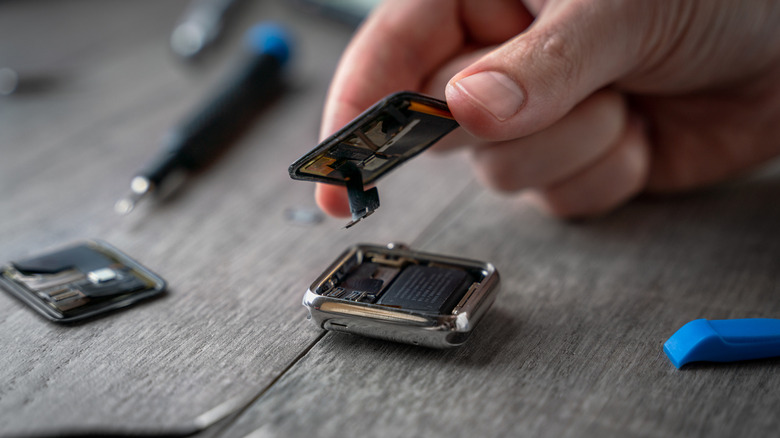
When you spend a lot of money on one of the best Apple Watch models, you want it to last as long as possible. But inevitably, as with any device that uses lithium-ion batteries, the battery will slowly degrade over time. You’ll find it draining faster and faster, and you’ll have to recharge it more often. Thankfully, this doesn’t necessarily mean you’ll have to toss the watch into a recycling bin and buy a new one. Apple Watch batteries can be replaced, which is a consideration worth making to extend the life of the device while also helping the environment.
Spending the $99 it typically costs to fix the watch through Apple can be worth it to get more usage from a wearable that cost you hundreds of dollars — assuming it still has life left it in otherwise. You’ll have to determine if that money is better spent on an upgrade for the refined design and exclusive features of a more recent model, keeping watchOS compatibility in mind.
Advertisement
Pricing an Apple Watch battery replacement
Andy Miller/Getty Images
You can arrange Apple Watch repairs directly through Apple, and the price is generally a flat fee of $99. Other retailers like Best Buy serve as Apple authorized Apple Watch service and repair providers, offering the same repair or replacement service for an equal fee. Typically, the process will take about a week, and you can schedule it online or in store.
If you have an active AppleCare plan on your device, that covers battery issues, including if the battery capacity drops below 80%. However, it does not cover normal degradation of the battery over time. Chances are, if this is the case, your Apple Watch is long outside of its warranty and extended warranty period anyway. There is an option to get ongoing AppleCare for Apple Watch for a monthly or yearly fee until you cancel. But this still includes service fees and/or deductibles and doesn’t cover battery depletion from normal use.
Another option, if you’re confident enough to consider it, is a DIY replacement. You’ll find batteries offered by companies like iFixit, though the company only sells batteries for the original and Series 1 models. After acquiring a replacement battery for a newer model elsewhere, you can use iFixit’s detailed instructional guides on how to swap it out manually. But this is not recommended unless you feel comfortable handling the intricate repair process; there are risks that come with attempting it yourself.
Advertisement
When to replace battery versus get a new watch
Ringo Chiu/Shutterstock
While eliminating e-waste and extending the life of tech products is great, there comes a time when an Apple Watch isn’t worth bringing back to life with a new battery. First, consider software support. The latest watchOS 27 drops support for many older devices; it’s only available for the Apple Watch Series 9, SE 3, and Ultra 2 and newer. That means if you own an Apple Watch Series 8 or older model, you won’t get the latest software update. Your watch will continue to work just fine, though.
In fact, many people report still using models as old as the Series 4 today. The previous generation watchOS 26 had wider compatibility, working with models dating back to the Apple Watch Series 6 and second-generation SE. This means the Apple Watch Series 5 and first-generation SE (and older) are no longer supported, with their software end of life dating back to September 2024.
Your iPhone model shouldn’t be a concern Apple’s iPhone and Apple Watch compatibility page shows that older watchOS versions work fine with modern iOS releases, though you can’t use the latest Apple Watch with an iPhone running an old iOS release. For example, an Apple Watch Series 11 (our review) will only pair with an iPhone 11 or newer that’s running iOS 26 or later.
Apple Watches don’t hold their value for as long as many other Apple products, so you may not recoup the battery investment if you resell the watch. Check what comparable models are selling for first so you know how much profit you could make. If you’re handing the watch down to a friend or family member, consider giving it a replacement battery so they can enjoy the wearable for years to come.
Advertisement
To help you decide what’s best, consider the age of the watch, software support, cost of the battery, and how much longer the watch will likely be supported. I’d suggest replacing the battery for a Series 6 or 7 and above, which are the oldest models compatible with watchOS 26. But for anything older than five or so years, you’re better off upgrading instead.
Sometimes claimed to give you wings, energy drinks can, at the very least, be used to make rockets fly. This is what [Nate Scovill] did in a recent video, where cans of the sugary stuff are processed to give a rocket its proverbial wings.
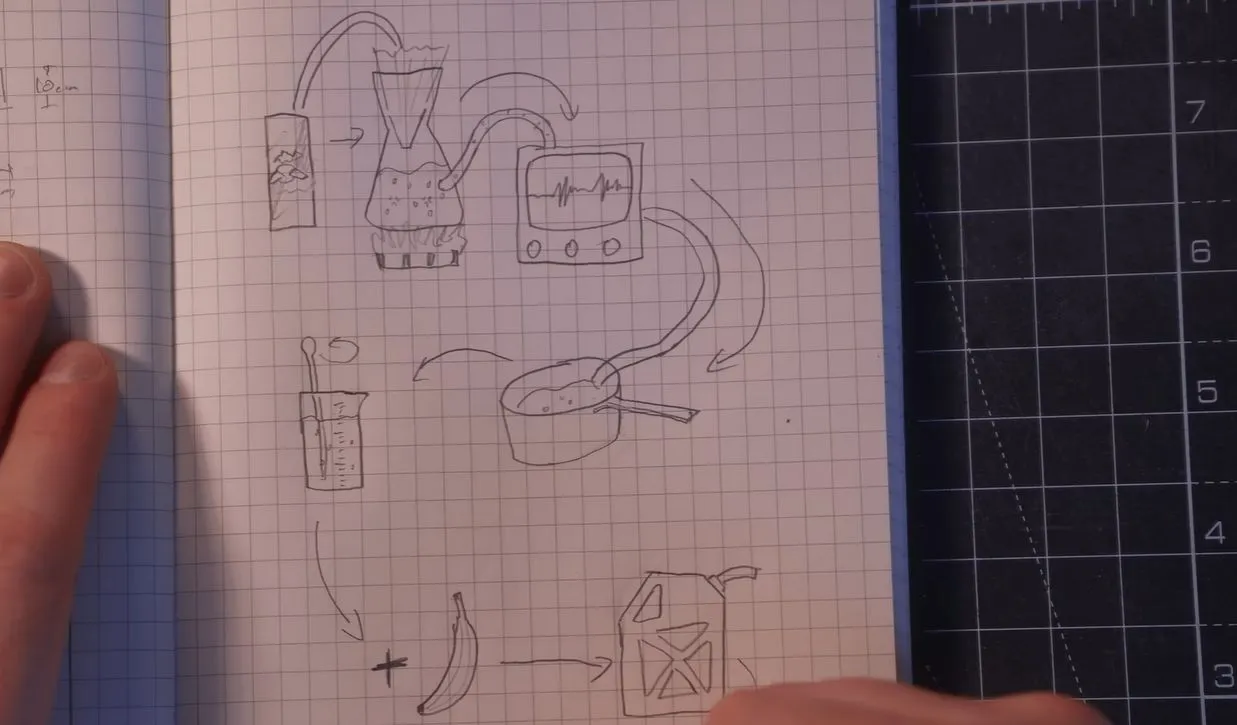
The basic concept is so-called rocket candy, which uses the fact that sugar is a pretty decent fuel type that — when combined with an oxidizer like potassium nitrate — can be turned into solid rocket fuel. Naturally it’d be easiest to start off with a pure source of sucrose or sorbitol for the sugar, but what if you only have access to cans of sugary soda?
Removing the moisture from the energy drink was the obvious first step, as water and rocket fuel aren’t a great mix. Adding and mixing potassium nitrate to the resulting thick syrup created the fuel-oxidizer mixture, also known as rocket fuel. This did take a detour involving removing the carbonation using a vacuum chamber, as CO2 and fire do not really like each other either.
Advertisement
We previously covered making your own rocket candy, though it’s far from the only rocket fuel that can be made at home using products bought at the local supermarket. Obviously, doing so comes with a whole heap of risks, not least of which is the notion that the difference between a rocket and a bomb is a pretty thin and fuzzy line that you do not want to accidentally cross.
Anthropic has revealed how it’s watermarking text generated by Claude AI to comply with the European Union’s new AI transparency rules. The company said its text watermarking will not have easy-to-see visuals, will not be distinguishable to the people who read it and will not be adding hidden characters to the text. Instead, Anthropic’s method involves leaving a pattern in the text that can only be decoded by someone who has the key for it.
The company explained that large language models pick one word at a time when generating text by choosing from a list of potential appropriate words to use. They pick words randomly, as long as they make sense for the context of what they’re generating. With watermarking on, Claude will use a key to decide on what word to choose instead of using an arbitrary random number generator to pick the next word.
In its example, Anthropic used the digits of pi as a key. Say, the key starts with the digit 2 from the pi sequence 3.1415926535. The next word generated is the sixth in the list of choices, then the fifth, the third and then the fifth again. This method is an adaptation of Google DeepMind’s SynthID-Text approach to watermarking, which the team described in a paper published in Nature. Watermarking doesn’t affect the quality of Claude’s output or slow it down, the company said, and it will not require extra tokens or make generations more expensive.
Of course, AI-generated prose typically has tells. Models are fond of using certain sentence constructions like “this isn’t [X], it’s [Y],” for instance. But those tells are only enough to let you know that an AI was involved in writing that text, not the model used. Anthropic will release an API that has “keys” to decode Claude’s watermarking and will be able to say whether the its AI generated the block of text being checked.
Advertisement
Anthropic admits that its text watermarking method does have limitations. It can’t tell whether Claude actually wrote the text or just edited it, which means if you ask the AI to edit something for you, it will be watermarked too. As the company explains, it can only tell that Claude was likely involved with the text at some point. Even translations will be watermarked. If Claude has only proofread and lightly edited the text, or if the text is too short, the watermark may not be enough to be detectable. Take note that lightly editing Claude-generated text probably won’t remove its watermark. If you want to be sure, you will need to rewrite it completely.
There have been some concerns on how watermarking would affect code, since it may not be copyrightable without significant human input. If one could prove that an entire codebase was AI-generated, they could copy and then iterate on it. Anthropic said, though, that code has “generally less watermarking than some other forms of text” because it typically requires exact output. If there are no choices to be made in the text generation, then watermarking can’t be applied.
Anthropic will also watermark images by adding a cryptographically signed note in its metadata that says it was generated by Claude. In its announcement, the company said it was applying watermarks to all of Claude’s output at launch because it doesn’t have sure ways to implement the changes by region. The changes will affect output across all Claude products that use models released after August 2. Anthropic will also add watermarking capability to older Claude models over the coming months.
Steam power is a staple of the steampunk aesthetic, thermodynamics, and a checkpoint for the budding mechanical engineer studying heat cycles. But because food is largely made of water, steam is also common in the culinary arts. So it’s no surprise that when thermodynamics is applied to cooking, exciting things can happen.
This particular example of steam-powered culinary happenings is inspired by industrial potato-peeling machines. By adding high-pressure, high-temperature steam to a pressure vessel with potatoes inside, heat can transfer more easily to the inside of the potatoes. Because the pressure is so high, however, the water in the skin won’t boil. This is fundamentally the same concept as a pressure cooker. However, what’s different is that instead of a pressure cooker’s slow release, these industrial peeling machines rely on explosive decompression, flash boiling the water underneath the potato’s skin. This rapidly expanding steam rips away the skin in a nice clean sheet.
But, to [Stuff Made Here’s] disappointment, there were no videos of the process on the internet. But, fortunately for us, being an engineer of complicated machines means that there is one now that you can watch below.
The machine itself is, on paper at least, fairly simple. It consists of a boiler, connected to a fruit chamber by a valve, and another valve to vent the steam out of the fruit chamber. However, engineering a pressure vessel that can safely withstand over 1,000 kPa of steam with a window for filming when you can’t weld very well is another matter entirely. The boiler is two stainless steel plates with a cylinder in the middle, with face seals used to keep the chamber steam-tight. A custom jig was needed to machine the pipe ends flat enough to mate with the seals. It’s held together with threaded rods. However, because the rods and the vessel body have different thermal expansion coefficients, Belleville washers are used as expansion joints in the system.
Advertisement
The fruit chamber is welded together because it experiences lower pressures. This also allows for a less sensitive O-ring seal on the door, reducing the work required to use the door. A glass piece inlaid into the steel door provides a view, held in place by pressure and 3D-printed brackets. A stand holds the fruit centered within the window for our viewing pleasure!
The results speak for themselves, though operation is complicated and dangerous, and it can only peel one fruit at a time; the skin of nearly every example placed inside is perfectly removed. Experiments include apples, potatoes, grapes, lemons, strawberries, blackberries, and (pictured above) popcorn on the cob. It’s quite a fun demonstration of the thermodynamic principles at play!
The Ultimate Unity Game Development Bundle has 44+ hourse of video training designed for aspiring developers. Dive deep into Unity Engine and C# fundamentals, master player physics, and polish your creations with pro-level animations and post-processing. With multi-platform deployment training, it’s everything you need to kickstart a portfolio. It’s on sale for $25.
Note: The Techdirt Deals Store is powered and curated by StackSocial. A portion of all sales from Techdirt Deals helps support Techdirt. The products featured do not reflect endorsements by our editorial team.
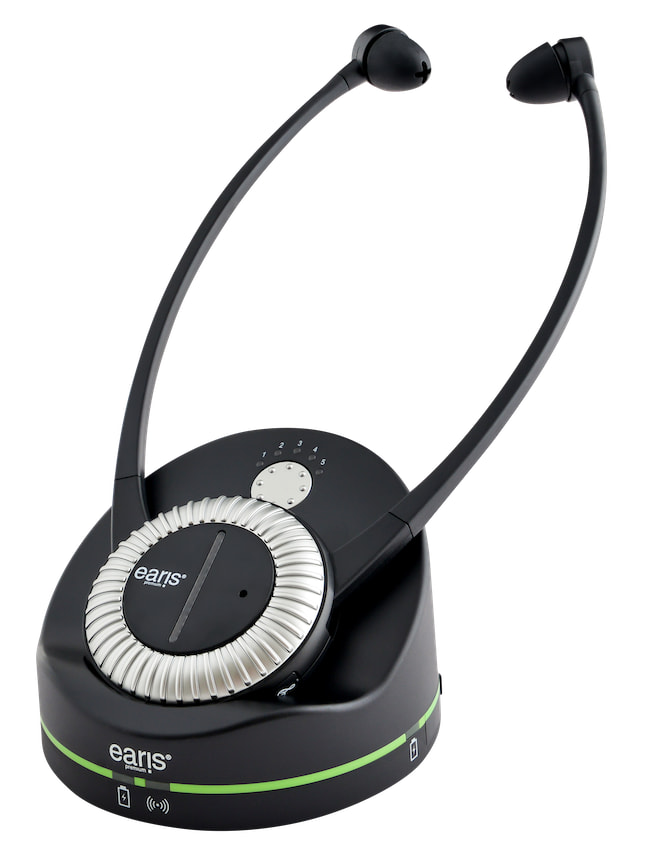
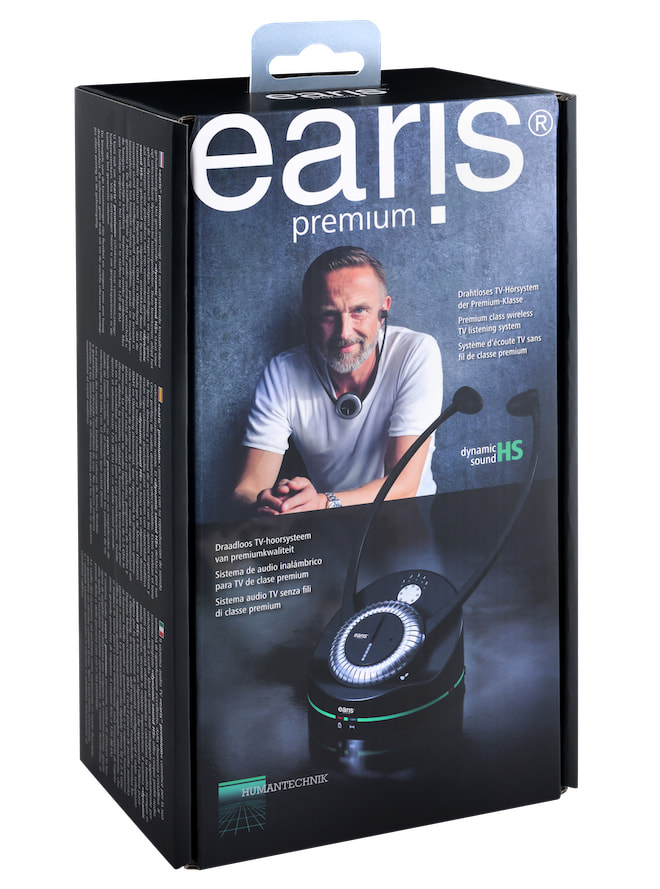
Essence For Hi-Res Audio has introduced the Earis Premium Personal TV Audio System, a wireless personal-audio solution designed for viewers who want clearer dialogue, independent volume control, and a more immersive listening experience without relying on TV speakers, a soundbar, or a conventional two-channel or multichannel system.
Essence, which manufactures HDMI DACs and also represents brands including Amphion, Acoustic Energy, FIBBR, and ATI, is positioning Earis Premium as more than a simple TV listening headset. The system is designed to reproduce dialogue, music, ambience, and movie effects with greater clarity while allowing the listener to control volume without changing the level for everyone else in the room. The Earis Premium receiver provides up to nine hours of battery life and recharges when placed in its transmitter and charging base.
Solving a Problem
Wide-dynamic-range movie and television soundtracks can shift quickly from quiet dialogue to dramatically louder music and effects, often sending viewers reaching for the remote to adjust the volume. Earis Premium takes a different approach by moving the audio system directly to the listener through a personal headset, allowing the user to hear dialogue and other program material at a comfortable level without changing the volume for everyone else in the room.
The Earis Premium is designed for longtime audio enthusiasts whose hearing has changed with age, viewers who have difficulty following dialogue, couples who prefer different listening levels, late-night viewers, and apartment or condominium residents who want high-quality sound without disturbing neighbors. It could also appeal to home-theater owners looking for a personal listening alternative when firing up the full system is impractical—or when they are simply tired of riding the volume control through every quiet conversation and explosive action sequence.
Advertisement
The Wireless Receiver
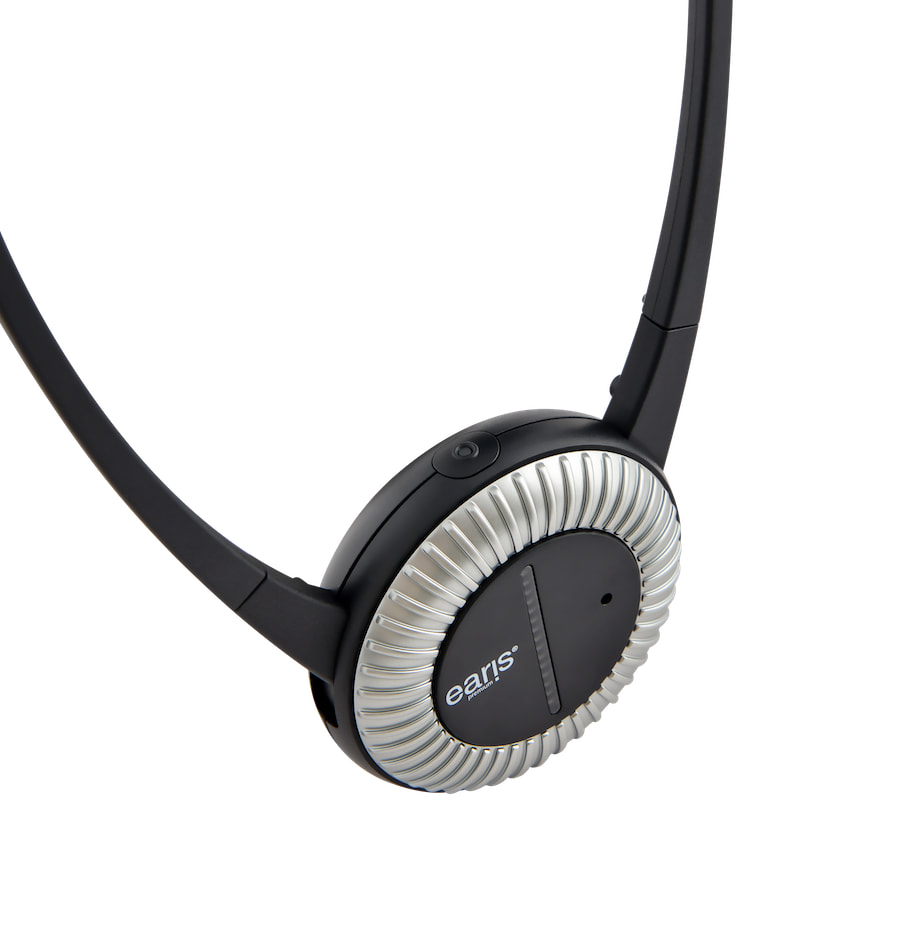
The 2-ounce under-chin wireless receiver integrates a Wolfson WM8918 24-bit DAC/headphone amplifier, 14.8 mm moving-coil transducers, 24-bit/48 kHz PCM operation, and dedicated 2.4 GHz wireless transmission. The result is a short, purpose-built signal path designed specifically for personal television audio, rather than relying on conventional Bluetooth headphones or earbuds that were designed to serve a much broader range of listening applications.
By using its own 2.4 GHz wireless connection, Earis Premium is built around the specific requirements of TV viewing, where reliable transmission, dialogue intelligibility, and synchronization between the picture and sound are particularly important.
“Designed and engineered in Germany, Earis Premium impressed me because it did far more than improve dialogue clarity,” said Bob Rapoport, founder of Essence For Hi-Res Audio. “Full range music, ambience, localization, effects and dramatic impact were all preserved. What I heard was the actual Hi Res Audio soundtrack of shows like House of the Dragon; I was immersed in the realism of the production’s sound design in a new and more direct way than my two-channel in-room system could take me. It was addictive.”
Personal Volume and Balance Controls
The Earis Premium provides a rotary volume control along with a separate left/right balance control on the rear of the under-chin receiver, giving listeners direct control over both overall listening level and channel balance.
Independent volume control allows one viewer to listen at a preferred level without forcing everyone else in the room to accept the same setting. The balance control can compensate for differences in hearing between the left and right ears, helping restore a more natural stereo balance and improve image localization.
Advertisement
A single Earis Premium transmitter can also support two headset receivers, making the system practical for couples or two viewers who both want a personalized listening experience.
Audio Specification Highlights
The Earis Premium has a stated frequency response of 20 Hz to 16 kHz, with maximum output rated at 122 to 125 dB SPL and latency of less than 47 milliseconds. The DAC section is specified at a 96 dB signal-to-noise ratio and 0.005% total harmonic distortion (THD).
Advertisement. Scroll to continue reading.
The transmitter accepts 24-bit/48 kHz PCM stereo through its optical digital input and also provides an analog input, allowing the Earis Premium to work with a broad range of televisions and other source components.
You Can Even Add a Subwoofer
Earis Premium can also be used alongside a powered subwoofer. With the main speakers turned down and the subwoofer left active, the headset handles the personal stereo presentation while the subwoofer continues to reproduce the lowest bass frequencies in the room.
Advertisement
That combination gives the listener the clarity and independent volume control of the Earis Premium while preserving some of the physical low-frequency impact of a conventional home-theater system, creating a more full-range personal viewing experience without running the entire speaker system at normal listening levels.
Earis Premium Personal TV Audio System Specifications:
Essence For Hi-Res Audio Model
Earis Premium
Product Type
Personal TV Audio System
Price
$699
Maximum Output
Up to 125 dB SPL
Digital Audio Input
Optical PCM stereo up to 24bits/48k
Analog Input
3.5mm
Microphone Input
3.5mm
Modulation method
PCM Analog-over-digital
Transmission Carrier frequency
2.4 GHz~2.5 GHz
Signal-to-Noise Distance
-87 dB
Transmission Power
10 dBm
Audio latency
< 47 ms
Transmission Range
> 70 m
Temperature Range
0 °C to 45 °C
Power Supply
5 Volt DC / 1.5 A
Power Adapter
100-240 Volt 50-60 Hz 300mA
Stethoset receiver
Harmonic Distortion
1kHz<1% at 500mVrms
Frequency Response
20 Hz – 16 kHz
Sound Pressure Level (SPL)
122 dB SPL at Input=1KHz/500mVrms
Earpad Material
Silicone rubber
Power Supply
3.7V 400mAh, Lithium-polymer rech. battery
Running Time Per Charge
9 hours
Charging time
2 hours
Weight (battery incl.)
61 g
Dimensions (mm)
244 x 112.5 x 24
Operating Temperature Range
0 °C – 45 °C
Pocket receiver
Connection
3.5mm stereo jack socket, 16 Ohm minimum
Power supply
3.7V 400mAh, Lithium-polymer rech. battery
Running Time Per Charge
9 hours
Charging Time
2 hours
Weight (battery incl.)
41 g
Dimensions (mm)
63 x 24 mm
Operating Temperature Range
0 °C – 45 °C
The Bottom Line
The Earis Premium is not the first wireless TV listening system, but its combination of a 2-ounce under-chin receiver, dedicated 2.4 GHz transmission, 24-bit/48 kHz PCM playback, independent volume and balance controls, support for two receivers, and the unusual ability to integrate with a powered subwoofer gives it a more audiophile-oriented spin on the category.
There are compromises. The Earis Premium is a stereo-only system with no Dolby Atmos or spatial-audio support, and its digital connectivity is limited to optical PCM rather than HDMI/eARC. At $699, it also costs considerably more than several Sennheiser TV-listening systems. Sennheiser remains the most obvious competitor, with models such as the RS 255 and RS 275 selling for well under $300, while products such as the RS 195 have established the brand in personalized TV listening and dialogue enhancement.
For viewers who primarily want a cheaper way to hear dialogue more clearly, Sennheiser offers plenty of alternatives. Earis Premium makes more sense for listeners who also care about music, stereo imaging, independent control, and getting closer to a full-range personal home-theater experience without turning on the entire room system.
Price & Availability
The Earis Premium is priced at $699, with U.S. shipping beginning August 25, 2026, directly from Essence For Hi Res Audio.
Copilot’s gurning blob is leaving Voice for a new career in education
Microsoft has yanked Mico from the Copilot spotlight less than a year after unveiling the anthropomorphic assistant intended to make its AI a little less soulless.
As part of Microsoft’s announcement that its consumer and work Copilot applications will merge, the company confirmed that the weird blob thing would shuffle out of Copilot Voice and into Learn Live, a voice-based study mode that guides users through subjects and assignments.
Advertisement
“Mico helped us learn about warmth, expressiveness, and how people want to talk with AI,” Microsoft wrote. “Those learnings are shaping Copilot going forward.”
“Learn is where the character has the most room to grow, with tutoring sessions that give Mico more to react to and teach through.”
As the update rolls out, Mico will no longer be the face of Copilot Voice. Users can still speak to Copilot and receive responses, but will be spared the blob’s gurning.
Mico is only the latest in Microsoft’s long line of anthropomorphic assistants. There was Clippy (or Clippit), which arrived with Office 97 but had been pushed into Microsoft’s desk drawer of doom by the time Office 2007 appeared. Then came Cortana, named after the character from the Halo video game franchise and pitched as a far more intelligent assistant. Microsoft introduced Cortana on Windows Phone in 2014 and brought it to PCs with Windows 10 the following year, before losing interest.
Advertisement
Mico didn’t even last a year as the face of Copilot Voice before Microsoft pulled it from the spotlight, although both the character and its Copilot “brain” live on in Learn Live. In terms of lifespans, it’s easy to compare it to the catastrophic Microsoft Bob, which was launched in 1995, with the last release happening that same year. However, the product lingered a little longer and later resurfaced, hidden as digital ballast on the Windows XP installation CD for licensing and encryption.
Modern digital distribution means that such a second life is unlikely to await Mico. Dave Plummer, the engineer responsible for Bob’s inclusion as an encrypted blob, said: “What’s ultimately important is that while Bob never got to play on the big stage, he always followed the band around and got to ride on the bus.”
Mico hasn’t been thrown off the bus just yet. Microsoft has merely made the blob sit with the schoolchildren. ®
A new Mirai-based modular Linux botnet malware called Evooo1Bot has been targeting internet-facing gateway devices, turning them into SOCKS5 traffic relay nodes.
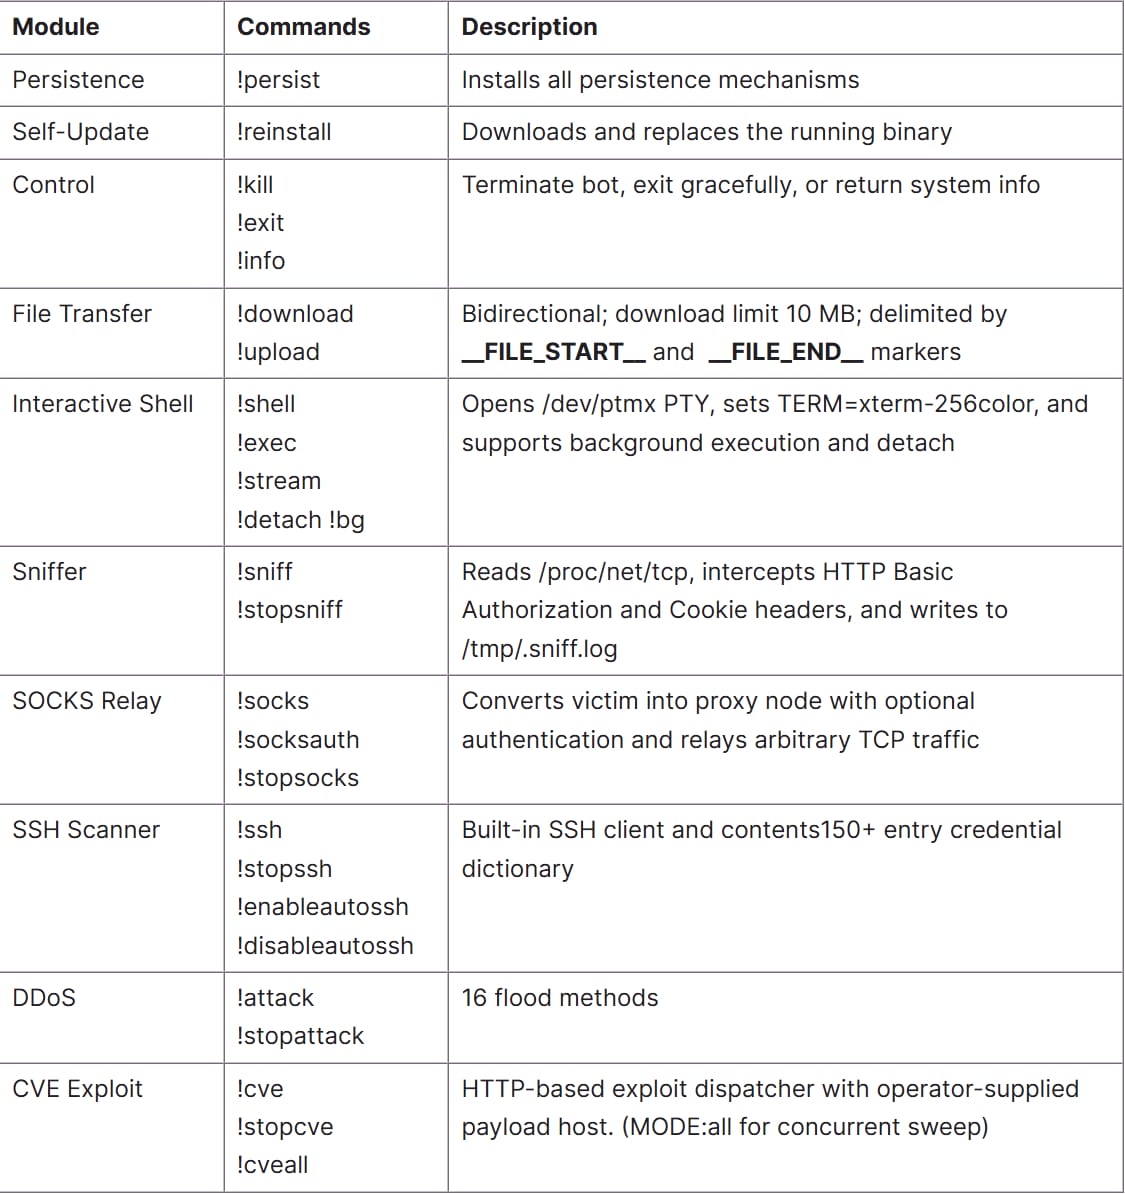
The malware’s capabilities extend beyond turning devices into proxy nodes and include credential theft, SSH brute-forcing, and launching distributed denial-of-service (DDoS) attacks.
Since at least July, Evooo1Bot has been targeting devices from Alcatel, NETGEAR, Tenda, Mitsubishi Electric, Telesquare, and D-Link across various regions by exploiting known vulnerabilities.
Evooo1Bot’s current geographical spread Source: Fortinet
“While the malware reuses the DDoS engine from the publicly leaked Mirai source code, it extends the original framework with numerous capabilities, including encrypted C2 communications, an SSH brute-force scanner, a SOCKS relay module, a credential sniffer, and an integrated exploit arsenal targeting multiple known vulnerabilities,” Fortinet researchers found.
Newer builds include a separate vulnerability-exploitation module targeting Hikvision cameras, Atlassian Confluence, Zyxel firewalls, TP-Link routers, D-Link NAS devices, WSO2 products, Kubernetes ingress-nginx, and vulnerable PHP-CGI installations.
Advertisement
However, Fortinet notes that some of the embedded exploits are not correctly implemented, leading to failed exploitation.
When leveraging an exploit successfully, a script downloads one of the 12 available malware builds that match the host’s CPU architecture, then clears Bash history to wipe traces of the attack.
Evooo1Bot uses encrypted command-and-control (C2) communications over port 443 and performs extensive checks for debuggers, security tools, sandboxes, virtual machines, containers, and honeypots before it launches on the infected device.
Persistence is established through systemd, SysV init, shell profiles, and rc.local, while a cron job attempts to re-download the payload every five minutes.
Advertisement
The malware’s modules Source: Fortinet
An interactive shell gives operators direct control over compromised systems, while file-transfer commands support uploads and downloads.
The malware also features a credential sniffer module that monitors ‘/proc/net/tcp’ and attempts to capture HTTP Basic Authentication and Cookie headers.
The SOCKS5 module supports direct listening and reverse-relay modes, allowing attackers to conceal malicious traffic, circumvent geographic restrictions, or potentially access networks through compromised systems.
Fortinet says proxying sessions run independently, and multiple can be opened simultaneously, allowing monetization through residential proxy services if the botnet grows large enough.
The SSH scanner module uses 150 username and password combinations for enterprise-oriented accounts, and performs post-login checks to avoid honeypots.
Advertisement
Finally, the DDoS module that was inherited by Mirai supports 16 flood methods, including UDP, DNS, SYN, ACK, GRE, fragmented TCP, and an HTTP flood with customizable requests.
To defend against botnet malware, keep your IoT devices’ firmware updated, replace default admin credentials, turn off remote access panels, and replace devices when the vendor no longer provides support for them.
Overall prevention scores can hide what happens after initial access. Once attackers are using valid credentials, prevention drops sharply.
The Blue Report 2026 measures defenses technique by technique across 338 million simulations run in customer production environments.
The big picture: The RAM crisis has made the latest hardware so unaffordable that components from four years ago are storming sales charts. AMD and Nvidia have already responded to the demand by re-releasing chips from 2022, and now Intel is poised to follow suit.
Robert Hallock, Intel’s vice president and general manager of enthusiast channel business, recently told Tom’s Hardware that the company plans to continue offering Raptor Lake CPUs, first launched in 2022, for a while longer. Intel, like AMD, is responding to sustained demand for hardware that supports DDR4 RAM.
During a lengthy interview, Hallock noted a spike in demand for Alder Lake and Raptor Lake processors, which have recently become harder to find. While the exec did not mention specific products, he confirmed that the company aims to stabilize and maintain the supply of 10-nanometer chips that support Intel’s LGA 1700 socket “for years to come.”
The comments align with prior rumors that Intel might introduce another refresh for Raptor Lake – the lineup’s third – during the first half of 2027. Tom’s Hardware heard reports on the topic during Computex earlier this year, where at least two motherboard vendors also confirmed plans to increase production of aging LGA 1700-compatible boards to meet rising demand. Intel’s rumored refresh, tentatively dubbed Raptor Lake Next, would exist alongside the DDR5-exclusive Nova Lake.
Surging demand for processors and mainboards that support the supposedly obsolete DDR4 memory is likely due to RAM shortages driven by AI data centers. The price of DDR5 RAM has skyrocketed over the past year, driving PC users to either purchase DDR4 memory at much lower (but still inflated) prices or hold onto the RAM they already have. Raptor Lake CPUs support DDR4 and DDR5 memory, giving buyers the opportunity to upgrade without replacing an entire PC.
AMD has already responded to the situation by re-releasing the Ryzen 7 5800X3D, the CPU that introduced 3D V-Cache in 2022. The ongoing crisis has also turned the modest Ryzen 5 5500 into the reigning budget CPU king. While the company offers better processors at similar prices, such as the 7500F and 9800X3D, they all require DDR5 RAM.
The trend has even affected Nvidia GPUs. While tightening stocks of GDDR7 VRAM have increased the prices of the company’s latest RTX 5000-series graphics cards and delayed the launch of the RTX 5000 Super cards, Nvidia has revived the 12GB RTX 3060, also from 2022, as a temporary substitute.
It’s not a controversial statement to say that energy bills are high these days, and that finding ways to lower these costs is essential to the modern budget. Consumer Reports offers helpful tips for lowering energy bills, though one of the biggest difference-makers is seeking out an alternative energy source to offset traditional energy consumption. Arguably the most popular option is solar, but wind power shouldn’t be overlooked in its own right. Installing a wind turbine at home isn’t just possible; it’s an effective method of cutting a sizeable percentage from your energy bill — though it is a pricey investment, ranging from $20,000 to $50,000 on average for a full-size unit.
On the whole, there’s potential for a wind turbine setup to save a significant amount of money every year on energy. Estimates place a small system as possibly dropping bills by between 50% and 90% in the absolute best conditions. With a battery setup, storing wind energy for later use is a possibility, too, and that’s not even getting into the environmental benefits. As a clean energy source, wind turbines don’t produce harmful emissions, nor do they require fossil fuels for power or water for cooling, so you’ll have peace of mind knowing much of your home energy production is environmentally conscious.
With all of that said, setting up a home wind turbine or two isn’t accomplished in an afternoon. It takes the right parts, expertise, documentation, and setup to reap the many benefits of this renewable energy source.
Advertisement
1. A sufficient location
Robert Heemskerk/Getty Images
Before purchasing a single wind turbine part or planning where to set it up, you need to assess if your home is in an ideal place for wind power to begin with. Naturally, even smaller wind turbines require ample wind, with residential turbines needing approximately 7 miles per hour (mph) of wind to generate power. All kinds of obstacles, including high surrounding buildings, tall trees, or even tight-knit homes in neighborhood environments, can restrict or divert wind gusts away from the turbine, limiting the potential for energy production. Thus, in such an area, wind power might not be worth the effort, and instead one of the other green energy alternatives for homes could be the answer.
If you’re comfortable moving, there are some regions worth considering for their wind energy viability. The most wind turbine-friendly areas within the United States include seacoasts, ridgelines, and throughout the Great Plains region, so if you want to try wind power, these areas are the way to go. With that said, you’re not strictly limited to these parts of the country. So long as there’s consistent wind movement to keep the turbine blades turning at a sufficient speed and a lack of wind-inhibiting obstacles, you’ll generate some amount of electricity for your home to run on.
Advertisement
2. The necessary permits and certifications
Nanci Santos/Getty Images
So, you’re ready to set up your residential turbine, but you can’t get started just yet. As any homeowner could tell you, building on your property isn’t simple. Wind turbines are no exception, being both a home improvement project you shouldn’t tackle yourself and an endeavor demanding extensive paperwork. Worse yet, there can be some legal inconsistencies from region to region, so it’s a good idea to start local with your documentation journey to make sure you don’t miss any key parts. Your chosen installer is a valuable resource at this step, since they should be able to acquire the necessary permits and certifications before beginning.
Generally speaking, a valid building permit is required to construct a wind turbine at your residence. To connect it to your power grid, you’ll need to reach out to your local utility for approval and assistance with this setup. At this point, you may have the opportunity to enter a net metering agreement with them to sell off any excess energy your turbine produces, so this could be a nice moneymaking venture, too. You should also be mindful of the color and patterning of your wind turbine, as some areas are highly specific regarding their appearance. During all of this paperwork, don’t forget to look into the potential tax benefits and general incentives turbines can qualify you for.
Advertisement
3. Professional help
Realpeoplegroup/Getty Images
Setting up residential wind power requires more than a few helping hands. Professional help is crucial to getting everything installed safely and correctly. As far as setting up the turbine, while a crew of capable friends and family members could get a guyed turbine raised and stabilized, a large self-supported tower will more than likely require more experienced hands. A concrete foundation is required, and depending on the size of the tower and turbine, heavy machinery could be necessary to move and stand everything up.
Structural labor aside, the electrical side of wind turbine setup isn’t for the faint of heart. Whether you’re connecting to the power grid or opting to connect the turbine to a battery, you need to have a strong understanding of how electrical systems work and how to safely work on them. Otherwise, you could add to the list of major electrical mistakes you don’t want to make at home. Thus, you’ll want to hire someone familiar with this type of wiring, and for all setup steps for your turbine, you’ll want to budget accordingly to cover these professionals’ services.
Advertisement
4. The turbine and tower
Alberto Masnovo/Getty Images
With your space determined, paperwork done, and professionals lined up, you can turn your attention to the turbine itself, as well as the associated items needed to run and utilize it. First, you want to assess what size turbine you want in terms of energy production. Home turbines range from 400 watts to 100 kilowatts, so you should do some research into what your dwelling needs. This power need will determine the size of the turbine, which can come in multiple forms. Most common are horizontal turbines, though vertical turbines — available in S-shaped Savonius and oval Darrieus forms — are possibilities for your setup, too.
Under the turbine goes the tower, to which it must be mounted in order to catch the wind and turn it into electricity. It’s recommended that the tower leave at least a 30-foot gap between the bottom-most part of the turbine and grounded obstacles within 300 feet for safety reasons. They come in two main variations: self-supported, concrete foundation-bound towers and guyed towers, characterized by pipe or tubing, stabilizing guy wires, and an anchor. Investing in a tilt-down tower for easier maintenance isn’t a bad idea either, assuming it doesn’t uncomfortably strain your budget. Of course, roof-mounted turbines like those from Ridgeblade are out there as well for those limited on yard space.
Advertisement
5. The electrical elements
Now that the wind turbine and mounting tower have been selected, the next step is the more technical part of a home wind setup. There are several key electrical elements to bring together that will allow the turbine to actually do its job. If you’re planning to connect your turbine directly to the home’s power grid, you’ll need a power conditioning unit, which is also known as an inverter. This is necessary to make the system’s direct-current output compatible with the alternating-current grid, making it safe and usable. That said, even without hard-wiring into the grid, an inverter is still necessary.
Advertisement
Should you keep your turbine independent of the existing power grid, you’ll need something else to store and channel that wind-generated power. This is where a battery setup comes into play, taking in the energy and holding onto it during periods of low wind. Alongside the battery itself, you’ll need a battery charge controller to prevent it from overloading and overheating, in addition to an inverter. While some appliances can use DC power directly from the battery, most will need DC-to-AC conversion to work safely. In either case, it’s paramount to consult a professional electrician to ensure these volatile electrical elements are set up correctly.
Advertisement
How these elements were selected
Sven Loeffler/Getty Images
To choose these elements for a home wind turbine installation, we took a multifaceted approach to researching the build. For one, there’s the actual selection and setup of the wind turbine itself, and the associated construction necessary. These parts of the process aren’t cheap or simple, so being aware of all of the elements needed to get such a system up and running is crucial. Not to mention, it’s a good idea to be aware of the potential cost range for this effort; this way, those considering wind power know if they can realistically afford such an undertaking.
Aside from the actual wind turbine planning, setup, and use, there are the location and paperwork-related aspects. Wind turbines need to be set up in specific areas with ample wind to achieve the owner’s energy production goals; they need to be built within the local laws and regulations in the area to avoid any legal trouble; and they should be set up by those who actually know what they’re doing. Homeowners need to know that there’s a lot of paperwork, phone calls, and planning involved to get this set up from a hypothetical to a usable reality.
Sam Altman told a summit of tech interns that two years of college was “the exact right amount of time” for him and that four years may be more than the world now requires. He made the case to an audience whose entry-level pipeline is already being closed by AI.
Sam Altman thinks a degree takes longer than it needs to. Two years at Stanford was “the exact right amount of time” for him, the OpenAI chief said, and staying would have brought “vastly diminishing returns.”
He was talking to tech interns. The remarks came during a surprise appearance at Internapalooza, a networking summit run by investor Cory Levy for students spending the summer in the industry.
“I’ve sort of thought that maybe the way the world has evolved, college just shouldn’t be as long as it is,” Altman said, while allowing that it was “still great to meet people and kind of like live on your own and get to work on projects.”
Advertisement
The audience is what complicates it. TNW has reported that AI is killing the summer internship, the mechanism that has long converted students into employees.
Nor is that only an American problem. A Swiss study found fewer job ads aimed at career starters as automation absorbed the tasks juniors used to be hired for.
Altman’s other advice pointed the same way without meaning to. “You can make a whole startup kind of by yourself in a room with a lot of AI tokens, but not much else,” he said.
Heard from a founder’s chair that is liberating. Heard from an internship, it is a description of a job that might not need filling.
Advertisement
Not everyone reads the trend that way. Adecco’s chief executive has argued that AI is changing jobs rather than destroying them, which is the more optimistic case and not an unreasonable one.
The rest of the session was conventional founder advice. People waste effort trying to be taken seriously, Altman said, though he conceded that enterprise sales was the exception and that he eventually solved it by hiring a 50-year-old.
His own route is worth remembering before anyone acts on this. Altman left Stanford in 2005 to co-found Loopt, which landed in Y Combinator’s first batch and led to him running the incubator, while his mentor Peter Thiel pays $250,000 over two years to under-22s on condition they drop out. As Altman put it himself, “you don’t get to run the experiment twice.“


















.jpg)













































You must be logged in to post a comment Login