Tech
How to Stay Safe on Public Wi-Fi: Step-by-Step Guide

Public Wi-Fi is safe enough for checking the weather or reading the news. It gets risky the moment you log into your bank, your email, or anything with a saved card number. A few minutes of setup, done before you connect rather than after, closes most of that gap.
Quick Take
Here is the short version, before the full walkthrough below. Do these five things every time you use a public network, in this order.
- Confirm the exact network name with staff before you join it. A near-identical fake name is the easiest trap to fall for.
- Turn off auto-join on your phone and laptop, so neither device reconnects to a network on its own.
- Turn on your VPN before you open anything else, not after you start browsing.
- Skip banking, shopping, and other sensitive logins unless your VPN is confirmed on and two-factor authentication is turned on.
- Keep your operating system and security software updated before you travel, not during.
The rest of this guide walks through each step for phones, laptops, and the situations where these tips genuinely don’t apply.
Prerequisites
Do these things at home, on your own network, before you connect to public Wi-Fi anywhere. Setting them up at the airport or coffee shop, on the same connection you’re trying to protect, defeats the purpose.
Install a VPN app on every phone and laptop you travel with. Set it up now, so you’re not comparing options over an unsecured connection later. This list of VPN apps for Android is a reasonable starting point if you haven’t picked one for that platform.
Turn on automatic updates for your phone and your laptop. Most attacks that succeed on public Wi-Fi rely on a security hole that was patched months earlier. These basic cybersecurity habits cover this alongside a few others worth setting up once, not per trip.
Finally, turn on two-factor authentication for your email, banking, and any account you’d be upset to lose. If your bank or employer offers an authentication app instead of text-message codes, use that instead. Text codes can be redirected through a hijacked phone number; an app on your own device can’t be.
Know the Real Risks First
DangerThis isn’t a hypothetical problem. A public Wi-Fi safety survey found that roughly one in four regular users have run into a security problem because of it, and nearly half admitted joining a network before without checking it was legitimate.
The steps in this guide make more sense once you know what they’re defending against. Three things go wrong on public Wi-Fi, and none of them require the attacker to be a skilled hacker.
Evil Twin Networks
An evil twin attack happens when someone sets up a fake Wi-Fi hotspot using the same name as a real one nearby. Your phone can’t tell the difference by name alone. Once you join the fake network, the attacker can show you a fake login page, or simply watch what you send.
This is why confirming the network name with staff is step one in the Quick Take above. A coffee shop’s real network has exactly one name. Two networks with nearly identical names is the warning sign.
Man-in-the-Middle Interception
This attack doesn’t need a fake network at all. On an open, unencrypted Wi-Fi network, someone else connected to the same hotspot can potentially read data traveling between your device and the internet. This is called packet sniffing, and free tools that do it are easy to find online.
A VPN exists to stop exactly this. It wraps your traffic in its own encryption before it touches the local network, so anyone sniffing that network sees scrambled data instead of your actual activity.
Malware Delivered Through the Connection
Some public networks push malicious software onto connected devices, often disguised as a required “network login” app or a fake update prompt. Android phones face their own version of this: OMACP malware spreads through network configuration messages rather than a normal app install.
None of these three risks require you to be targeted personally. They’re automated and cheap to run against anyone who connects.
Which Steps Apply to You
Not every step below matters equally in every situation. Answer these questions first, then use them to judge how carefully to follow what comes next.
- What device are you using? Phones and laptops have different auto-join settings, covered separately in Step 2.
- What are you about to do? Checking sports scores carries little risk. Logging into your bank, checking email, or entering a card number means every step below applies, not just the easy ones.
- How long will you be on this network? A five-minute check-in at a departure gate is a different risk than working from a café for three hours, where a bad connection has more time to do damage.
If your answer to the second question involves money or a password, don’t skip the VPN or two-factor authentication steps, even if the rest feels like overkill for a quick visit.
Step-by-Step: Securing Your Connection
-
Step 1: Confirm the Network Name
Ask an employee for the exact Wi-Fi name before you connect, or check a printed sign. Don’t guess based on which network looks official. If you see two networks with almost the same name, such as “Airport_WiFi” and “Airport_WiFi_Free,” treat both as suspicious until staff confirm which one is real.
Expected outcome: you connect to a network you’ve manually verified, not just the strongest signal in the room.
-
Step 2: Turn Off Auto-Join
This step looks different by device. Find the version that matches what you’re using.
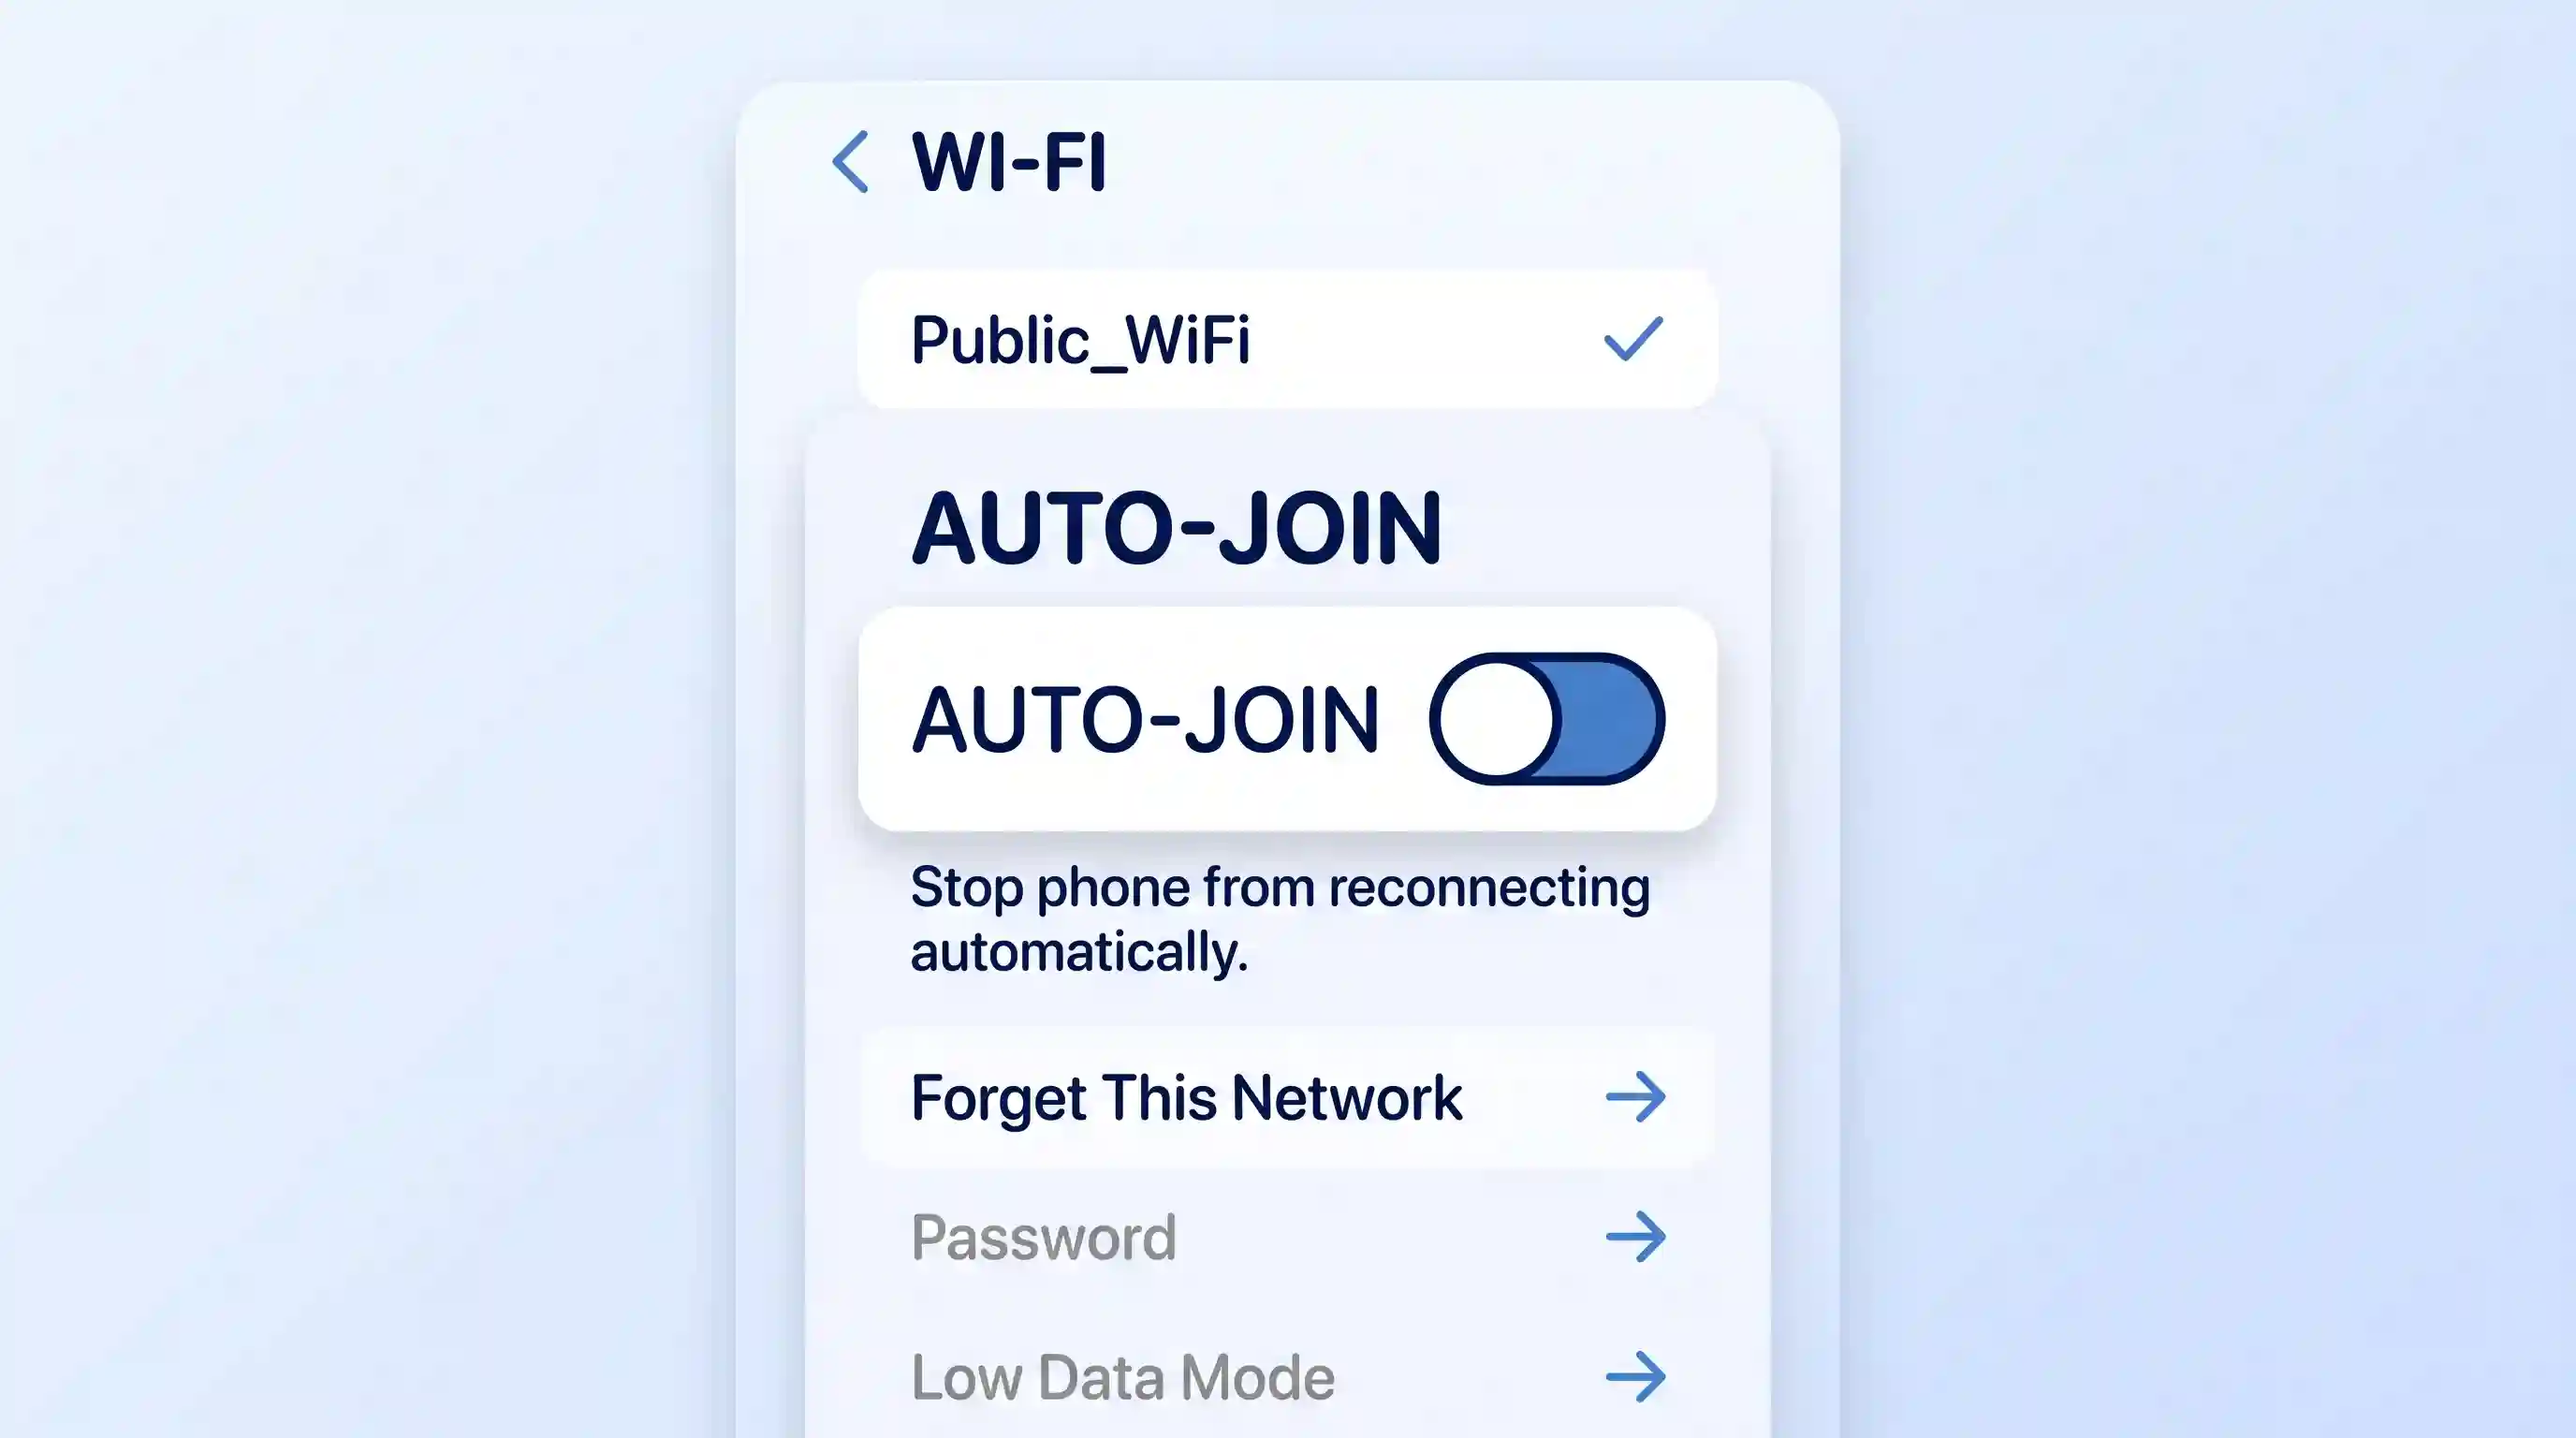
On iPhone: open Settings, tap Wi-Fi, tap the network name, and turn off Auto-Join. This keeps the password saved but stops your phone from reconnecting on its own. To remove the network entirely instead, tap Forget This Network.
On Android: open Wi-Fi settings, tap the gear icon next to the network, and look for a toggle labeled “Connect automatically” or similar. Exact wording varies by phone manufacturer, so search your settings app for “network suggestions” if you can’t find it under the network itself.
On Windows or Mac laptops: uncheck “Connect automatically” at the connection prompt when you first join. If you already connected once without noticing that box, open your Wi-Fi settings, select the network, and turn the option off there instead.
Expected outcome: your device asks before joining this network again, instead of doing it silently from inside your bag or pocket.
-
Step 3: Turn On Your VPN Before You Open Anything Else
Open your VPN app and confirm it shows as connected before you open a browser, email, or any other app. A VPN encrypts your traffic before it reaches the local network, so even a compromised hotspot only sees scrambled data.
If you don’t already have a VPN installed, do this at home first. Setting one up for the first time on an unfamiliar network is exactly the situation you’re trying to avoid. When choosing one, look for an app with a kill switch, a feature that blocks all internet traffic if the VPN connection drops unexpectedly, so you’re never accidentally exposed mid-session without knowing it.
Expected outcome: your VPN app shows an active, connected status before any other app touches the network.
-
Step 4: Turn Off File Sharing and Set the Network to Public
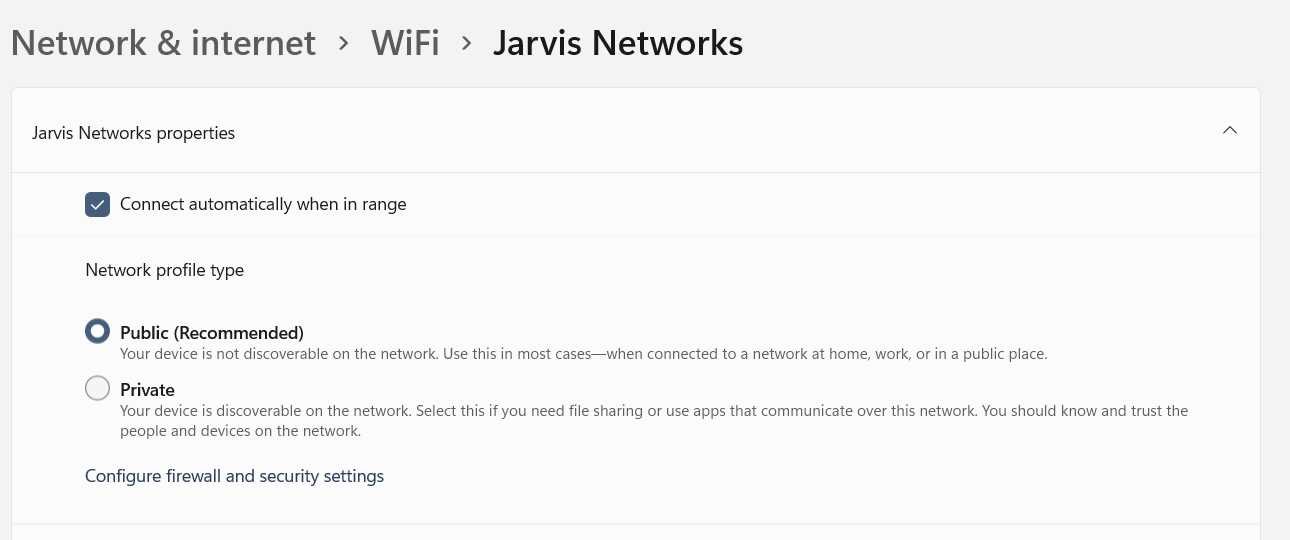
On a Windows laptop, choose “Public” rather than “Private” when prompted after connecting to a new network. This turns off network discovery, so other devices on the same Wi-Fi can’t see your laptop or browse its shared folders. If you missed that prompt, you can turn off file sharing manually afterward.
On a Mac, open System Settings, go to General, then Sharing, and make sure File Sharing and Screen Sharing are both switched off before connecting to public Wi-Fi.
Expected outcome: your laptop is invisible to other devices on the network, and no folder on it can be reached from outside.
-
Step 5: Check for HTTPS, But Don’t Trust It Completely
Look for a padlock icon and “https://” before the website address in your browser. This means the connection to that specific site is encrypted, even on an unsecured network.
Here’s the catch: scammers can put a padlock on a fake site too. The Federal Trade Commission points out that fraudulent sites are often encrypted as well, so a padlock alone proves the connection is private, not that the site itself is legitimate. Check that the web address is spelled correctly before you trust the padlock next to it.
Expected outcome: you catch a misspelled or fake web address instead of trusting the padlock icon on its own.
-
Step 6: Turn On Two-Factor Authentication
Before you travel, turn on two-factor authentication for your email, banking, and social media accounts if you haven’t already. A stolen password by itself then isn’t enough to get into your account, since the attacker would also need your phone or a code app.
Expected outcome: logging in from a new device or location triggers a code request, blocking access even if your password leaked.
-
Step 7: Confirm Your Security Software Is Current
Check that your antivirus or endpoint protection has updated within the last week before relying on public Wi-Fi. If you’re overdue for an update or don’t have one installed, a tool covered in this Bitdefender Total Security review is worth evaluating alongside whatever protection your device already includes.
Expected outcome: your device can recognize and block known malware, rather than relying on the network alone to keep it out.


Verify You’re Actually Protected
SuccessBefore you check email or log into anything, run through this quick check.
Look at your VPN app and confirm it says connected, not connecting or disconnected. Look at your browser and confirm the site shows a padlock with the correct address spelling. On a laptop, confirm the network type is set to Public, not Private or Home. If you have another device handy, try browsing to your laptop from it; it shouldn’t be visible.
If any of these checks fail, disconnect, fix the setting, and reconnect before doing anything sensitive. This takes under a minute and catches the most common mistake: assuming a setting is on when it quietly reset itself after an update.
Troubleshooting
Your VPN won’t connect at all.
Many hotel and airport networks use a captive portal, a webpage that requires you to accept terms or enter a room number before granting internet access. Your VPN needs a working internet connection first, so turn the VPN off, complete that login page, then turn the VPN back on right away. Wi-Fi connected but no internet access covers this same captive portal problem in more depth on Windows.
Windows shows “no internet, secured.”
This usually means the captive portal login hasn’t been completed, or the portal page failed to load. Open a browser and try visiting any plain website; that should trigger the login page to appear.
Your browser shows a certificate warning.
This means the site’s encryption certificate doesn’t match what your browser expected, which can indicate a man-in-the-middle attack in progress. Close the tab and don’t click through the warning, even if the site looks familiar. Try again later on a different network.
You realize auto-join reconnected you to a network you never verified.
This happens when a device remembers a network name from a past visit, and a fake copy uses that same name somewhere else. Forget that network entirely, not just this once, and manually rejoin only after confirming the name with staff.
Your phone can’t find the network you were told to join.
Weak signal and interference from other devices are the usual causes on a crowded network. Move closer to a router or access point before assuming the network is down, and ask staff whether the network name changed recently.
A site asks for information it’s never asked for before.
An unexpected request for your password, card number, or a security code mid-session is a strong signal of a fake page inserted into your connection. Close the browser, reconnect on a trusted network, and change that account’s password from there.
Where This Approach Has Limits
- A VPN and the steps above lower your risk significantly, but they don’t make public Wi-Fi risk-free. A few things are worth knowing honestly.
- A VPN encrypts your connection, but it does nothing against phishing. If you type your password into a convincing fake login page, the VPN protected the connection perfectly while you handed over the password anyway. Encryption and deception are different problems, and a VPN only solves one of them.
- A VPN also can’t remove malware already on your device. If something installed before you turned the VPN on, it keeps running underneath the encrypted tunnel.
- A VPN can leak your DNS requests, the lookups your device makes to find a website’s address, outside its encrypted tunnel if it’s misconfigured. That can reveal which sites you visit even though the content stays hidden. Most reputable VPN apps turn on leak protection by default, but it’s worth confirming in your provider’s settings if you want to be sure.
- Captive portals create a real gap of their own: they require an unencrypted connection to complete their login page before your VPN can even turn on. That short window, usually under a minute, is the least protected part of the whole process. Keep it brief and avoid opening anything sensitive during it.
- If you ever suspect an account was compromised despite these precautions, use this data breach checklist and change passwords from a trusted connection, not the one you suspect.
Key Takeaways
- Verify the exact network name with staff before connecting; a near-identical name is the most common trap.
- Turn off auto-join on every device so nothing reconnects to a network without your knowledge.
- Turn on your VPN before opening any other app, not after you’ve already started browsing.
- A padlock icon means the connection is encrypted, not that the site itself is trustworthy.
- Two-factor authentication is what stops a stolen password from becoming a stolen account.
- A VPN doesn’t stop phishing, clean existing malware, or protect a captive portal login, so treat it as one layer, not a complete solution.
These habits cover Wi-Fi specifically. For broader habits like password managers and spotting phishing attempts, see this online safety guide.
FAQ
Is airport or hotel Wi-Fi riskier than a coffee shop network?
Not inherently. Risk comes from how a network is set up and secured, not from the type of venue. That said, busy places with lots of unfamiliar devices connecting and disconnecting all day give an attacker more cover to blend in unnoticed. Follow the same steps everywhere rather than assuming one location is automatically safer than another.
Does a VPN slow down my connection?
Usually, a little. Your data takes a slightly longer path because it’s encrypted and routed through the VPN provider’s server before reaching its destination. For browsing, email, and most everyday tasks, the difference is small enough not to notice. Video calls and large downloads are where you’re most likely to feel it.
Can someone see what I’m doing if I only browse and never log in?
Partially, yes. HTTPS hides the exact page you’re looking at and anything you type, but it doesn’t always hide which website you’re visiting in the first place, since your device still has to look up that site’s address before connecting. A VPN hides this last piece too, because it encrypts the entire connection, not just the page content.
Will using public Wi-Fi get my account flagged as a suspicious login?
It might, and that’s actually a good sign rather than a problem. Banks and email providers often flag a login from an unfamiliar location or network and ask you to confirm it’s really you. That’s the same two-factor authentication system doing its job, not evidence that something went wrong. Only confirm the login if you recognize it as yourself.
You must be logged in to post a comment Login