















Self-hosted community projects are constantly growing in number, many of them operating under an open-source or fair-code license that saves you from paying costly subscriptions or usage-based fees.
With Docker, you can run any number of self-hosted applications on a standard web server or local workstation in completely separate environments using partitioned resources. Thanks to Docker Hub, you also gain access to a whole trove of community-maintained applications and projects that require very little effort to get working.
In this step-by-step guide, I’ll show you how to self-host Docker apps using any Linux-based workstation or VPS server, all the way from installing Docker Engine to launching containerized applications with Docker Compose. We’ll even talk about some popular Docker apps to get you started, if you’re unsure what this setup can do for you. Let’s jump in.
Latest Videos FromTechRadar
What is Docker?
Docker is an open-source platform that packages your software into separate containers.
A container, in case you were wondering, is exactly what it sounds like — a walled-off section of your server or device that contains all the code, libraries, and settings associated with an application. Containers get their own separate resource allocations too, so you can be sure that an application isn’t drawing more from your system than it’s meant to.
Self-hosted applications rely on specific “dependencies,” like databases, programming languages, system tools, etc. That’s why most of them recommend installing through Docker, so that the dependencies installed for one application don’t break the dependencies of another application or service. Docker apps are completely isolated from each other so that they don’t pull from the same resources or interrupt one another during runtime.
You don’t need to learn everything about Docker just to self-host an app, but knowing some basics helps. Put simply, Docker Engine is the core platform that isolates your applications; images are the project libraries used to install an app or service, Docker Hub is a public library of images for apps you can run using Docker, and Docker Compose is an add-on that lets you launch multiple Docker containers at the same time for apps that are more complex.
Why do I need Docker Compose?
Elaborating on that last point, most applications aren’t simple enough to run from a single container. They usually have a frontend component, a backend for administrators, as well as databases they use to store and retrieve information.
Instead of having to launch each Docker container separately by typing docker run into your Linux terminal or SSH every time you need to rerun the app, you can create a compose.yaml file to specify which containers and services need to run together. This is what Docker Compose helps you do.
Once you create a compose.yaml file, Docker Compose can help you run the entire application using a single command:
docker compose up
You can also use docker compose stop to pause your application temporarily and docker compose down to fully stop and clear the containers to prepare for another deployment.
How to self-host a Docker app step-by-step
Now that you know the basics, let’s walk through the exact process of self-hosting a containerized application with Docker Engine and Docker Compose.
Prerequisites
- A Linux-based home server or VPS running a recent version of Ubuntu or Debian
- Root access to that server
- An SSH client on your own computer (built into macOS, Linux, and modern Windows terminals) to interact with your server
- Your server’s IP address and SSH credentials
Step 1: Connect to your server over SSH
Access the terminal on your local macOS, Linux, or Windows device. We can log into your server from here by using your SSH credentials and server IP. Enter the following command to start:
ssh username@your-server-ip
Make sure to enter your SSH password when prompted. Now you’ve established a direct link from your current device to the server you’ll be installing Docker on.
Now update your server’s libraries and packages to the current version before proceeding. This way, you won’t run into any conflicts with the installation, and the latest security patches will be added immediately.
sudo apt update && sudo apt upgrade -y

Step 2: Install Docker Engine
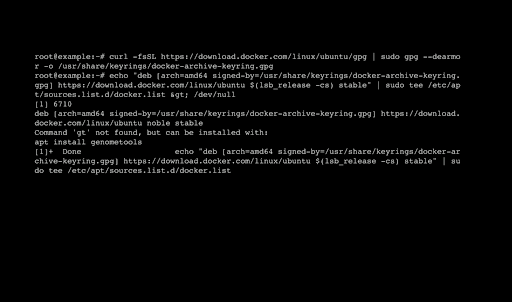
You can pull the most recent version of Docker Engine from its official repository. Start by installing the necessary certificates and Docker’s GPG key:
sudo apt install ca-certificates curl
sudo install -m 0755 -d /etc/apt/keyrings
sudo curl -fsSL https://download.docker.com/linux/ubuntu/gpg -o /etc/apt/keyrings/docker.asc
sudo chmod a+r /etc/apt/keyrings/docker.asc
You also need to add the official Docker repo to your list of package sources:
echo \
  "deb [arch=$(dpkg --print-architecture) signed-by=/etc/apt/keyrings/docker.asc] https://download.docker.com/linux/ubuntu \
  $(. /etc/os-release && echo "$VERSION_CODENAME") stable" | \
  sudo tee /etc/apt/sources.list.d/docker.list > /dev/null
Now update your packages and install Docker Engine with Compose:
sudo apt update
sudo apt install docker-ce docker-ce-cli containerd.io docker-buildx-plugin docker-compose-plugin -y
After the process is complete, you can verify that Docker is installed correctly along with Compose with a quick version check:
docker --version
docker compose version
If something went wrong during the installation, you’ll see a “command not found” error message in the terminal instead of the version numbers. That means you have to redo each step again in case you missed anything.
Step 3: Set up the project directory
Now that Docker is installed, we can move on to preparing the project directory for your self-hosted app. First, I like to run a quick command to make sure Docker is accessible to all users, not just restricted to those with sudo or root privileges. Here’s the command to help you change those permissions:
sudo usermod -aG docker $USER
Log out, then restart your terminal to update the usage permissions. Now you can create the actual project directory and navigate into it:
mkdir ~/my-app && cd ~/my-app

Step 4: Write your YAML file
You’re ready to write the compose.yaml file into your project directory. Execute this command to launch into the Nano editor:
nano compose.yaml
Now paste in the contents of the compose.yaml as per your Docker app’s setup instructions. Typically, the compose.yaml file should include an image field for your project image, a container name, a volume field that maps out your project subfolders, and the specific port that the app will be launching in. Here’s an example of a YAML file for a status monitoring app called Uptime Kuma:
services:
  uptime-kuma:
    image: louislam/uptime-kuma:1
    container_name: uptime-kuma
    volumes:
      - ./uptime-kuma-data:/app/data
    ports:
      - "3001:3001"
    restart: unless-stopped
Save the file and exit the editor. If this feels intimidating, don’t worry. You should find the specific instructions to create your YAML file in your Docker app’s setup instructions on Docker Hub or GitHub.
Step 5: Launch your application
All that remains is to launch your Docker app using Compose. You can spin up all your Docker containers in any given project directory by running this single command:
docker compose up -d
Once the containers are up and running, which usually takes less than a minute, you can access your app by visiting this address from your web browser: http://your-server-ip:3001. Make sure to replace your-server-ip with the actual IP address of your home server or VPS, which looks something like “192.168.1.1” (IPv4) or “[2001:0db8:85a3:0000:0000:8a2e:0370:7334]” (IPv6).

A few Docker apps worth trying
- Portainer: A visual interface for managing Docker containers without using your terminal or command line.
- Nextcloud: A privacy-first alternative to public cloud storage services like Google Drive.
- Pi-hole: A network-wide ad and tracker blocker. Works at the DNS level
- Jellyfin: A media server for streaming your own movies, shows, and music. It works similar to Netflix but with BYOD media management using your own media files.
- Vaultwarden: A self-hosted password manager that serves as an alternative to the Bitwarden API.
- AdGuard Home: Another popular DNS-based ad blocker with built-in encryption.
- Uptime Kuma: A simple status monitoring tool that alerts you when your self-hosted services or apps go down.



















































You must be logged in to post a comment Login