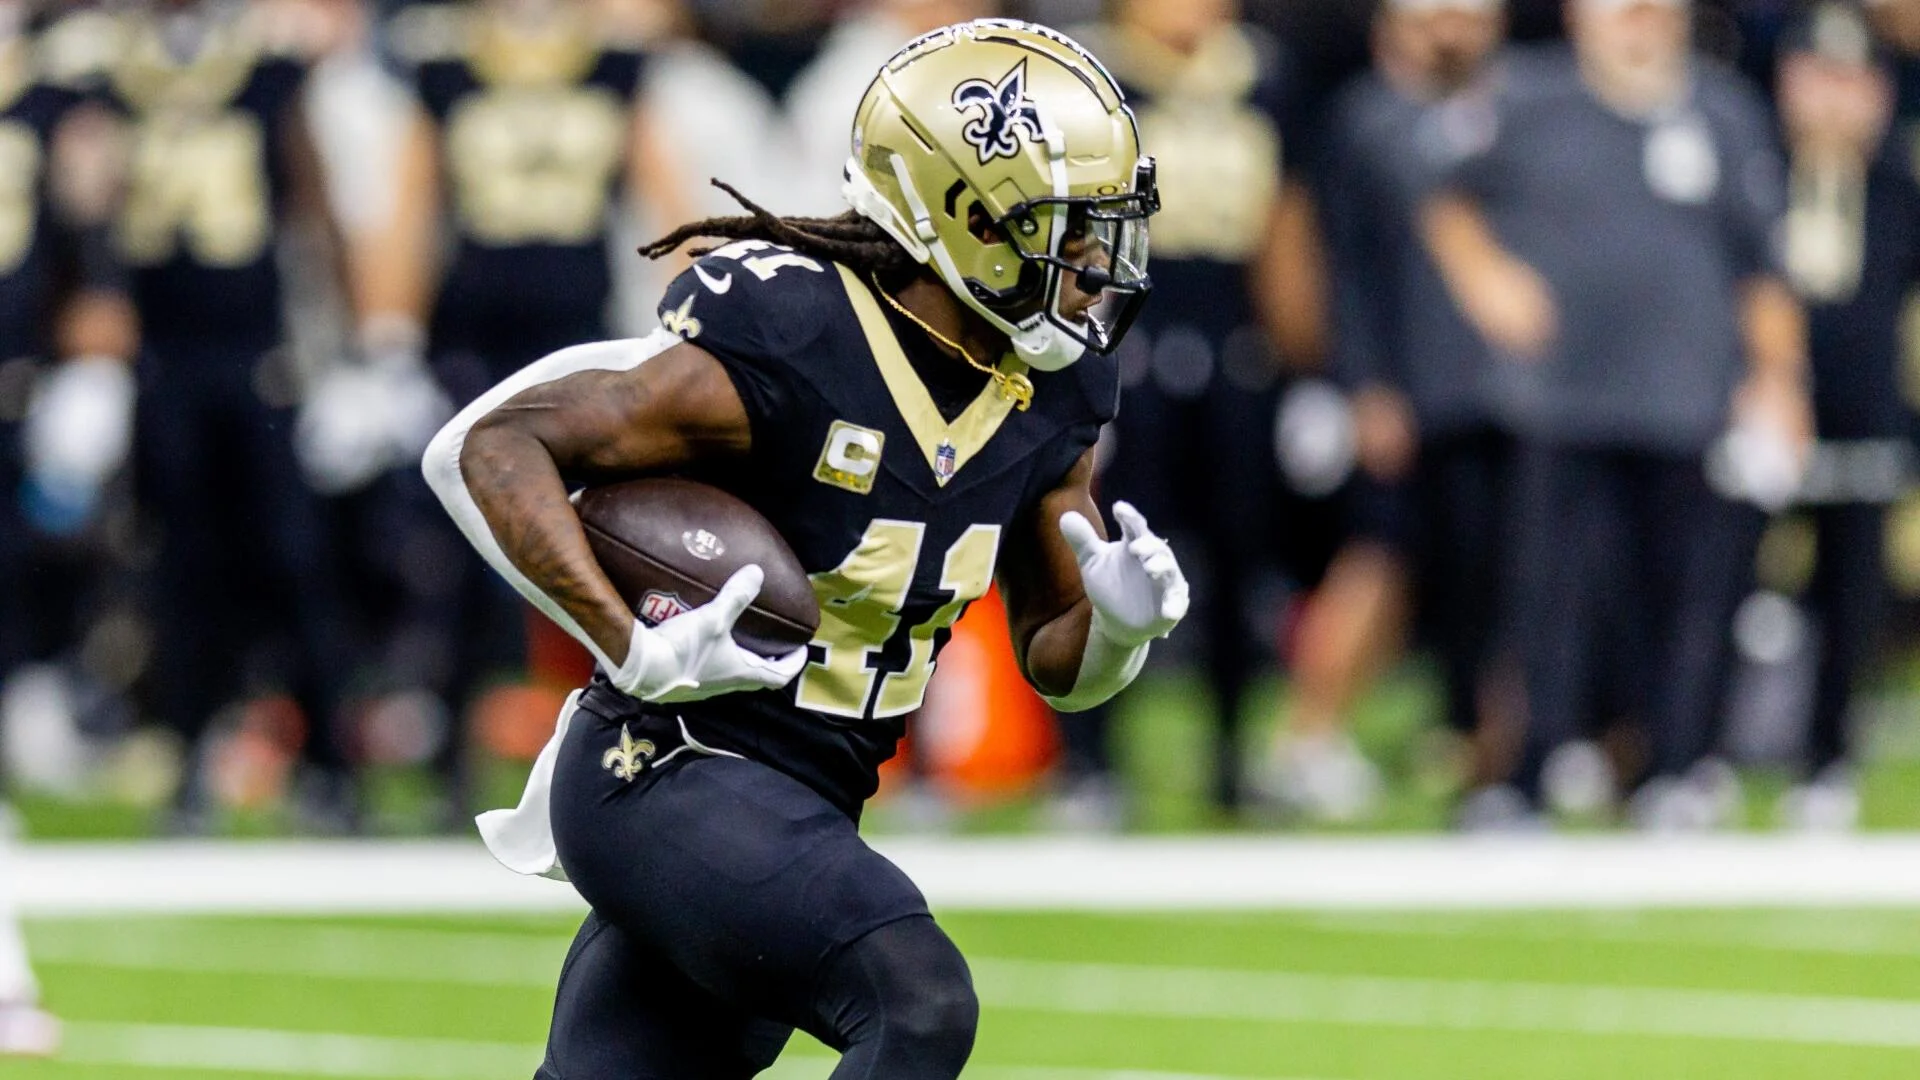
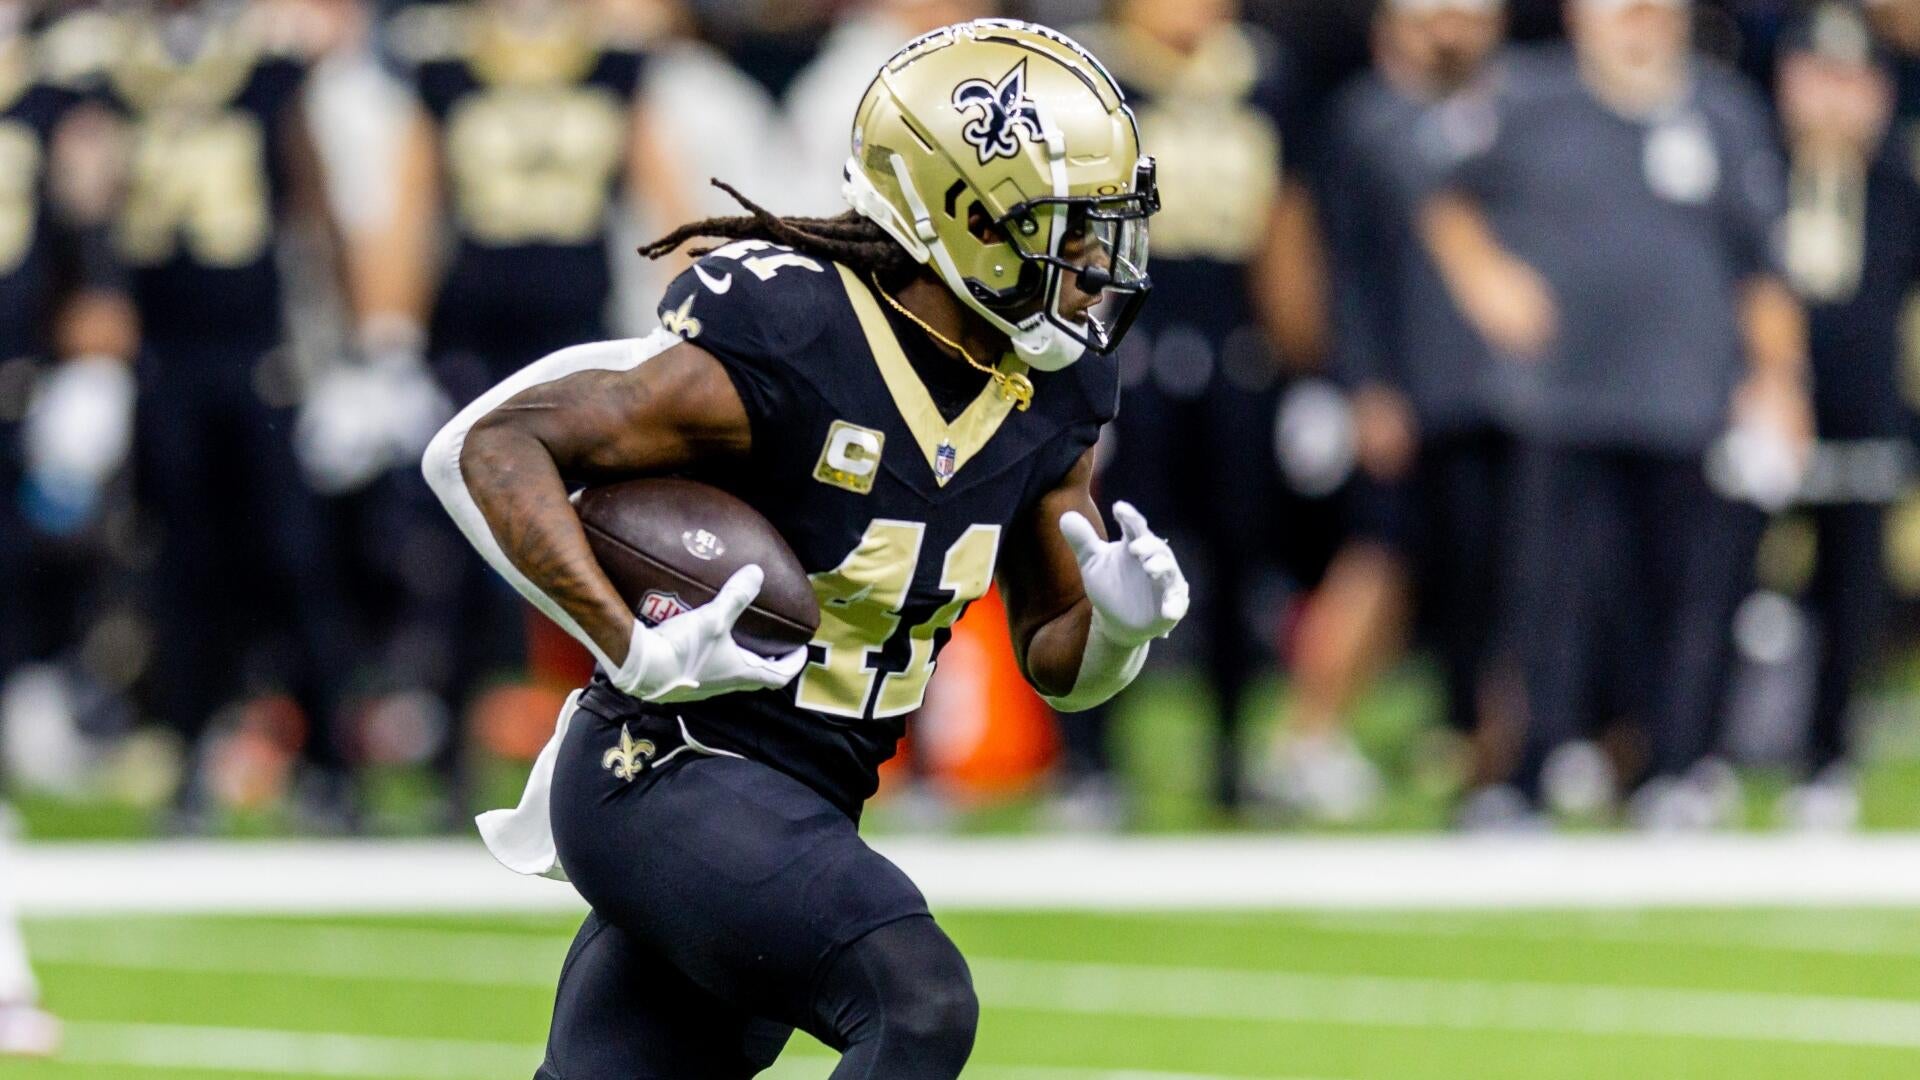
Connect with us
DAPA Banner

Sports

The LaMelo Ball Experience was on full display as Hornets somehow survive play-in thriller vs. Heat

Published

on

LaMelo Ball is probably the single most uniquely gifted and frustrating player in the NBA, and on Tuesday night he gave us the full experience in what might go down as the wildest game you see this entire postseason. 

First, the essentials: The Charlotte Hornets somehow beat the Miami Heat, 127-126, in overtime to win the East’s No. 9 vs. No. 10 play-in game. The Heat were eliminated. The Hornets will play either the Magic or the 76ers in a do-or-die game for the East’s No. 8 seed on Friday. 

Now, back to Ball, who literally went from losing the game for the Hornets to winning it for them in a span of about 12 seconds. First, after Tyler Herro sunk a corner 3 that left Charlotte clinging to a two-point lead, Ball wasn’t even able to get the ball across half court before coughing it up with a telegraphed, desperately weak pass intended for Sion James that wound up in the hands of Pelle Larsson with 16 seconds to play. Then, just for good measure, he turned around and fouled Herro on a 3-point attempt on the other end. 

Herro sunk all three free throws, and just like that, the Hornets went from having the game in hand to needing a game-winning bucket to survive. Which, of course, Ball promptly delivered. 

Advertisement

Look at Ball’s box score and it’s a wonderful mess of huge numbers: 30 points on 31 shots, 10 assists, 2 of 16 from 3 in 40 minutes. If you’re a Ball hater, he gave you plenty of material for your morning water-cooler rant — firing up one-legged 3s like he’s in the driveway and missing just about every one of them, getting targeted on ball and losing his man off ball on defense. 

And of course, with the game on the line, he decided to get fancy with his handle instead of taking the small angle he had won the first time he turned Mitchell and getting the damn thing across half court. Ball isn’t programmed to do anything the simple way. Going between the legs a second time, and in doing so turning directly back into the teeth of an incoming trap, is the downside of a mix-tape maniac having his hand on the switch of your season. 

That said, some freelancing fumbles are just part of the deal with Ball. It’s baked into his wild equation, which has been an overwhelmingly positive one for the Hornets all season. With Ball on the floor this year, Charlotte outscored opponents by just under 10 points per 100 possessions, per Cleaning the Glass, with an offense in the 97th percentile. With Ball off the court, the Hornets fell to a neutral team with a 36th percentile offense. 

Same deal on Tuesday. With Ball on the floor, the Hornets outscored the Heat by 15 points. With him off, the Heat outscored the Hornets by 14. That’s not a coincidence. Ball’s mania isn’t all for show. Keeping tabs on him is a nightmare. He puts constant pressure on a defense and can wiggle his way to any spot on the floor given enough time to fool around. He pushes pace. He’ll shoot from anywhere. 

Advertisement

This is a guy who will toss up a one-legged step back from 30 feet when he’s bricked his last seven shots, and he’ll do it confidently. A guy who’ll float a 40-foot alley-oop pass in a two-point do-or-die game with under five minutes to play, and stick it. 

Playing basketball against LaMelo Ball is like trying to fight a guy who doesn’t care if he dies. Like trying to play poker against the dude who goes all in every other hand. He might have the aces. He might have rags. You can’t feel comfortable sitting across from that kind of cowboy.

That’s the beauty of Ball. It doesn’t matter if it’s the second night of a back to back in January or a one-and-done play-in game in April — he’s playing with the pedal pegged. For much of this game, Miles Bridges was the only other Hornet generating any kind of juice. Kon Knueppel couldn’t make a thing. Brandon Miller was out for much of the first half in foul trouble. Ball had to shoot his way through a lot of his own misses, but he kept going. And when it mattered most, he delivered in a fashion that speaks to the substance in his style. 

“That shows growth,” Bridges said of Ball’s decision to turn the corner and get downhill on the game-winning shot. “Before, Melo would have shot a step-back 3 to try to win the game. But he has a different sense of urgency. And he’s a winning player. He always gets talked about as just a player who wants highlights and all this. But he truly wants to win, and I feel like it’s on full display right now.”

Advertisement

Source link

Advertisement
Continue Reading
Click to comment

You must be logged in to post a comment Login

Leave a Reply

Sports

Barrengarry targets 2026 Group 3 in Frank Packer Plate at Randwick

Published

on

Barrengarry suffered a minor false dawn a couple of Saturdays earlier, however, the gelding is primed for Group company this Saturday amid the Sydney Autumn Carnival.

The three-year-old looks to extend his rise through the $250,000 Frank Packer Plate (2000m) conducted at Randwick.

Positioned as a Group 3 spectacle two weeks beyond the Carbine Club Stakes—a race Barrengarry nominated for yet scratched amid a trivial concern—Kembla Grange handler Joe Ible anticipates the grand occasion keenly.

“He was in to run in the Carbine a week ago but he just wasn’t 100 percent so we scratched him,” the Kembla Grange trainer said.

Advertisement

“He looks like he’s bounced back nicely. He had a good trial on Friday at Canterbury.

“Horses like this are what we get out of bed every day and do it for. To have a horse like him walk in the stable, it certainly invigorates you and gets you going.”

In pursuit of a hat-trick, he’ll confront foes like Tulloch Stakes silver medallist Eureka Rebel, Providence off a Moonee Valley Vase second, alongside Matias and Olympian who nabbed third and fourth in the Carbine Club Stakes over the weekend.

This trajectory marks an improbable ascent for Ghaiyyath’s progeny, opening with a fourth over 1200m in Nowra’s maiden event last November.

Advertisement

His home track effort on February 17 yielded third across 1400m, succeeded by a commanding 1600m maiden breakthrough at Newcastle March 6, then a gritty 1500m Midway score against elders at Rosehill March 21.

Last Friday brought his only recent public trial over 1100m, placing fifth in a field of seven, roughly four lengths behind the winner.

Ible remains thrilled yet surprised by Barrengarry’s pace of growth, pondering bolder targets this campaign pending a solid Saturday effort.

“He’s always shown us something, but I wouldn’t have thought he’d be getting there as quickly as he has,” Ible said.

Advertisement

“The way he’s progressed this preparation, he still looks a bit backward and his mannerisms are a bit immature, so out of this preparation you start to think about what the future could be.

“If he was to go out and perform as we hope (this weekend) there’s a chance we’ll end up in Brisbane.”

Envisioned there is the $1 million Group 1 Queensland Derby (2400m) slated for Eagle Farm on May 30.

Discover prime betting sites with the best racing odds for the Frank Packer Plate.

Advertisement

Source link

Advertisement
Continue Reading

Sports

Plaintiff eyes fifth straight win in 2026 JHB Carr Stakes

Published

on

The debut seasonal win held no surprises for trainer Peter Snowden concerning unbeaten filly Plaintiff, but her impressive execution may have piqued some curiosity.

This elite-bred three-year-old, a Zoustar foal out of champion Group One horse Prompt Response, pursues another victory to make it five on the trot in the Group 3 JHB Carr Stakes (1400m) at Randwick on Saturday.

Plaintiff registered a highlight victory on the star-filled first day of The Championships, storming from last to victory in the Group 3 PJ Bell Stakes (1200m), as Snowden highlighted her ongoing stakes-calibre form.

“It wasn’t a surprise to us,” Snowden said.

Advertisement

Her previous preparation featured three city wins from three starts, with the stable always possessing firm belief in her quality.

Plaintiff is the firm $1.90 pick for Saturday’s JHB Carr Stakes, leaving Snowden convinced of her prospects to stay perfect en route to grander Queensland goals.

“I think she can go on with it,” Snowden said.

“She’s got a really good attitude, she’s got a good racing profile, she doesn’t pull, she relaxes really well and she’s got a turn of foot so she should get seven furlongs okay.

Advertisement

“We’ll get through Saturday and see what happens, but she’s got good ability and you can aim a bit higher with her and know she’ll be competitive.”

In prior runs she hugged the pace, yet Snowden trusts Plaintiff has every tool to take out the JHB Carr Stakes regardless of running style, with 57kg the heaviest under set weights plus penalties.

“She’s sat outside the leader in her first preparation at Rosehill so she’s pretty adaptable,” Snowden said

“You never get too far ahead of yourself but she’s certainly full of good potential.”

Advertisement

For the JHB Carr Stakes, punters should review betting sites with the strongest racing odds.

Source link

Advertisement
Continue Reading

Sports

Official – Referee Matteo Marchetti Appointed For Inter Milan Vs Cagliari Serie A Clash

Published

on

Referee Matteo Marchetti will be in charge of Friday’s Serie A clash between Inter Milan and Cagliari.

The Lega Serie A have announced the complete list of officials for the weekend, via FCInterNews. Francesco Meraviglia will be on VAR duty for the match.

Advertisement

Inter Milan have gone from strength to strength since returning from the March international break.

Advertisement

Indeed, after a 5-2 rout of Roma in their last outing at San Siro, they beat Como 4-3 on the road.

As a result, Cristian Chivu is on the verge of winning the Scudetto in his first season at the club.

With only six games left to play, the Nerazzurri boast a handsome nine-point lead over second-placed Napoli.

Matteo Marchetti to Referee Inter Milan vs Cagliari Serie A Clash – Meraviglia On VAR

The referee for Friday’s game will be Matteo Marchetti.

Advertisement

Assisting Marchetti in his duties will be Claudio Rossi and Alex Cavallina.

The role of the fourth official, meanwhile, will fall to Kevin Bonacina.

Advertisement

In the VAR booth, Francesco Meraviglia will oversee the match to correct any errors made by the on-pitch officials.

Advertisement

Assisting Meraviglia in his duties will be Marco Di Bello.

After falling victim to disastrous officiating in several matches this season, Inter will hope to avoid further controversy in this clash.

Source link

Advertisement
Continue Reading

Sports

Haslem defends LaMelo Ball after Adebayo Injury Incident

Published

on

Udonis Haslem has defended LaMelo Ball following the controversial play that led to Bam Adebayo leaving the game with injury.

The incident happened during the Charlotte Hornets’ overtime win over the Miami Heat, when Ball was seen grabbing Adebayo’s leg as both players chased a loose ball, causing the Heat big man to fall awkwardly.

The play was quickly labeled dirty by critics.

  • Bassey makes statement start with Warriors after new DealBassey makes statement start with Warriors after new Deal

Advertisement

Haslem, however, disagreed.

“Obviously, emotions are flying and everybody’s competing at a high level,” he said during halftime coverage.

“But what I will say is LaMelo is not a dirty player. I don’t think he meant to do that intentionally to hurt Bam.”

Advertisement

He described the moment as a split-second reaction rather than deliberate intent.

“In the heat of the moment… sometimes you make split-second decisions. I think he made a split-second decision.”

While defending Ball’s intent, Haslem still questioned the officiating.

“That’s got to be a call… I don’t know if that’s a flagrant or a regular foul… but I think something has to be called.”

Advertisement

“That’s a huge play to miss.”

On the other side, Heat head coach Erik Spoelstra criticized the play, calling it a “stupid play” after Adebayo was forced out with a lower back injury.

Ball has since apologized, maintaining that there was no intention to cause harm.

Advertisement

Source link

Continue Reading

Sports

All Abyss Gears in Crimson Desert

Published

on

By and large, Abyss Gears are among Crimson Desert’s biggest pillars of progression. These are socketable gems that you’d be familiar with if you played any ARPG before. There’s Abyss Gears that do piecemeal stat padding like a few points of extra damage or increasing your movement speed slightly. However, the bigger prize that opens up into the mid-game are those that add special effects to your Skills and attacks.

In many cases, these Abyss Gears can actually be the fundamental of your build. They are also freely moveable between weapons and armor. So when you see a unique weapon in Crimson Desert, you can extract its Abyss Gear that grants it that unique effect, and then socket it into your own weapon instead.

So, if you’re trying to get an overview of how to engage with the system, what you should use for min-maxing, or indeed whether your favorite playstyle has Abyss Gears aligned to it, here’s a full list of what you can find in Crimson Desert.


Every non-Skill based Abyss Gear in Crimson Desert, and how to get their blueprints

It’s likely that most Abyss Gears you’ll end up using in an end-game Crimson Desert build isn’t those that modify Skill effects. Instead, the way this game works incentivizes pushing up various stats like Attack Speed, Crit Rate, straight Attack (which doesn’t always equate 1:1 to actual damage) together.

Most Abyss Gears of this type will come in three tiers, and once you get their specific blueprint you can simply craft a higher tier by combining two of the lower-tier ones together.


All Abyss Gear obtainable from Witches in Crimson Desert

Once you get a blueprint for an Abyss Gear, you can craft your way to Lvl 3 (Image via Pearl Abyss)Once you get a blueprint for an Abyss Gear, you can craft your way to Lvl 3 (Image via Pearl Abyss)
Once you get a blueprint for an Abyss Gear, you can craft your way to Lvl 3 (Image via Pearl Abyss)

The primary way your interact with Abyss Gears in Crimson Desert is through witches. The first one you come in contact unlocks right after Chapter II. Sylvia, the Hermit Witch, is found in Shadow Whisper Cave north of Hernand City. Like all other witches, she can let you extract and embed Abyss Gear between weapons and armor for free (only creating new sockets cost money).

However, Sylvia is more of a demo-mode witch as she doesn’t have any wares to sell. All four other Witches in Crimson Desert sell Abyss Gear blueprints in Crimson Desert. Here’s what you get from each:

Advertisement
Abyss Gear Lvl I Lvl II Lvl III Blueprint acquisition
Vitality Health +0.2 / sec Health +0.4 / sec Health +0.6 / sec

Sold by Elowen(Witchwoods, Hernand)

Vigor Stamina Regen +2% Stamina Regen +4% Stamina Regen +6%
Composure Spirit +0.1/sec Spirit +0.2/sec Spirit +0.3/sec
Fortification Defense +3 Defense +6 Defense +9

Solid by Lyselia(Serpent Marsh, Demeniss)

Advertisement

Aegis Damage Reduction 1.0 Damage Reduction 2.0 Damage Reduction 3.0
Fortitude Guard Stamina cost -3% Guard Stamina cost -6% Guard Stamina cost -9%
Swift Attack Speed +1 Attack Speed +2 Attack Speed +3

Sold by Bari(Silver Wolf Mountain, Pailune)

Haste Movement Speed +1 Movement Speed +2 Movement Speed +3
Ascent Climb Speed +2% Climb Speed +4% Climb Speed +6%
Destruction Attack Damage +1 Attack Damage +2 Attack Damage +3

Sold by Areciel(Tashkalp, Crimson Desert)

Advertisement

Insight Critical Rate +1 Critical Rate +2 Critical Rate +3

Note that maxing out Trust with Witches will not unlock any new Abyss Gear blueprints. If you do that, you’ll instead get access to powerful higher-tier Elixir blueprints.


Bane Abyss Gears (increased damage against specific enemies)

Starting from this section, you’ll see that the gear blueprint for the vast majority of Abyss Gear is quite hard to find. You have to spam Excavation Dispatch missions which take 3 days to complete, and even then the chances of getting a specific one is only 2%.

On top of the time required, starting each of these Excavation projects also require a high amount of camp provision and coin. If you’re still struggling to get these secondary resources up, here’s a guide to the Dispatch mission strategy I used to get rich.

There are numerous Abyss Gears in Crimson Desert that increase damage dealt to a specific enemy faction (sort of like bane mods in Warframe). These only apply to the weapon you put it on, but even a basic Lvl I +4% is a significantly higher increase over a Lvl III Destruction.

Advertisement
Abyss Gear Lvl I Lvl II Lvl III Blueprint acquisition
Abyssbane Damage to Abyssal creatures +4% Damage to Abyssal creatures +8% Damage to Abyssal creatures +12%

Timeworn Ruins Excavation Dispatch (2% chance)

Beastbane Damage to Beasts +4% Damage to Beasts +8% Damage to Beasts +12%
Malicebane Damage to mighty foes +4% Damage to mighty foes +8% Damage to mighty foes +12%
Bloodbane Damage to humanoids +4% Damage to humanoids +8% Damage to humanoids +12%

Serpent Shrine Exploration Dispatch (2% chance)

Advertisement

Hexebane Damage to earthen beings +4% Damage to earthen beings +8% Damage to earthen beings +12%
Primalbane Damage to Walkers +4% Damage to Walkers +8% Damage to Walkers +12%
Steelbane Damage to Machines +4% Damage to Machines +8% Damage to Machines +12%

Economy, Crafting, and progression-boosting Abyss Gears

While most Abyss Gears are geared towards combat, some also improve things you do in between. For Crimson Desert players who are committed to the long-term grind and resource-hoarding for its own sake, it’s feasible to create a secondary gear set just to boost the hunting-gathering-crafting loop.

However, I don’t really find much reason to ever use these if you just keep one set of weapons and armor to refine through the game. Some of these are readily more useful, like Ledgermain before a Gold-pickpocketing run, or Companionship when you’re out to create an army of pet cats.

Abyss Gear Lvl I Lvl II Lvl III Blueprint acquisition
Aptitude Skill EXP Gain +10% Skill EXP Gain +20% Skill EXP Gain +30%

Bordig Ruins Excavation Dispatch (2% chance)

Advertisement

Service Contribution EXP Gain +10% Contribution EXP Gain +20% Contribution EXP Gain +30%
Equestrian Horse EXP Gain +1 Horse EXP Gain +2 Horse EXP Gain +3
Companionship Pet Trust Gain +1 Pet Trust Gain +2 Pet Trust Gain +3
Solidarity Trust Gain +1 Trust Gain +2 Trust Gain +3
Blessing of Nature 10% chance to gather additional items 20% chance to gather additional items 30% chance to gather additional items
Blessing of the Beast 10% chance to skin additional hide 20% chance to skin additional hide 30% chance to skin additional hide
Blessing of the Earth 10% chance to mine additional ore 20% chance to mine additional ore 30% chance to mine additional ore
Blessing of the Forest 10% chance to log additional timber 20% chance to log additional timber 30% chance to log additional timber
Ledgermain 10% chance to pickpocket additional items 20% chance to pickpocket additional items 30% chance to pickpocket additional items

Timeworn Ruins Excavation Dispatch (2% chance)

Fortune Silver Gain +10% Silver Gain +20% Silver Gain +30%
Efficiency 3% chance to save one crafting material 6% chance to save one crafting material 9% chance to save one crafting material

Status Immunity and Elemental Resistance Abyss Gears

A handful of Abyss Gears provide immunity or resistance to specific effects (Image via Pearl Abyss)A handful of Abyss Gears provide immunity or resistance to specific effects (Image via Pearl Abyss)
A handful of Abyss Gears provide immunity or resistance to specific effects (Image via Pearl Abyss)

Elemental effects are no joke in Crimson Desert. As you venture into more frigid biomes or deal with menaces like the Skull Knight boss, you’ll find that getting frozen solid and electrocuted is a frustrating way to die.

The following Abyss Gears directly counter this by flat increments. The Elemental Resistance system in Crimson Desert is threshold-based, like for example Ice Resistance Lvl 5 altogether stops the stamina-regen debuff from exposure to cold.

These also act as flat additions on top of the whatever resistances you get natively beforehand. If you’re wearing a cloak or armor that gives you Ice Resistance, any Ice Resistance Abyss Gear you put on top will add to it. If you crack Lvl 10 like this, you completely negate all effects of Ice and cannot be frozen.

Advertisement
Abyss Gear Lvl I Lvl II Lvl III Blueprint acquisition
Flameward Fire Resistance Lvl 1 Fire Resistance Lvl 2 Fire Resistance Lvl 3

Reachwood Ruins Excavation Dispatch (2% chance)

Frostward Ice Resistance Lvl 1 Ice Resistance Lvl 2 Ice Resistance Lvl 3
Shockward Lightning Resistance Lvl 1 Lightning Resistance Lvl 2 Lightning Resistance Lvl 3

Meanwhile, some Abyss Gears also give you complete immunity to some more niche status effects.

Abyss Gear Effect
Abyssal Assimilation Abyssal Toxin Immunity
Heart of Stone Petrification Immunity
Heart of the Serpent Poison Immunity

Other utility and miscellaneous Abyss Gears

There are a lot of niche Abyss Gears in Crimson Desert you can find oddly useful.

Advertisement

I can point at Disarm as an easy example. On paper, even 3% chance to disarm enemies seems situational and nothing special. However, you can use Shield Bash with this to force humanoid enemies to drop their weapons to the ground. This is currently the basis for the most popular way to farm Abyss Gears in Icewatch Altar, Frosthold Pass, and Frosthold Entrance.

Abyss Gear Lvl I Lvl II Lvl III Blueprint acquisition
Disarm 1% chance to disarm enemies on hit 2% chance to disarm enemies on hit 3% chance to disarm enemies on hit

Timeworn Ruins Excavation Dispatch (2% chance)

Infinite Arrows 20% chance to not consume arrows 40% chance to not consume arrows 60% chance to not consume arrows
Gourmet Food Effect Lvl +1 Food Effect Lvl +2 Food Effect Lvl +3
Surge Swim Speed +2% Swim Speed +4% Swim Speed +6%

Reachwood Ruins Excavation Dispatch (2% chance)

Advertisement
Rend 2.5% increased crit rate against cloth armor 5% increased crit rate against cloth armor 7.5% increased crit rate against cloth armor Not known yet
Shred 2.5% increased crit rate against leather armor 5% increased crit rate against leather armor 7.5% increased crit rate against leather armor Not known yet
Relentless Damage increases with consecutive attacks (cannot upgrade to Lvl II and III)

Bordig Ruins Excavation Dispatch (2% chance)

Spirit Transference Siphon a small amount of Spirit on hit (cannot upgrade to Lvl II and III)
Stamina Transference Siphon a small amount of Stamina on hit (cannot upgrade to Lvl II and III)
Life Transference Siphon a small amount of Life on hit (cannot upgrade to Lvl II and III)
Energy Drain Recover Resources on kill (more recovered at Lvl II and III

What are the best passive Abyss Gears to use in Crimson Desert?

The best Abyss Gears to this end are almost always Attack Speed on your gloves, boots, and shields, since Attack Speed is an universal increment. It affects all offensive maneuvers, including your armed and unarmed attacks, and even your Skills.

That being said, a lot of things (inclung +Attack Damage) have dimishing returns in Crimson Desert, so it’s also a good idea to mix it up with your Abyss Gears to pump up various effects in the end-game.

Advertisement

Effectively, you want to get a healthy mix of Critical Rate and Attack Speed (aim for 10 with both) to get the best DPS.

You also want a combination of Spirit Tansference and Composure if you don’t want to use Focus to regen Spirit in the middle of combat. Many of the best Skill-modifying Abyss Gears incur additional Spirit cost per attack, so this is a resource you want as much of as you can squeeze out.

Defensively, a combination of Damage Reduction 3.0 (Aegis) is essential, while flat Defense (Aegis) becomes less relevant if you use plate armor and reach higher refinement levels.


Greater Abyss Gears (and why they’re different)

Greater Abyss Gears present an interesting choice (Image via Pearl Abyss || Reddit u/B4ldurL1nk)Greater Abyss Gears present an interesting choice (Image via Pearl Abyss || Reddit u/B4ldurL1nk)
Greater Abyss Gears present an interesting choice (Image via Pearl Abyss || Reddit u/B4ldurL1nk)

When you fuse together two Lvl 2 Abyss Gears, there’s a low chance (reportedly 4%) that you get a Greater variant rather than the expected Lvl 3 variant.

These offer much higher overall boost above and beyond what Lvl 3 variants can give you. The tradeoff is that Greater Abyss Gears come with a durability meter (same as temporary weapons like Flame Spear), and they break after a while.

Advertisement
Abyss Gear Effect
Greater Abyssbane

Damage to Abyssal creatures +40%

Greater Beastbane Damage to Beasts +40%
Greater Bloodbaen

Damage to mighty foes +40%

Greater Hexebane
Greater Malicebane

Damage to earthen beings +40%

Greater Primalbane Damage to Walkers +40%
Greater Steelbane Damage to Machines +40%
Greater Flamward Fire Resistance Lvl 5
Greater Frostward Ice Resistance Lvl 5
Greater Shockward Lightning Resistance Lvl 5
Greater Destruction Attack +10
Greater Insight Critical Rate +10
Greater Swift Attack Speed +10

So if you get some of these when bulk-crafting Lvl 3 Abyss Gears, save them for an opportune moment where you could really use the boost.

Advertisement

All Skill-modifying Special Abyss Gears in Crimson Desert

Skill-modifying Abyss Gears are where you're spoilt for choice (Image via Pearl Abyss)Skill-modifying Abyss Gears are where you're spoilt for choice (Image via Pearl Abyss)
Skill-modifying Abyss Gears are where you’re spoilt for choice (Image via Pearl Abyss)

Now that we’ve talked about all the Skill-agnostic ones, here’s where the real fun begins. Crimson Desert gives you the opportunity to upgrade and tailor any specific Skill on the Skill Tree as the bread and butter of your playstyle.

Skill Abyss Gears, primarily found on unique weapons scattered throughout the world (or sometimes locked behind bosses), augment that Skill to add more effects. None of these fundamentally alter the skill. Rather, they some auxiliar effect or just straight damage on top to make it better.

The fare for using them is higher resource cost. For example, all Abyss Gears that only trigger on Spinning Slash will also increase the Stamina cost of Spinning Slash. For those that switch up Turning Slash, it’s more Spirit cost that you have to manage.

You can actually stack multiple Abyss Gears that modify the same Skill, and get the effects of both. Only, the resource cost will also add up, often to such a degree that makes missing your mark very punishing.

If you really care about optimization, I’ve found that only selecting one based on what’s required on your build.

Advertisement

For example, Ator’s Orb is not that great for actual DPS increase due to how it can misfire on smaller enemies. However, it’s great for dealing posture damage to bosses, so you could spam it to bring the boss to a stun faster, and switch to another weapon with a more pure-DPS Abyss Gear.

In any case, here’s all the options available for each Skill/move:

Attack type Abyss Gear Effect

Normal attack spam, dodge into attack, or jump into attack

Advertisement

Abyssal Rays

A series of rays spawn from the abyss to damage the target you hit

Wind Slash A blade of wind cuts through enemies in a wave ahead of you
Crescent Moon Slash

Unleashes a moon-shaped blade of energy forward, dealing fire damage

Half Moon Slash

Unleashes a moon-shaped blade of energy forward, dealing ice damage

Fullmoon Slash

Unleashes a moon-shaped blade of energy forward, dealing lightning damage

Advertisement

Forward Slash (Heavy Attack) spam

Ator’s Orb Summon orbs that auto-fire at enemies when you heavy-attack
Crow’s Pursuit

A flock of crows spawn to deal extra damage when you land a hit with a heavy-attack

Shadow Claw

Forward Slash sends three concurrent swipes forward, dealing additional damage

Advertisement

Finisher attacks

Arrow Rain

A rain of arrows damage enemies around you when you kill someone with a finisher

Order From Above

Spears of light rain down from the sky, damaging nearby enemies

Advertisement
Warden of Darkness

Commands spectral knights to decimate nearby enemies with their spears

Spinning Slash

Ancient Retribution Projectiles from the sky damage targets hit by Spinning Slash
Dark Crescent A flash of dark energy damages targets hit by Spinning Slash
Hound’s Claws

Sweeps the surrounding area with bloodstained claws, dealing additional damage

Advertisement

Evasive Slash

Ancient Wrath Abyssal spheres damage enemies hit by Evasive Slash
Judgment of the Soul

Commands the Forgotten General to charge forward, striking enemies in its path.

Spirit’s Judgment Commands a spectral knight to strike down the enemy
Advertisement

Turning Slash

Frost Spike

A wave of frozen spikes deal additional damage with Turning Slash

Greysoul Howling

Calls forth the phantom of Goyen, unleashing a sweeping strike of shadow energy

Groundsurge Shatters the ground in a frontal cone to deal damage
Wound of Darkness

Unleashes forward three blades of dark energy that push enemies back and deal damage

Advertisement
Momentum Turning Slash damage +33%

Charged Stab

Crow Storm

A flock of crows hit your target for extra damage and posture damage

Piercing Bloom

Unleashes a torrent of blood forward, dealing additional damage

Advertisement
Queen’s Fang Sprays spider venom forward, dealing damage to enemies hit

Elemental Imbuement

Pillar of Wind

Wind-imbed attacks summon a pillar of wind to damage enemies. This pillar also acts as a wind-draft, and gliding on this boosts you up into the sky.

Ancient Reckoning

Wind-imbued attacks deal additional damage with a deadly vortex

Advertisement
Flames of Judgment Fire-imbued attacks send out flames for higher overall damage
Volcanic Eruption

Fire-imbued attacks shatter a molten boulder, dealing fire damage to nearby enemies

Frost Hail

Ice-imbued attacks rain down a barrage of hail, dealing higher damage and freezing enemies faster

Shattering Frost

Ice-imbued attacks trigger a delayed burst of ice at the target, dealing damage to nearby enemies

Orbs of Lightning

Lightning-imbued attacks summon electric orbs that smite enemies for additional lightning damage

Advertisement
Storm Fang

Lighting-imbed attacks send out lightning bolts that chain through and shock multiple enemies

Parry

Earthrending Strike Parries cause a rock-infused strike that damages the enemy
Howling of Chaos

Successful parry emits a sonic shockwave that applies Confusion to nearby enemies

Advertisement

Evasive Roll

Parting Gift

Leaves behind explosives that detonate after a short delay, dealing damage

Rising Torrent A pillar of water erupts from below the enemy to deal damage.
Slashing Reeds Scatters a deadly flurry of reeds, dealing damage to enemies hit
Unarmed Strikes The Showstopper

The final strike at the end of unarmed attack chain knocks the enemy back with immense force, dealing damage

Advertisement

Lariat/Follow-up Lariat

Colossal Might

Lariat takedowns trigger an explosion, dealing AoE stun and sending enemies flying

Putrid Touch

Lariat takedowns inject enemies with poison, dealing damage over time

Advertisement
Tempest of Destruction

Lariat takedowns shatter the earth to unleash a rain of debris, dealing damage to enemies hit

Note that installing Abyss Gears that bolster a specific Skill in Crimson Desert doesn’t automatically give you the Skill. If it’s not unlocked by default, you’ll still have to go and get it from the Skill Tree first.


Check out our other guides on the game: