Amgen’s Conor Hughes explores Ireland’s biotechnology industry and how an early STEM education can be the gateway to a future career.
A process development associate in inspection at Amgen, Conor Hughes’ first foray into the STEM space actually began in childhood.
He told SiliconRepublic.com: “The biotech industry made sense to me, given how well established it is in Ireland. However, my interest in science started much earlier, when I was a child. My grandparents used to bring me to the Young Scientist Exhibition every year and from the ages of six to 12, I never missed an exhibition at Trinity’s Science Gallery.
“So from an early age, I had an interest in science and discovery. As I progressed with my undergraduate and master’s studies in chemical engineering at UCD, the industry’s economic significance became more apparent. It was also clear that biotech provided numerous opportunities for growth.”
Advertisement
As part of his master’s programme, Hughes completed a 12-month internship at Amgen and eager to continue in this space, he explained a graduate programme “felt like a natural next step”.
He said: “I already had a good sense of the culture and could hit the ground running, while still having plenty to learn.”
Can you describe a typical day in your role?
Usually, my day starts with an assessment of our inspection performance at a cross-functional meeting. We look back at the previous 24 hours, see how the process development unit has performed and then look ahead to the next day. I am part of the commercial support team and a key part of my role is focused on problem-solving to ensure we get the most from our inspection machines. Working with colleagues across different functions to find solutions is also important.
There is a technical side to the job too, our inspection machines can process up to 400 vials and 300 syringes per minute and I develop vision tools that use image processing to identify any potential defects.
Advertisement
My favourite part of the job is the variety. I can spend part of the day in meetings discussing a problem or a new piece of technology, then head onto the manufacturing floor and implement the solution. It is very rewarding to develop an idea all the way from discussion stage through to physically putting it into practice.
Did your responsibilities and workload change as the programme progressed?
The programme has a natural progression. From the outset, it gave me exposure to different departments. Graduates are expected to attend meetings, ask questions and work with experienced colleagues, so I really value being part of team conversations.
As your experience grows, people start coming to you more often, which is recognition of your development. As my knowledge of processes has increased, I have become an established point of contact for colleagues, including senior staff members.
A recent example was working as inspection lead for the introduction of a new product on-site. As I’ve progressed, I’ve had more interaction not just across functions in Ireland but across the wider Amgen network. For example, I’m working with colleagues at other Amgen sites, including California and Puerto Rico, on developments in visual inspection and deep learning.
Advertisement
What skills have you developed since being part of the company’s programme?
My communication and problem-solving skills have developed significantly. In a fast-moving biotech environment, it’s not enough to have an idea or a solution in your head. You need to be able to explain it clearly so other people can understand it, challenge it and help you to move it forward. Troubleshooting is also a big part of my role and taking part in the programme has improved my ability to break down a problem and to arrive at a workable solution. I’ve also built up my technical skills on the job in inspection, vision engineering and image processing.
In addition to the programme itself, there’s a strong focus on continuous professional development at Amgen. For example, there is a weekly technology-sharing forum where people from different departments teach others about developments in their function. It gives you exposure to technical areas that are beyond your own day-to-day role.
What have been the most challenging parts of working life since taking up this programme?
Managing varied projects is one of the programme’s more challenging aspects. On one hand, it gives participants a real breadth of experience, but at the same time, switching your focus from one project to another can take some adjustment. Shift work and early start times make for a steep learning curve, but they also provide an opportunity to build close bonds with the colleagues who are working shifts and to take on more responsibilities.
Would you recommend the graduate programme at Amgen to others?
Absolutely. There is a huge variety of roles and the ability to move between departments and broaden your experience provides a major advantage during the early stages of your career. Amgen’s workplace culture means that it’s easy to speak to a colleague to find out what they do and to learn about their department.
Advertisement
Cross-functional learning is a big part of the culture here. Recently, the graduates took part in training at NIBRT, where we gained practical experience about filling lines and carried out activities linked to commercial manufacturing. Although my role is focused on inspection, the course was valuable because it gave me a better understanding of other parts of the process.
Amgen also has great social activities, including sports, fundraising and volunteering. The mix of technical learning, career development and community is a big part of what makes the experience so rewarding.
What advice would you like to give to future graduates who are just starting out?
Just go for it. The more responsibility you are willing to take on, the more experience you will get. Talk to managers and other graduates about what their day-to-day work entails. Follow the ‘ask and you shall receive’ approach, if there’s something you want to learn or get involved in, people will do their best to support you.
I also recommend getting involved in extracurricular activities. Amgen offers everything from tag rugby and five-a-side football to golf and beach clean-ups. It’s another great way to meet people and hear from experienced colleagues. Also, don’t be afraid to create something yourself. The main thing is to stay curious, get involved and enjoy the experience.
Advertisement
Don’t miss out on the knowledge you need to succeed. Sign up for the Daily Brief, Silicon Republic’s digest of need-to-know sci-tech news.
Apple’s long-rumoured smart home hub could be more colourful than expected, with a new leak suggesting the device may launch in four finishes when it arrives (hopefully) later this month.
The colours could also tie into one of the hub’s more personal features. Users will reportedly be able to create a Photo Face, with Apple’s preview artwork for the feature matching the colour of the device itself.
That said, the colour options aren’t confirmed just yet. Bloomberg’s Mark Gurman previously reported that the home hub would come in Apple’s familiar grey aluminium finish, without mentioning the other three options. So while Silver, Space Grey, Starlight and Rose Pink have now appeared in separate reports, we’ll have to wait for Apple’s official announcement to know which finishes actually make it to store shelves.
Advertisement
Apple’s Home device may come in four finishes: Silver, Space Gray, Starlight, and Rose Pink.
The Photo Face setup screen picks its preview art based on the hardware color the device reports.
Beyond the colours, the home hub is expected to have a roughly 6-inch square display, with Apple reportedly planning both tabletop and wall-mounted versions.
The tabletop model sounds particularly distinctive. According to Gurman, its display will sit on a polished metal arm connected to a round metal base with perforated speaker holes. The design is said to resemble Apple’s unusual iMac G4, which launched back in 2002.
The home hub is expected to sit at the centre of Apple’s broader push into smart home products, although the company has yet to officially confirm the device.
For now, the four reported finishes give us another small detail to look out for when Apple finally shows it off. If the leak is accurate, the home hub won’t be limited to the usual Apple grey after all.
Amazon is trying to buy back trust. Facing a nationwide data center backlash that has stalled projects worth billions of dollars, the e-commerce and cloud giant announced this month that it will stop using nondisclosure agreements with government agencies and will donate more than $1 billion over five years to communities living near its server farms. The response from critics: not nearly enough.
The announcement, laid out by Amazon Web Services CEO Matt Garman in a company blog post and press release, marks one of the clearest acknowledgments yet from a major tech company that the public is losing patience with the AI-driven data center boom. Across the country, more than 100 moratoriums on new data center construction are reportedly under consideration, driven by complaints about secretive permitting processes, spiking electricity bills, strained water supplies, and diesel generator pollution.
What’s Fueling the Data Center Backlash
The anger has been building for months. Environmental activist Erin Brockovich recently said the number one complaint she hears about data centers is a lack of transparency, describing a familiar pattern: projects announced only after permits are already secured, developers who go silent, and local officials who sign NDAs before their own neighbors learn a massive facility is coming to town. New York has already imposed a one-year moratorium on permits for large data centers, and similar measures are being debated in statehouses nationwide.
Garman tried to push back on what he called four myths fueling the data center backlash: that these facilities guzzle too much water, drive up electricity costs, spew excessive pollution, and offer nothing to the communities that host them. He cited an Amazon-commissioned report claiming direct data center water consumption makes up just 0.5% of industrial water use in the U.S., far less than golf courses or almond farming. He also argued that backup generators at data centers sit idle 99.9% of the time, running roughly 10 hours a year.
Advertisement
Independent experts and advocacy groups have challenged those framings. Scientists have noted there are no federal or state requirements forcing tech companies to report water and energy usage, making it difficult to verify numbers that come straight from the companies themselves. And an independent grid watchdog recently found that data centers were the main driver behind a 76% year-over-year electricity price spike on America’s largest power grid, undercutting Amazon’s suggestion that rising rates stem mostly from aging infrastructure rather than surging demand.
Critics Say Amazon’s Pollution Claims Don’t Add Up
Nowhere has the pushback been sharper than over pollution. Stand.Earth, a global nonprofit that has fought data center expansion in affected communities, told Ars Technica that Amazon’s generator claims are misleading, citing cases where its facilities ran on diesel backup power for days at a stretch rather than mere hours. The group also pointed to a planned Amazon data center in Pecos, Texas, permitted to emit 33 million tons of carbon dioxide annually — more than any other power plant in the United States — which went unmentioned in Amazon’s community commitments.
“For all the claims Amazon makes about investing in carbon-free energy, it conveniently leaves out that it is constructing the single-largest source of climate emissions in the United States,” Stand.Earth said, noting the facility would consume as much energy as 1.9 million homes.
Amazon has separately pledged to become “water positive” by 2030 and says 75% of its projects have already hit that mark. But Stand.Earth argues that figure ignores the much larger water footprint tied to generating the electricity that powers data centers, as well as unresolved questions about potential contamination from newer cooling technologies.
Advertisement
Is $1 Billion Enough to Change the Conversation?
Perhaps the most pointed criticism concerns scale. Amazon’s $1 billion pledge, spread across five years, is roughly the same amount the company says it already contributed to data center communities over the past three years — meaning the new commitment may not represent much of an increase at all. Stand.Earth called it “a drop in the bucket” next to the $220 billion Amazon is expected to pour into data center infrastructure in 2026 alone, calling the gesture “a flailing attempt at damage control for the harm its data center build-out has already caused.”
Garman has framed the stakes in geopolitical terms, warning that moratoriums risk handing China an advantage in the AI race and suggesting that foreign actors may be stoking opposition to American data centers — language that echoes rhetoric from the Trump administration about disinformation campaigns undermining U.S. tech dominance.
Not everything about Amazon’s announcement was dismissed outright. Even Stand.Earth acknowledged that scrapping NDAs is a genuinely positive step that should make future projects more transparent to the communities that will live alongside them. But transparency alone doesn’t resolve the deeper dispute over whether data centers are good neighbors or costly burdens.
That tension gets at something bigger than any single policy fix. Anthropic CEO Dario Amodei recently described the broader AI backlash as fundamentally a “crisis of trust,” in which the public assumes governments and corporations are perpetually scheming against their interests. Writer Jasmine Sun made a similar observation, noting that when data center opponents are shown corporate rebuttals, their reflexive response is simply: “I don’t believe them.”
Advertisement
That skepticism may be the real obstacle facing Amazon and its rivals. No matter how many statistics companies publish about water usage or idle generators, the data center backlash appears rooted less in any single disputed fact and more in a broader sense that communities are being asked to shoulder the costs of the AI boom while tech giants reap the profits. Until that perception shifts, pledges of transparency and charitable billions may do little to quiet the opposition building in statehouses and city councils across the country.
If your eSIM is not working on iPhone, first identify what has actually failed: the eSIM may be missing or unable to activate, installed but disconnected from the carrier, connected to the carrier but unable to use mobile data, or affected by a Dual SIM configuration problem. The correct fix depends on which of those states you can see.
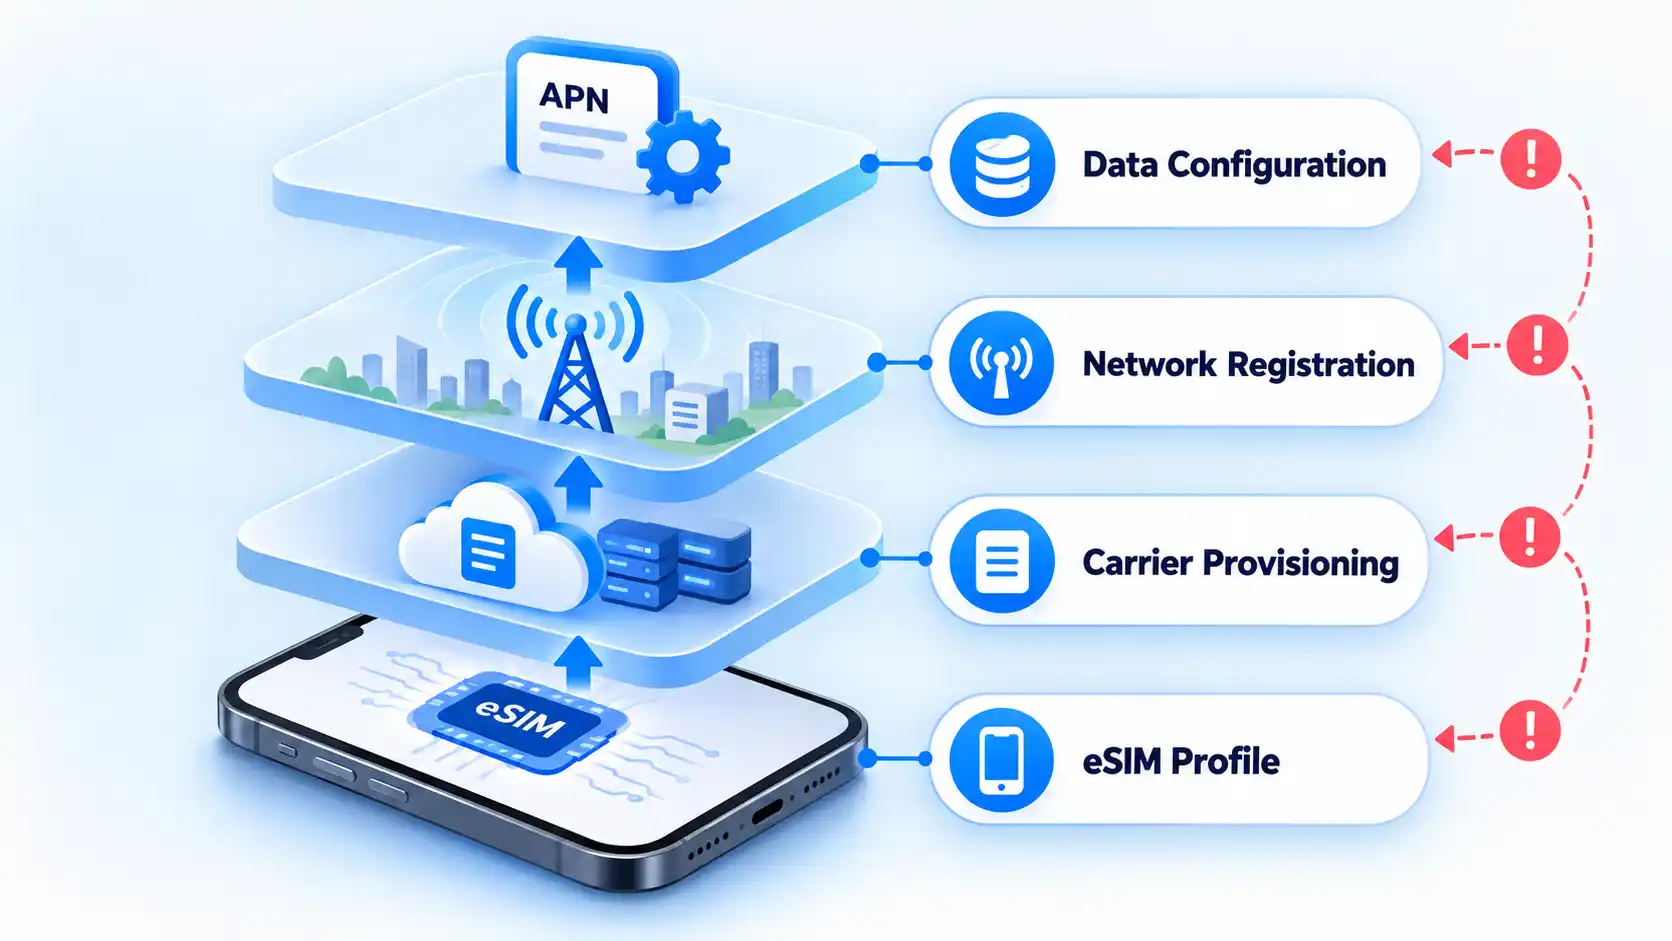
Do not start by deleting the eSIM or changing network settings at random. An installed eSIM profile, successful carrier connection, and working mobile data are separate states, so troubleshooting the wrong layer can create another problem without fixing the original one.
This guide uses Cellular for the mobile-network menu. Depending on your iPhone’s language and region, it may appear as Mobile Service, Mobile, or Mobile Data. Likewise, Cellular Data may be labelled Mobile Data, and Carrier Lock may appear as Network Provider Lock.
Start With What Your iPhone Is Showing
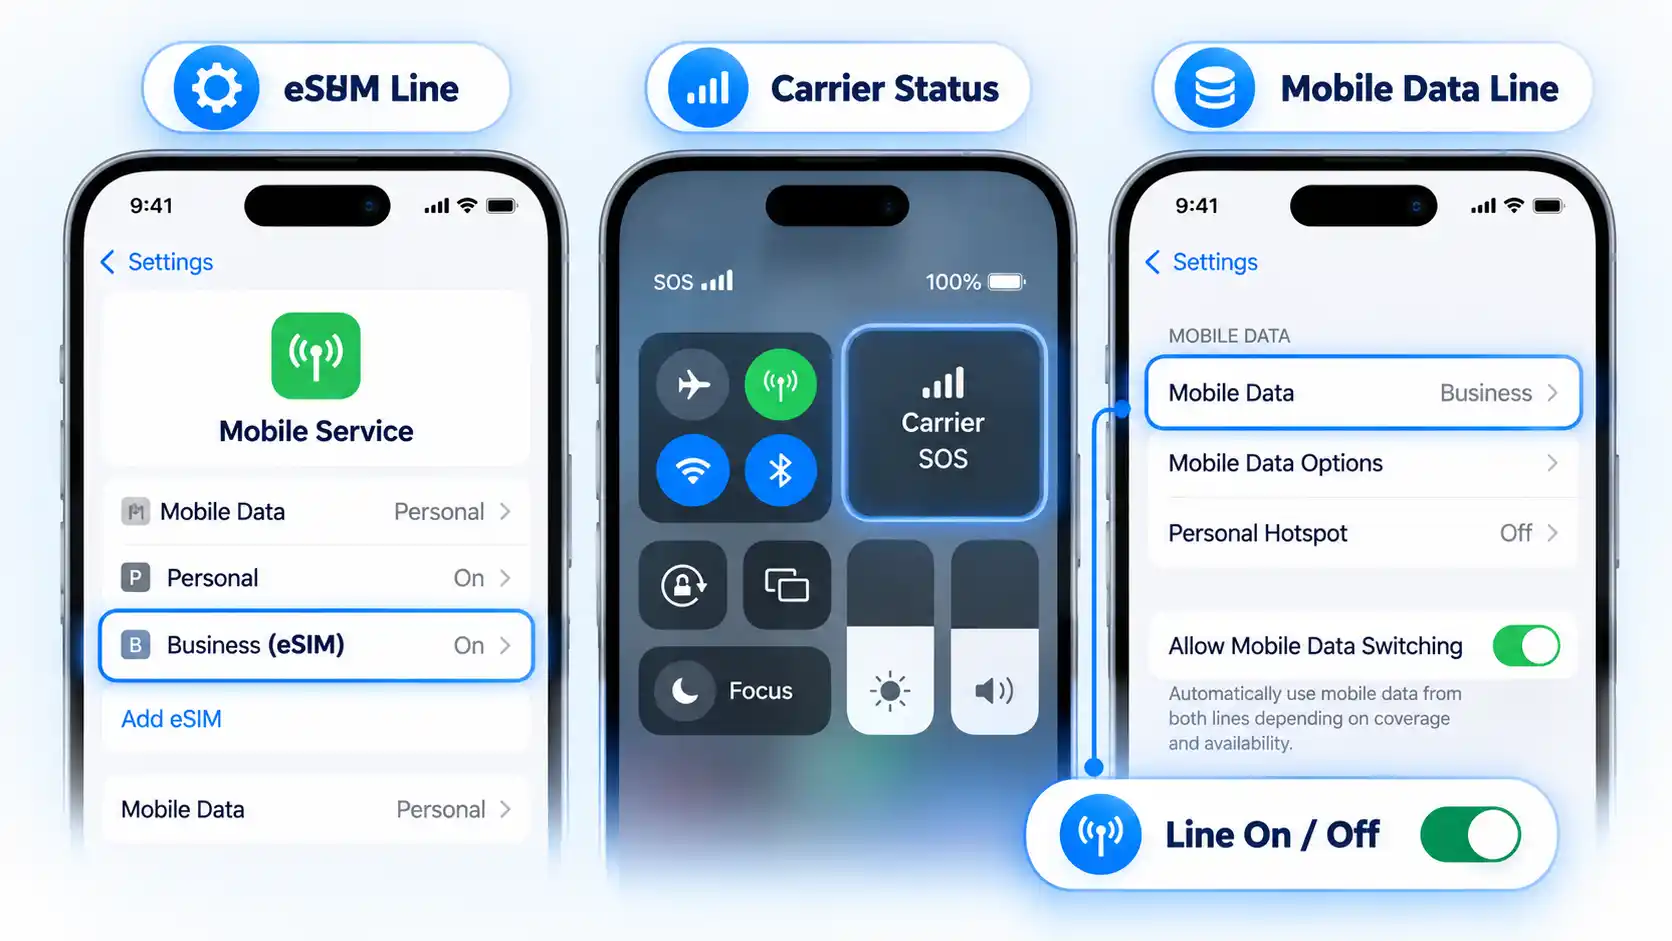
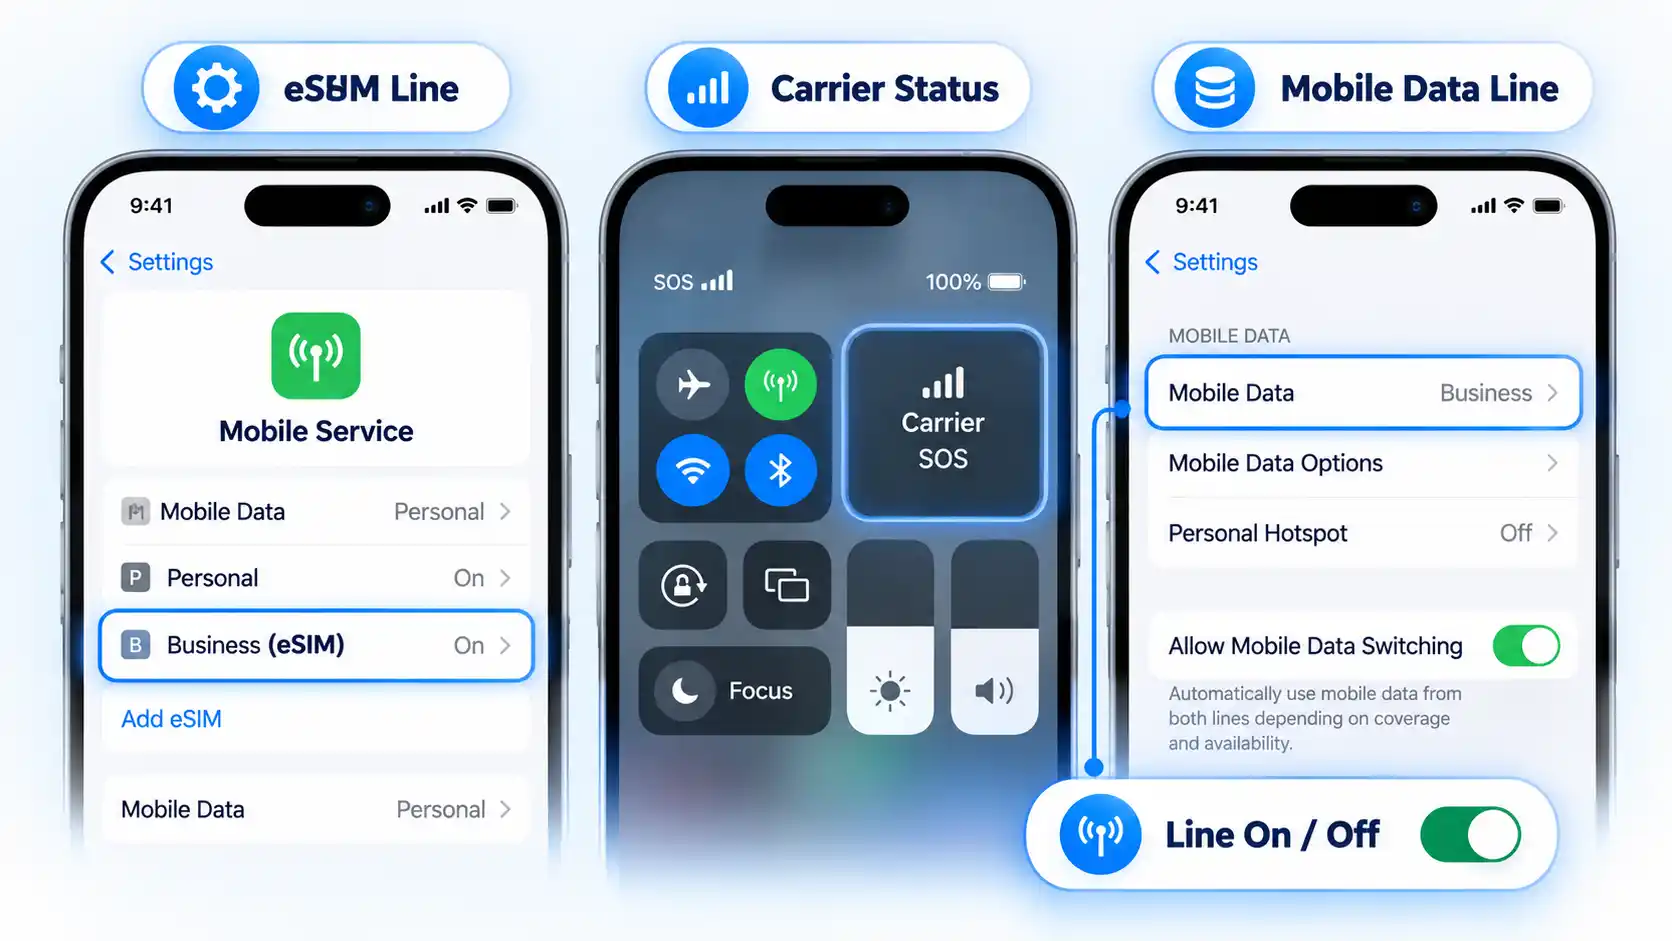
Open Settings > Cellular to check whether the expected line is listed. Then inspect its carrier status in Control Centre: swipe down from the top-right corner on an iPhone with Face ID, or swipe up from the bottom on an iPhone with a Home button. Match the result to the branch below.
Advertisement
The eSIM is missing: the expected mobile plan does not appear in Settings. Start with the activation section.
The eSIM appears, but you see SOS, No Service, or Searching: the profile exists, but the iPhone is not currently connected to the mobile network. Use the network-registration section.
The carrier appears, but mobile data fails: the phone has progressed further than a complete No Service failure. Isolate the selected data line, roaming requirements, and Access Point Name (APN) configuration.
One line works but another does not: treat it as a Dual SIM problem rather than assuming the whole cellular system has failed.
This distinction matters because eSIM activation involves more than storing a digital SIM profile on the phone. The carrier still has to provision the plan and the iPhone has to register successfully for service.
Use this procedure if the eSIM never appears as an available line, setup produces an activation error, or activation starts but does not complete. At this stage, concentrate on getting the plan installed and recognized before troubleshooting mobile data.
Confirm that the plan can be activated. Make sure you have an active mobile plan from a carrier that supports eSIM and that the iPhone is connected to Wi-Fi or a hotspot. An internet connection is the normal setup requirement, although some eSIM-only iPhone models can activate without Wi-Fi in certain countries and regions. Also check Settings > General > Software Update and install the latest iOS version the iPhone supports.
Check for a carrier lock if you are changing carriers. Open Settings > General > About and find Network Provider Lock. If it says No SIM restrictions, the iPhone is unlocked. Only the current carrier can remove a carrier lock, so contact it if the new eSIM belongs to a different carrier and the phone is still restricted. The same lock check is useful when confirming that an unlocked phone can accept service from another compatible network.
Refresh the cellular connection. Open Settings, turn Airplane Mode on and then off, and open Control Centre afterward and check whether the carrier now appears.
Check whether the line exists but is disabled. Open Settings > Cellular and tap the affected line. If Turn On This Line is disabled, enable it. If it is already enabled, turn it off and then back on. Check Control Centre again before continuing.
Restart the iPhone. After it restarts, check whether the line appears and whether the carrier is visible in Control Centre. On iOS 18 or later, the current Apple Support app can also run additional diagnostics when the cause remains unclear.
Check the carrier-settings version. Go to Settings > General > About, scroll to the eSIM section, and find the version beside Network Provider. Tap the version number. If an update is available, choose OK or Update.
Stop if the eSIM still cannot be set up. If the line is still absent or activation still fails after these checks, contact the carrier that issued the eSIM. At this point, the carrier may need to check plan provisioning or account information that the iPhone cannot repair locally.
Do not delete an installed eSIM merely to repeat these steps. Reinstallation and activation-code rules can vary by provider, so remove the profile only when the carrier or eSIM provider specifically instructs you to do so.
If the eSIM Is Installed but Shows SOS or No Service
If the eSIM appears in Settings but the iPhone shows SOS, No Service, or Searching, installation is no longer the main problem. No Service or Searching means the device is not connected to a mobile network, so the next job is to restore or diagnose that network connection.
Force a fresh network connection. Open Settings, turn Airplane Mode on for at least 15 seconds, and then turn it off. Give the iPhone a moment to search for the carrier again.
Restart the iPhone. After the restart, check the status area again. If the carrier returns, test only the service included with the plan before making further changes.
Make sure the eSIM line is enabled. Open Settings > Cellular, tap the affected line, and check whether it is on. If it is off, tap Turn On This Line, then check for service again.
Rule out a carrier, account, or coverage problem. If the iPhone still cannot register, check with the carrier that the account is active and in good standing, the device is not blocked from mobile service, the correct plan is attached, and there is coverage with no local outage. These conditions are carrier-side checks rather than settings the iPhone can verify by itself.
Update iOS and carrier settings. Check Settings > General > Software Update and install the latest iOS version the iPhone supports. Then connect to Wi-Fi and open Settings > General > About. If a carrier-settings update is available, install it.
Escalate persistent No Service. If the carrier confirms that the account, plan, coverage, and network are normal but the iPhone still cannot connect, carrier support or Apple service may be needed to distinguish provisioning from a device problem.
If the Carrier Appears but Mobile Data Does Not Work
If the carrier appears and the line is enabled but websites or apps cannot use cellular data, isolate the data connection instead of repeating activation steps. Start by making sure Wi-Fi or another cellular line is not hiding which connection the iPhone is actually using.
Turn off Wi-Fi for the test. Go to Settings > Wi-Fi and switch Wi-Fi off. A working Wi-Fi connection can otherwise hide a failed eSIM data connection.
Select and isolate the intended data line. Go to Settings > Cellular > Cellular Data and select the eSIM you want to test. If available, temporarily switch off Allow Cellular Data Switching (or Allow Mobile Data Switching) on that screen. End any active voice call before testing. Turning switching off can interrupt mobile data during calls on the other line; use it here to isolate the test, then restore your preferred setting afterward.
Apply roaming only when the plan requires it. If your carrier or eSIM provider says this plan requires roaming, go to Settings > Cellular, select the affected line, and enable Data Roaming, opening Cellular Data Options or Mobile Data Options first if shown. Check the plan’s roaming terms before enabling it; using a plan abroad does not automatically mean roaming is included without extra charges. Do not treat this as a universal fix for every eSIM.
Check the APN only if your carrier requires it. APN stands for Access Point Name, the network path the iPhone uses for mobile data. Depending on the carrier, the setting can appear under Settings > Mobile > Mobile Data Network or Settings > Mobile Data > Mobile Data Options > Mobile Data Network. If neither option exists, contact the carrier rather than trying to expose or override it.
Use only carrier-supplied APN values. Incorrect APN settings can disable mobile data and may cause additional charges. Do not copy an APN from an unrelated carrier or a generic troubleshooting page. If your carrier permits APN editing, enter only the values it supplies.
Test cellular data again. Keep Wi-Fi and data switching off, confirm the intended eSIM remains selected for data, and test with no voice call in progress. Open a new webpage or another service that requires a live data connection. If data still fails while the carrier remains visible, contact the carrier to verify the plan’s data provisioning and APN requirements.
Successful voice service does not prove that cellular data is configured correctly, and the reverse can also be true for a data-only eSIM. Judge the result against the services included with your actual plan.
Advertisement
If One Line Works but the Other Does Not
When an iPhone has two active plans and only one is failing, troubleshoot the affected line rather than treating the phone as completely offline. Dual SIM adds another variable because the two plans can have different carriers, account states, coverage, and data roles.
Confirm that both plans are valid for Dual SIM. Both plans must be set up and ready to use, and the carriers involved must support Dual SIM with eSIM. If the plans come from different carriers, the iPhone must be unlocked.
Check that the affected line is present and enabled. Open Settings > Cellular and confirm that both expected plans are listed. Tap the failing line and enable Turn On This Line if it is off. With no voice call in progress, check its carrier status in Control Centre. If the plan is missing, use the activation branch above; if it remains enabled but shows SOS or No Service, use the network-service branch.
Check the affected line’s account and network state. If the plan exists but will not work, confirm with its carrier that the plan is eligible for Dual SIM, coverage is available, there is no outage, and billing has not blocked service. Corporate plans may also require confirmation from the company or carrier that Dual SIM is supported.
Check which line is handling mobile data. An iPhone uses one mobile-data network at a time. Go to Settings > Cellular > Cellular Data and select the intended line. If you are testing a data failure, use the isolated data test above, including its temporary switching setting and no-call condition.
Account for call-related Dual SIM behavior. Seeing No Service on the other line during a call does not always mean that eSIM has failed. The other line can show No Service while one line is being used for a call; available behavior depends on features such as Wi-Fi Calling and Allow Mobile Data Switching.
Escalate only the failing line. If one plan works normally and the other remains unavailable after these checks, contact the carrier responsible for the failing plan. That isolates the support request from the line that is already known to work.
If you regularly choose between two active plans, the difference between using an eSIM and configuring Dual SIM matters because eSIM describes the SIM technology, while Dual SIM describes using two mobile plans on the iPhone.
Stop changing iPhone settings when the correct line is present and enabled but activation or network service still fails after the relevant sequence above. At that point, the carrier may need to inspect provisioning, billing, account eligibility, a device block, an outage, or another network-side condition that is not visible from the iPhone.
The eSIM still will not activate
Contact the carrier that issued the eSIM after you have confirmed internet access, current iOS, Airplane Mode, line visibility, a restart, and carrier settings. Keep the exact activation error visible or write it down before contacting support.
The eSIM is installed but the iPhone still has no carrier service
Ask the carrier to verify that the account is active, the correct plan is provisioned, the device is not blocked or barred, coverage is available, and there is no relevant outage. If the carrier confirms that its account and network are normal and a hardware problem is suspected, Apple service may be the next step.
Advertisement
The carrier appears but cellular data still fails
Tell the carrier that network registration succeeds but data does not. Ask it to verify the plan’s data provisioning and, when applicable, the correct APN. Do not substitute APN values from another carrier.
Only one of two mobile plans is failing
Contact the carrier responsible for the failing line and identify it clearly. Ask it to verify Dual SIM eligibility, account status, coverage, outages, and billing. A working second line is useful evidence because it shows that the iPhone is not completely disconnected from cellular service.
What information should I have ready for carrier support?
Record the exact error message and have your phone number plus the carrier account password or personal identification number (PIN) available. Also collect the iPhone’s IMEI, which identifies the phone on mobile networks, and its EID, the identifier associated with the embedded SIM. Both are available under Settings > General > About. Have those identifiers ready when contacting the carrier about an eSIM setup failure.
The useful stopping point is observable: either the intended line reconnects and the service included with your plan works, or you have narrowed the failure far enough that the carrier or Apple can investigate the remaining account, network, provisioning, or hardware layer.
Apple says it is changing its macOS privacy settings to stop third-party app developers from misusing them to access message histories.
Friday’s announcement comes two weeks after tech columnist Jason Aten said that Meta’s new general-purpose AI agent Muse sent him an unsolicited notification referencing a thread between him and a co-worker over Apple Messages. Aten said he never granted Muse permissions to read his messages and had assumed they were off-limits. Social media last week blew up with masses of people who agreed and said the incident showed that AI assistants given access to calendars, emails, messages, shopping accounts, and other resources are akin to a skill saw or other power tool. While potentially useful, they can do real damage if not used carefully.
He said/she said
Meta CTO David Singleton joined the fray with a rebuttal that appeared solid. For Muse to access Apple Messages, a user must manually give it two privileges. One is full-disk access, a macOS system-level permission. The other is to enable a Messages connector setting in Muse.
“The Messages integration in the Muse Mac app is opt in,” Singleton said. “Your Muse can only read Messages content if macOS system-level Full Disk Access is granted and the Messages connector is enabled.”
Advertisement
Singleton’s implication was clear. Muse could have read Aten’s Messages communications only if he had enabled both settings, and if so, the columnist had only himself—and certainly not Meta—to blame.
Earlier this week, I spoke to macOS security expert Patrick Wardle, who questioned Singleton’s denial. His reasoning: “From a technical point of view, with FDA (full-disk access), any (non-root file), is readable, browsing history, browser cookies, chats, etc etc etc.” I asked Meta how Muse couldn’t read messages when the app had full disk access, while every other app with that privilege could. Meta PR’s only response was to requote Singleton saying: “The Messages integration in the Muse Mac App is opt-in. Your Muse can only read Messages content if macOS system-level Full Disk Access is granted and the Messages connector is enabled.”
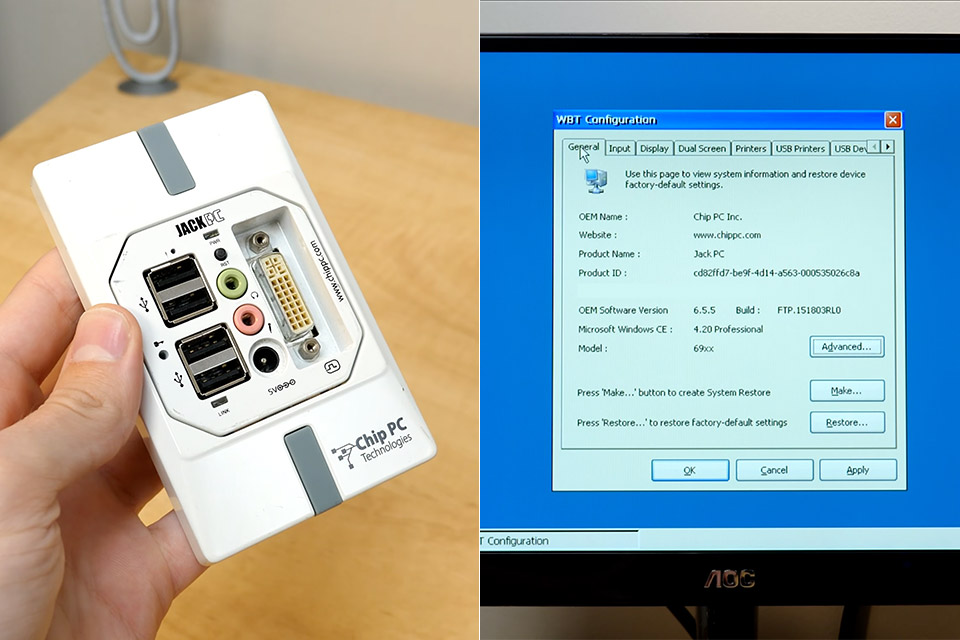
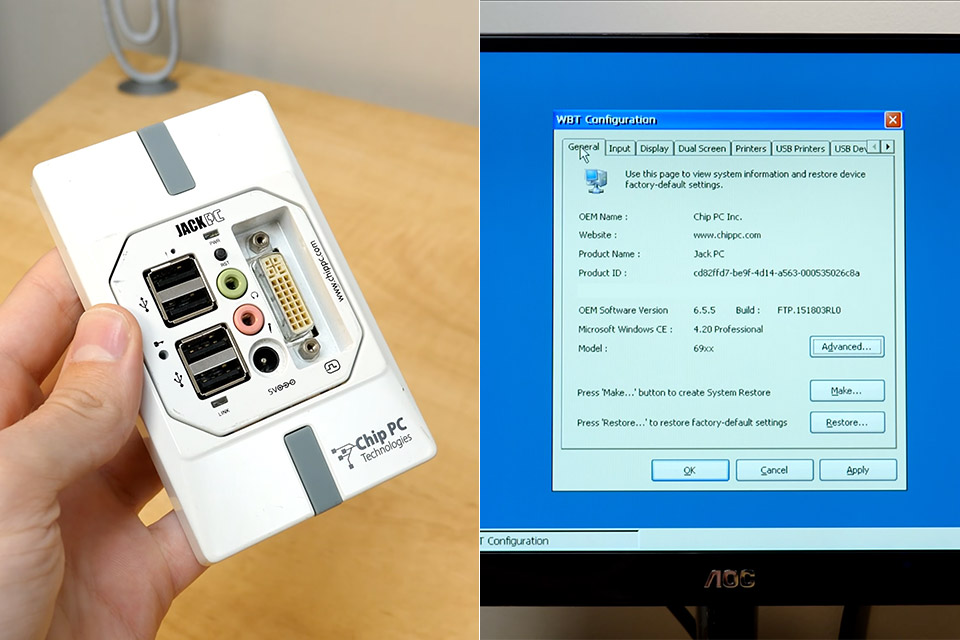
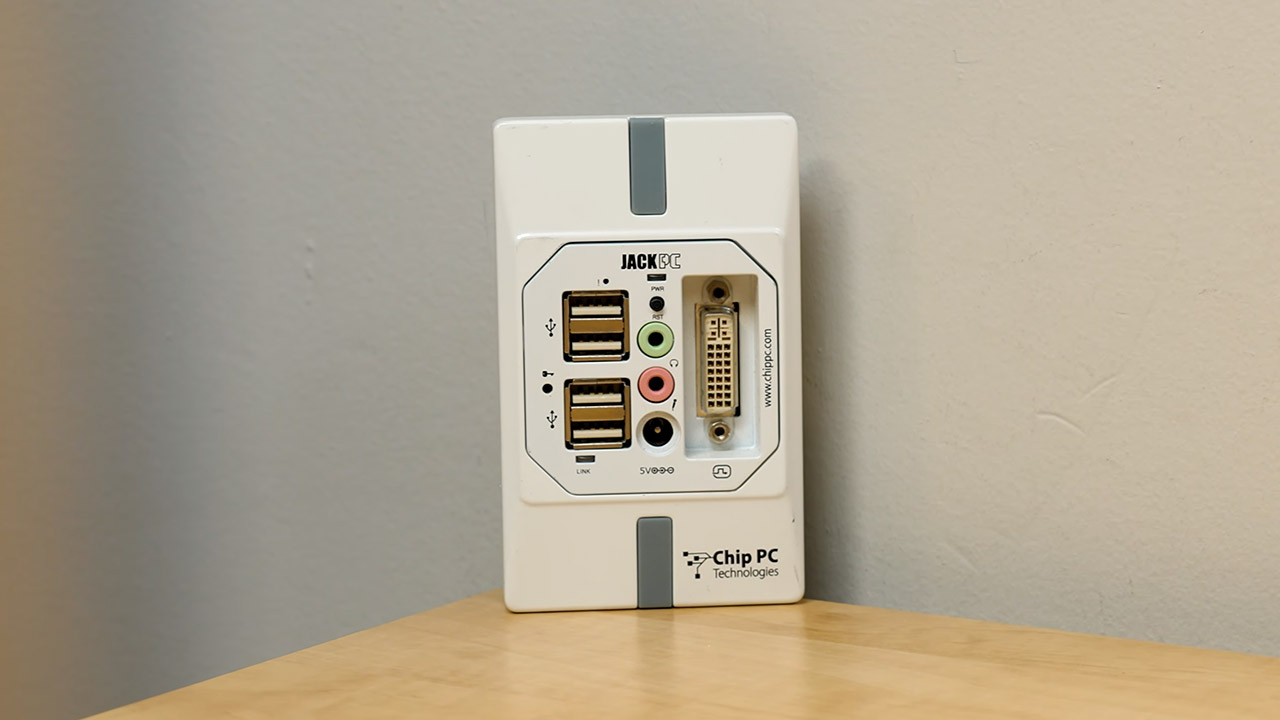
Back in the middle of 2006, a small company called Chip PC Technologies started shipping a computer that vanished into the wall. Jack PC occupied the same opening as a standard network jack, behind a faceplate barely larger than a light-switch cover, and every port a desk worker needed sat on that plate. Offices were paying for floor space by the square foot, and a tower under every desk ate room, power, and repair hours. Chip PC, founded in 2000 and based in Ness Ziona, built thin clients for companies that already ran Citrix or Microsoft terminal servers.
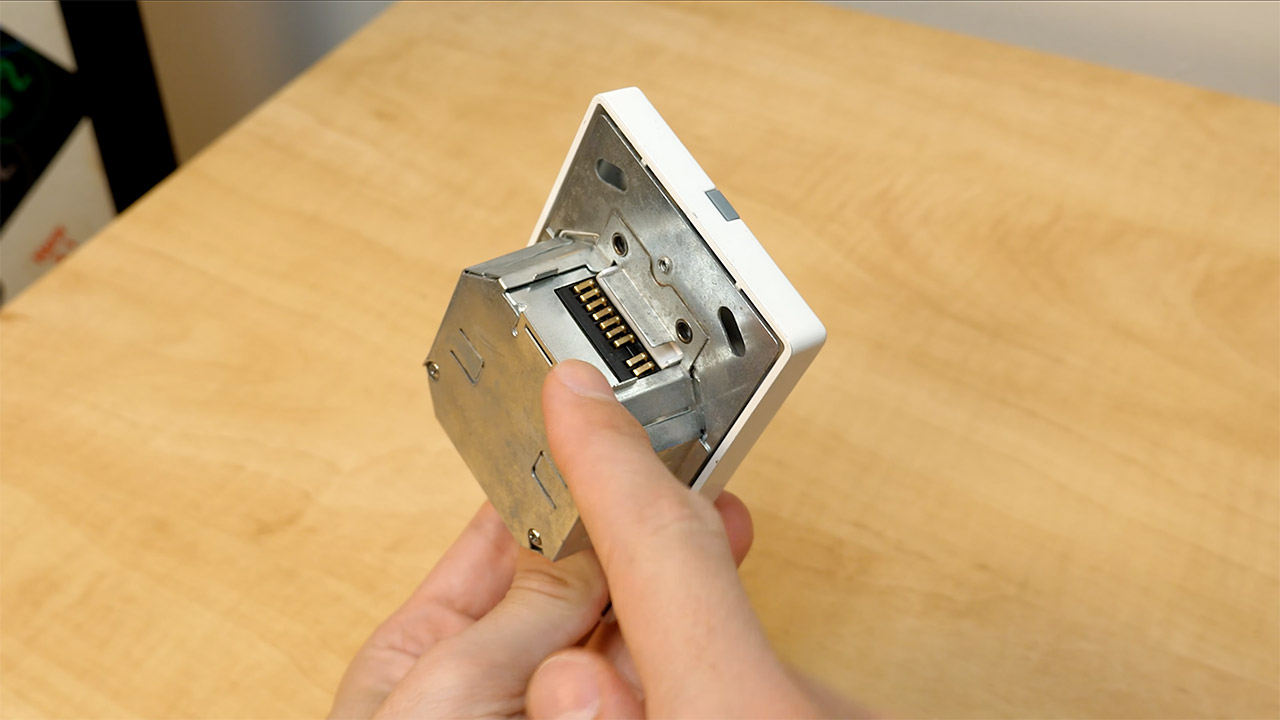
Installation was supposed to seem like you just connected an Ethernet cable to a power outlet and plugged it into the rear of the switch, but because the switch supported Power over Ethernet, you could use the same wire to power the computer. In use, the computer consumed 3 to 3.5 watts, with the most demanding scenarios reaching 5 watts. When it’s in sleep mode, its power consumption lowers to around a third of a watt. If you didn’t have a powered switch, you could simply install a midspan injector or connect a small 5-volt brick to a DC port on the front.
LITTLE DO-IT-ALL — Mac mini packs pure power into a small, five-by-five-inch desktop as the M6 chip delivers next-level AI capabilities. Mac mini…
M6 CHIP — Everything you do on Mac mini feels more responsive with the M6 chip and its next-generation CPU. Fly through AI workflows with up to 4.8x…
CONNECT IT ALL — Features three Thunderbolt 4 ports, an HDMI port, and a 2.5Gb Ethernet port in the back, and two USB-C ports and a headphone jack…
Inside the box, there were two or three circuit boards piled on top of each other, making the total size roughly 1.6 inches. The US-style face plates were about 2.8 inches wide and 4.6 inches tall. Because the heat output was minimal, Europe and the UK had plates that were a pretty square form, about 3.4 inches on each side, with the wall cavity doing all of the cooling for you and no fan. Initially, there were three models to pick from. According to Chip PC, the EFI 6700 included an AMD Alchemy Au1550, a 333 MHz MIPS processor that is roughly equivalent to an 800 MHz x86 processor. It included 32 megabytes of flash memory, 64 megabytes of DDR RAM, and 4 megabytes of vram, as well as a VGA connection capable of up to 1280 by 1024 resolution.
The EFI 6800 improved performance by increasing the CPU speed to 500 MHz, making it roughly similar to a 1.2 GHz x86 microprocessor. It also had 64 megabytes of flash, 128 megabytes of RAM, 8 megabytes of vram, and a VGA connector that could display up to 1600 by 1200. The final iteration, the EFI 6900, had the same fast processor and memory but replaced the VGA port with a DVI-I interface. It also featured dual display capability, allowing you to operate two panels simultaneously, each with a resolution of 1024 by 768. All three variants feature four USB 2.0 ports, a headphone connector, and a microphone jack on the front of the faceplate.
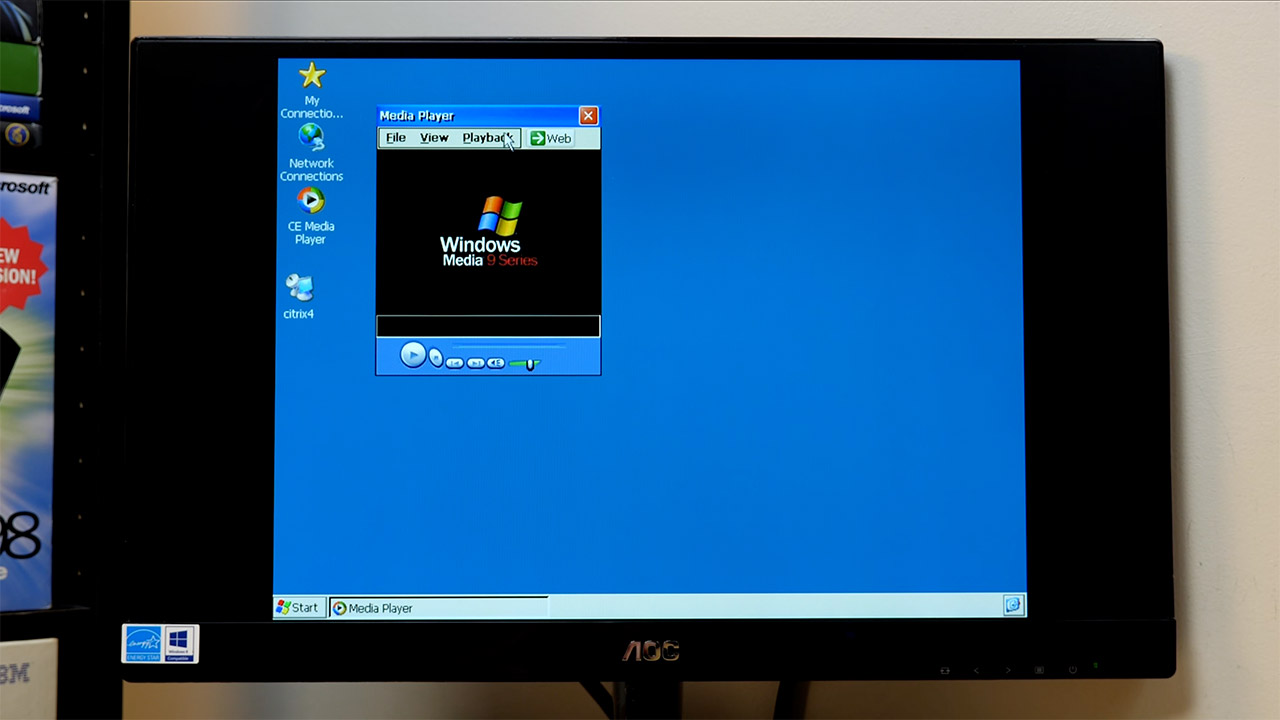
The operating system was Windows CE 5, which was stored on flash memory with Internet Explorer 6 and Microsoft Remote Desktop and Citrix ICA client software. Real work, of course, took place on a server in the next room or in another building. The local storage stored the operating system and a few settings, but no user files. Chip PC advertised this setup as being difficult to steal because the computer was housed inside the wall, difficult to infect with malware because the CE on a locked MIPS board couldn’t run standard Windows programs, and fleet control was handled entirely through the company’s Xcalibur Global software, allowing an administrator to send settings to all of the computers without having to physically visit each one.
The costs, however, were a bit of a sticker shock for some consumers, with UK prices ranging between 209, 279, and 349 pounds for the three separate variants. In Europe, the middle-of-the-range model was priced between 299 and 499 euros, whereas in the United States, the middle model cost $392. Some reviewers noted that a full desktop was really slightly less expensive. Chip PC maintained that the savings would show up on your power bill, clear off some desk clutter, and reduce the amount of broken computer towers, but you still required a monitor, keyboard, and mouse on your desk. Resolution and color depth were adequate for office work and web browsing, but not for much else.
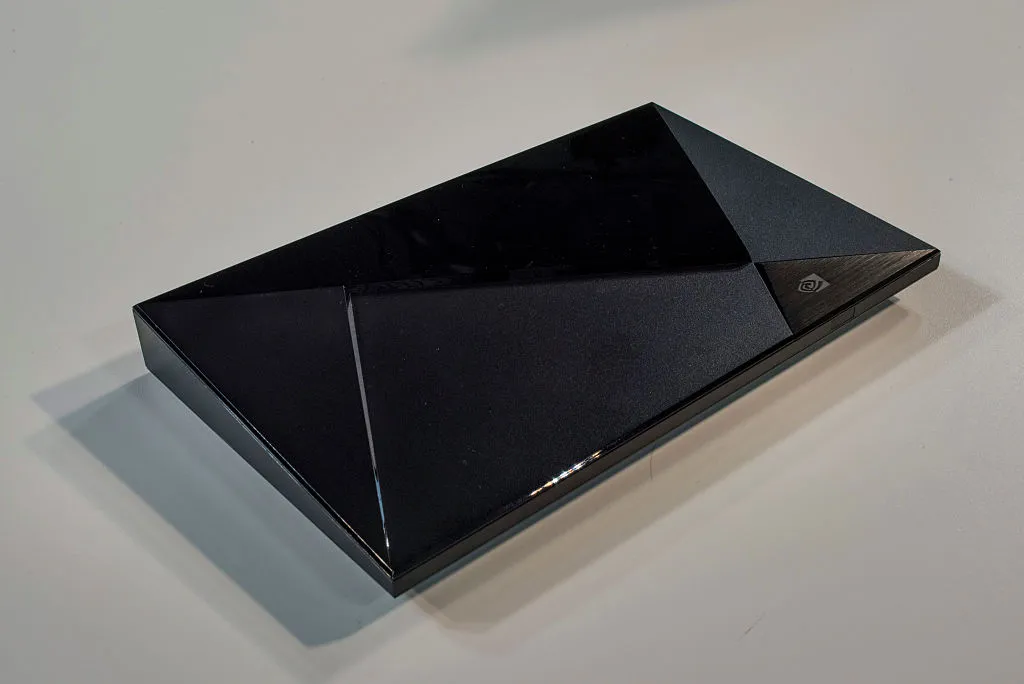
Seven years is a long time in consumer electronics. It’s long enough for a device to go from cutting-edge to nostalgic, long enough for its chipset to look almost quaint next to newer silicon. What it usually isn’t long enough for is a price increase. Yet that’s exactly what just happened to Nvidia’s Shield TV Pro, a streaming box that first launched in 2019 and has now jumped from $199.99 to $299.99. The culprit, according to Nvidia itself, isn’t some flashy new feature or supply shortage tied to a natural disaster. It’s artificial intelligence, and more specifically, the soaring AI memory prices that are rippling through nearly every device with a chip inside it.
Nvidia didn’t dance around the explanation. “Starting October 2, SHIELD Pro will be priced at $299. The cost of components, including memory, has increased substantially across the industry,” a company spokesperson confirmed. That’s a remarkably blunt admission for hardware running a Tegra X1+ processor that dates back years, long before the generative AI boom reshaped global chip demand. The device hasn’t gotten faster or gained new capabilities. It’s simply become more expensive to build, because the memory chips inside it are now competing for fabrication capacity with the data centers powering the AI revolution.
Why AI Memory Prices Are Reshaping the Gadget Market
To understand why a seven-year-old streaming box costs more today than it did last year, you have to look upstream, toward the massive data centers training and running large language models. Those facilities require enormous quantities of high-bandwidth memory and storage, and the companies building them, including Nvidia, have been buying up manufacturing capacity at a scale the memory industry has never seen. That demand doesn’t exist in a vacuum. Every gigabyte of DRAM or flash storage funneled toward an AI server is a gigabyte not available for a smartphone, a laptop, or, yes, a humble set-top box.
The result is a market where AI memory prices have climbed sharply across the board, squeezing manufacturers who never intended to compete with hyperscale data centers for parts. Nvidia, somewhat ironically, sits on both sides of this equation. It is simultaneously one of the companies most responsible for driving AI-related memory demand through its market-dominating GPUs and accelerators, and now a victim of the price pressure that demand has created for its own consumer products.
Advertisement
The Shield TV Pro isn’t an isolated case, either. Game console makers have been absorbing and passing along similar cost increases. Sony’s PS5 Pro, for instance, has risen from $699.99 at its 2024 launch to $899.99 today. Nintendo and Microsoft have made comparable adjustments to their current-generation hardware. Across the industry, anything built around memory or storage chips is increasingly vulnerable to the same upward pressure, regardless of how old or established the device might be.
A Passion Project Meets Hard Economics
Nvidia has described the Shield line as something of a passion project internally, a product kept alive less for its profit margins and more for the loyalty of a niche but devoted fan base. The company has confirmed it still actively manufactures the device and sells every unit it produces, meaning there’s no backlog of cheaper, pre-AI-boom components to draw from. Each new Shield built today draws on the same strained supply chain affecting flagship phones and PCs.
That explains why stock of the Shield TV Pro had grown increasingly scarce in recent months. It likely became uneconomical to keep producing units at the old price as component costs crept upward. Bumping the price to $300 makes manufacturing viable again, even if it also makes the device a much harder sell. For casual users who just want to stream Netflix or Disney+, a $300 set-top box is a tough proposition when cheaper streamers do the job for a fraction of the cost. The Shield’s appeal has always rested on niche strengths: broad codec support, Plex server capability, and AI-assisted upscaling that remains unusually capable for its age. Those features still matter to enthusiasts, but they’re a harder sell at triple the price of a basic streaming stick.
What makes this story notable isn’t really the Shield TV itself, though. It’s what the price hike signals about the broader trajectory of consumer electronics. As long as AI memory prices continue climbing to feed data center expansion, manufacturers across categories, from streaming boxes to game consoles to laptops, will likely keep passing those costs on to shoppers. Devices that have nothing to do with artificial intelligence are being swept up in its economic wake simply because they share the same fundamental building blocks.
Advertisement
For consumers, the lesson is an uncomfortable one: even mature, years-old products are no longer immune to price increases driven by forces entirely outside their own design or performance. The AI boom has rewritten the economics of memory and storage so thoroughly that even a legacy streaming box, built on half-decade-old technology, can’t escape its gravitational pull. If anything, the Shield TV Pro’s $100 jump may just be an early, relatively minor example of a pattern that’s likely to keep repeating across tech shelves for the foreseeable future.
Realme is back with another special edition phone in collaboration with Warner Bros. After a color-changing Game of Thrones edition collectible, the company has launched a Harry Potter-themed phone. The Realme 16 Pro 5G Harry Potter Edition pairs themed exterior styling with the standard model’s core hardware and bundles it with a bunch of goodies.
I’m a Potterhead, and I couldn’t wait for my unit to arrive. As soon as it reached my doorstep, I unboxed it and went hands-on with the device. From the unboxing experience to its software, this is a Hogwarts makeover any Harry Potter fan would love.
Alohomora! Unboxing the Harry Potter phone
The new Realme special edition phone comes in a chest-shaped box that resembles Harry’s Hogwarts trunk. Unfortunately, casting the Alohomoraspell doesn’t unlock it; you’ll need to use your thumbs, like any other Muggle. Once unlocked, the neat presentation screams of “You’re a wizard, Harry!” and pulls you into the world of Harry Potter.
On the left side, you’ll find a brown box carrying the phone case and a SIM-ejector tool, both of which carry the Harry Potter branding with the Hogwarts crest. Put your wand on the box (you don’t get one with the phone), incant “Accio,” and… yeah, it does nothing.
Advertisement
You need to pull out the case, which is in a matching brown color. And that’s when you start getting to a number of other fun goodies thrown in for Harry Potter fans.
Moving to the right side, there’s another rectangular cardboard holder with the Sorting Hat logo on top of it. Inside, you get the Hogwarts letter, Platform Nine and Three-Quarters train ticket, bookmarks of each house and four postcards.
The letter carries a wax-like stamp on the back, while the bookmarks come with a holder, where you can place your favorite house’s emblem. I added the Hufflepuff badge to it, and it’s now my favorite bookmark.
Move the rectangular holder out of the way and you’re greeted with the phone itself. But before reaching the device, I must tell you, Realme has also color-coded the charger and wire to match the theme. This is worth a mention because several phone collaborations limit the theme to the device and collectibles, leaving the phone accessories plain white. But that’s not the case here and I appreciate it.
Advertisement
A customized Harry Potter-styled phone
Prakhar Khanna/CNET
With a simple swish and flick, wizards and witches can use the Wingardium Leviosa spell and the phone levitates out of the box. However, Muggles will need to pick it up like any other device. The phone itself continues the theme with gold accents on the dark brown design. There are plenty of hidden Harry Potter references that are delightful to uncover.
Starting with the camera module, it has two prominent camera rings with a little golden diamond between them. Look closely, and you’ll find they resemble Hedwig’s eyes and nose. The camera module’s gold-colored deco looks great against the brown rear panel, which has a leather-like texture. It feels nice in the hand.
The rear panel also has a diamond pattern, which, according to Realme, is inspired by wizard’s chess from the books and movies. It imprints the four-house crest along with the “Draco Dormiens Nunquam Titillandus” motto and the Harry Potter and Realme logos, which are inscribed underneath.
Put it under the sun and you’ll see the crest light up in the house-specific colors. Realme calls it the Quadra Light-Sensing Color-changing Tech, which lights up specific areas when you shine a UV light over it. Also (I almost missed this), the right side of the phone has “Welcome to Hogwarts” engraved into it.
The Harry Potter UI is mesmerizing.
Realme has customized the Google app icons as well.
The references don’t end here. Realme’s Harry Potter-fication runs deeper. When you power on the phone, there’s a Harry Potter boot animation and a custom letter wax fingerprint animation.
Then you’re greeted with a Hogwarts-specific UI, with the castle on the wallpaper and more than 30 custom icons. For example, the Phone app is a red telephone booth, whereas the Notes app is a quill. Even the Google apps’ icons are customized to match the theme.
Advertisement
What about the specifications?
It has a big battery, bright display and a lot to like.Prakhar Khanna/CNET
I haven’t used the Realme 16 Pro 5G Harry Potter Edition as my full-time phone yet, but it packs impressive specifications. You get a 6.78-inch AMOLED screen with a 1.5K resolution and a 144Hz refresh rate. It boasts up to 6,000 nits in peak brightness. While I haven’t tested it, the screen was easily legible under direct sunlight.
This special-edition Realme phone is powered by the MediaTek Dimensity 7300-Max chip, paired with 12GB of RAM and 256GB of onboard storage.
You get a 200-megapixel primary camera, accompanied by an 8-megapixel ultrawide-angle sensor with a 112-degree field of view. On the front is a 50-megapixel selfie shooter. To top it off, the phone packs a 7,000-mAh battery with support for 80-watt fast charging. It runs a customized version of Realme UI 7.0 based on Android 16. It is limited to 5,000 units and is priced at INR 62,999 (~$655) in India. Harry Potter fans in the US won’t be able to buy this one, but Google’s Pixel phones recently received Harry Potter theme packs that add their own magical customizations.
I might use it full time because of how cool it looks.Prakhar Khanna/CNET
It is 2026. It’s only fair for Hogwarts to finally adopt smartphones in addition to using Floo Powder to communicate. The Realme 16 Pro 5G Harry Potter Edition feels quite special as a fan of the books and movies. It is evident that the two companies have put a lot of thought into this collaboration.
Realme effortlessly put me back into the realm of the Wizarding World. From the trunk case and its unboxing experience, down to the customized software, I loved every bit of it. Then came the hidden references and collectible items. I have a strong Harry Potter bias, but this is my favorite limited edition phone of all time. It is Riddikulus-ly cool.
Prakhar Khanna is a Writer at CNET with bylines in ZDNET, Forbes, and other major outlets. A digital nomad at heart, he thrives in chaos–mixing deadlines with travel, often writing stories on planes, trains, and cafe tables while hunting down the best pizza spots wherever he lands. His backpack usually carries one phone too many, and his playlists are stacked with 2000s Bollywood. Find him across social media @ParkyPrakhar.
Contact: parkydoesstuff(at)gmail(dot)com
See full bio
IEEE TryEngineering is dedicated to inspiring intellectual curiosity in children.
The technologies shaping our world, including in the realms of artificial intelligence, electric vehicles, and ocean exploration, are evolving rapidly. Helping young learners understand the concepts is essential to preparing the next generation of problem-solvers, creators, and engineers.
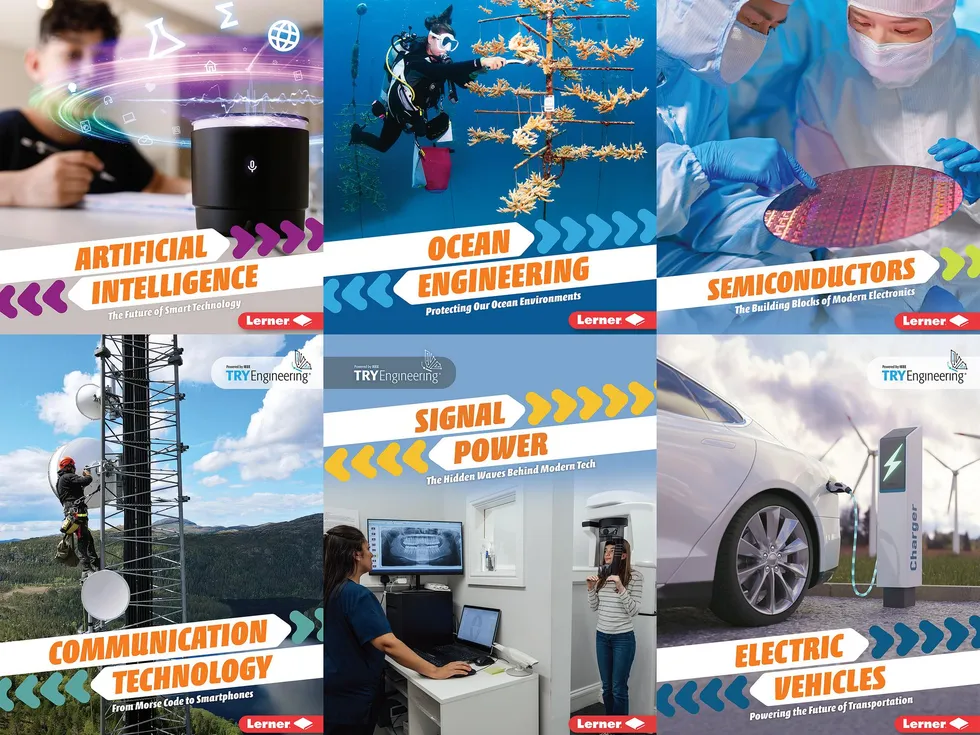
The series, Tomorrow’s Technology With TryEngineering, Powered by IEEE, makes complex topics more approachable and engaging, with each book combining age-appropriate explanations, real-world examples, and design challenges that encourage curiosity and critical thinking. The series is based on ebooks and videos available at tryengineering.org.
Whether used in the classroom, a library, or at home, the books can help pupils connect STEM concepts to the technologies they encounter every day, including computers and smartphones.
Communication Technology: From Morse Code to Smartphones teaches readers about smoke signals, semaphore towers, telephones, and wireless networks. The pupils can gain an understanding of how engineers are changing communications technology through innovations such as 6G and space-based networks. The book highlights career opportunities in the aerospace and telecommunications fields.
Electric Vehicles: Powering the Future of Transportation covers how e-cars, e-bikes, e-scooters, and electrified trains are transforming the way people travel. Readers can discover how hybrid and fully electric vehicles operate and how the batteries that power them work. They also can learn about the roles engineers play in developing smarter transit systems.
Ocean Engineering: Protecting Our Ocean Environments highlights the vital ecosystem role played by the world’s oceans, which require careful stewardship. play in our ecosystem. Readers can learn how engineers study the underwater world using submersibles and floats, how they address pollution, and how they protect marine environments.
Semiconductors: The Building Blocks of Modern Electronics focuses on the technology behind nearly every electronic tool we use. Microchips power smartphones, computers, and countless other products, all thanks to semiconductors. Readers can learn about insulators and conductors, how microchips are manufactured, and why semiconductor engineering is a fertile field for innovation.
Advertisement
Signal Power: The Hidden Waves Behind Modern Tech explores how engineers analyze and manipulate signals to make technologies work more effectively. Whether it is a phone call reaching the correct person despite background noise or a medical device monitoring a patient, signal processing plays crucial roles in modern life. The book introduces different wave types, the signal processing workflow, and careers in the field.
The book series can help children understand the technologies shaping the world around them while encouraging them to think like engineers and innovators. By connecting STEM concepts to real-world applications, the series can make learning more meaningful and engaging.
The Tomorrow’s Technology With TryEngineering series is available through Amazon, Bookshop, and Lerner. More about the collection may be found here.
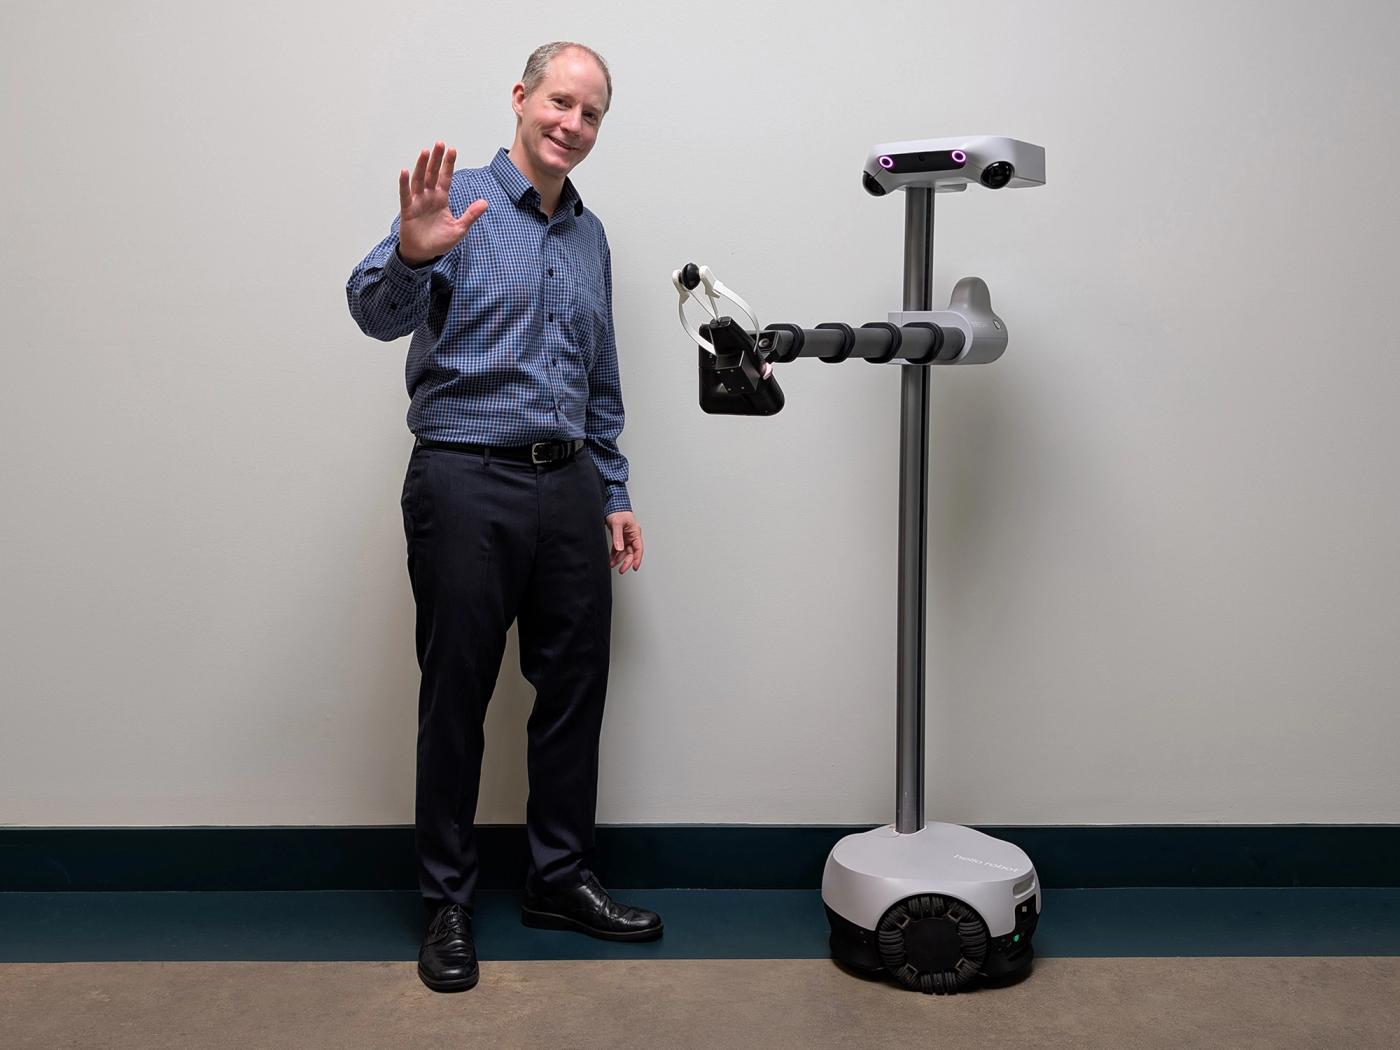
In this edition of our A Day in the Life of a Roboticist series, we meet Charlie Kemp, cofounder and chief technology officer of Hello Robot, who develops mobile manipulators to help people in their homes and workplaces. His interest in robotics began with the grand challenges of artificial intelligence, and his work has taken him from humanoid robots at MIT to assistive robots for older adults and people with disabilities. “Working at Hello Robot is a rewarding experience,” he says. “I love the community using Stretch robots as research and development platforms. They’re discovering new ways that human-friendly robots can benefit society.”
Charlie Kemp, cofounder and CTO of Hello Robot, develops assistive robots for homes and workplaces.Photo: Hello Robot
My focus is on enabling mobile robots with arms to benefit people in homes and workplaces. Many promising applications for robots involve close physical interaction between people and robots, such as robots that physically assist older adults and people with disabilities.
Working at Hello Robot is a rewarding experience. I love the community using Stretch robots as research and development platforms. They’re discovering new ways that human-friendly robots can benefit society. I also love Hello Robot’s collaborative efforts to create assistive robots for older adults and people with severe mobility impairments. Finding human assistance is becoming more difficult due in part to aging societies. Robots have the potential to improve quality of life and empower people to have greater independence.
What does a day working with robots look like for you?#
Some of the best days are focused on the people using the robot rather than the robot itself. Keith, Henry and Jane Evans, and hundreds of people who have worked with robots from Hello Robot and my academic lab have changed my perspective on robotics and life in general. What is actually important in people’s lives? Sometimes, scratching an itch or picking up a dropped object is what’s important. What are the real challenges for creating a useful and easy-to-use robot? Sometimes, autonomy isn’t the answer, because the individual wants more control. The answers to these questions aren’t found by sitting in a room by yourself programming a robot. You have to get out into the world with an open mind. It’s where you discover what works, what doesn’t, and what you didn’t anticipate. Real-world interactions almost always reveal new opportunities for improvement, and those lessons shape the way you think and the robots you build.
Robotics initially attracted me as an approach to tackling the grand challenges of artificial intelligence. I became interested in AI as an undergraduate at MIT. Prof. Rod Brooks had just started the Cog project, a highly ambitious and exciting research effort to use humanoid robots to investigate embodied intelligence. I was hooked! I eventually joined Rod Brooks’s lab and worked on the humanoid robot Domo with my cofounder Dr. Aaron Edsinger. Aaron and I won the best paper award at the IEEE-RAS International Conference on Humanoid Robotics in 2006. The paper was about a system that enabled Domo to help a person put objects on a shelf. This led to my interest in assistive robotics and helped me get a faculty position at Georgia Tech. Now, Aaron and I lead Hello Robot, which we founded together to create non-humanoid robots. I never would have predicted this chain of events.
Advertisement
What are your favorite things about working with robots?#
One of the most rewarding aspects of robotics is seeing software come to life in the physical world. There’s a unique satisfaction in writing code that leads to a robot doing something new. The field is still young, so you can see glimpses of the future. More importantly, you have the opportunity to influence the future. I used to imagine there was an inevitable path for technological progress, but I’ve come to realize that many futures are possible. It’s worth working toward the future you want. If you don’t create the future, someone will create it for you.
What advice would you give someone hoping to start a career in robotics?#
There are two things I’d emphasize. First, it’s easy to watch videos of robots online and feel like robotics has been solved. But the truth is that there is a vast difference between a demo video and a robot being productive in the real world. The world is more creative than we are. It’s extraordinarily good at breaking robotic systems in ways that surprise roboticists. There is still an enormous amount to build, learn, and discover. For anyone starting a career in robotics, this is not a moment to feel behind. It is a great time to begin.
Second, you don’t have to focus on robotics technology to work in robotics. The most impactful applications of future robots will likely depend on robotics technologists working together with people with expertise in specific application areas. For example, Dr. Vy Nguyễn is the clinical research lead at Hello Robot. She started in robotics while earning her doctorate in occupational therapy. Her expertise in occupational therapy has helped her make important contributions to Hello Robot’s work on assistive robots.
What is one favorite robot project you’ve worked on?#
I’ve been fortunate to work on a variety of exciting robotics projects with teams of remarkable people. It’s hard to pick one, but Robots for Humanity stands out.
Advertisement
Back in 2010, Henry Evans saw a demonstration of my academic lab’s research on CNN. This led to a collaboration that continues to this day as part of Henry’s Robots for Humanity effort. Henry has severe quadriplegia, and he and Jane Evans are inspirational pioneers in assistive robotics. In collaboration with Henry, Jane, and others, my former lab at Georgia Tech (the Healthcare Robotics Lab) made progress toward mobile robots with arms (mobile manipulators) that can meaningfully benefit people with disabilities in their daily lives.
Creating a home robot for Henry and Jane was the main inspiration for the prototype robot my lab created that led Aaron and me to found Hello Robot. And the research my lab conducted as part of Robots for Humanity continues to influence Hello Robot’s work on an assistive home robot. Henry and Jane have used each generation of Stretch, which has influenced the subsequent designs, especially Stretch 4.
Describe something about robots that surprised you.#
Robotics is full of surprises! It’s fun and humbling. My academic lab focused on physical robotic assistance for tasks such as feeding, hygiene, and dressing. At Hello Robot, I’ve been surprised by the ways physical robotic assistance can help people connect emotionally.
For example, Henry Evans used Stretch to present a rose to Jane. Picking up the rose and handing it to Jane involved relatively simple robotic motions, but the result was an emotionally powerful gesture.
To install an eSIM on an iPhone, first identify how your carrier or eSIM provider supplied the plan, then use the matching setup method. Depending on the carrier, that may be a QR code, a transfer from another iPhone, automatic Carrier Activation, an activation link or app, or manual eSIM details.
You do not need to try those methods in order. They are alternative ways to install the same type of digital carrier profile, and the correct route depends on what your carrier supports.
Menu names vary by language and region. This guide uses Cellular; your iPhone may display Mobile Service or Mobile Data instead. Likewise, Add Cellular Plan may appear as Add Mobile Plan.
Before You Install an eSIM
An eSIM is a digital SIM built into the iPhone rather than a removable card. If you are deciding between SIM formats rather than trying to install one, eSIM and physical SIM differ most noticeably when you switch phones or carriers. For installation, the more important question is whether your iPhone and carrier support the eSIM you want to activate.
Advertisement
Prerequisites
Use an eSIM-compatible iPhone. Apple currently lists iPhone XS, iPhone XS Max, iPhone XR, and later as supporting eSIM, with regional exceptions for some models.
Have an active plan from a carrier or worldwide service provider that supports eSIM.
Connect the new iPhone to Wi-Fi or a hotspot. Apple notes that some eSIM-only iPhone models can activate without Wi-Fi in certain countries and regions.
Update to the latest iOS version your iPhone supports under Settings > General > Software Update. Quick Transfer has additional software requirements, listed below.
Keep the activation material your carrier supplied, such as a QR code, activation link, carrier app instructions, or manual eSIM information.
These requirements are covered in Apple’s current eSIM setup requirements. Regional hardware matters: Apple documents different eSIM availability for some iPhone models sold in China mainland, Hong Kong, and Macao, so check your exact model and region rather than relying only on the iPhone family name.
Use only the exact values supplied by the provider.
Install an eSIM With a QR Code
Use this method when your carrier or eSIM provider gives you a QR code. The code contains the information needed to retrieve or configure that plan, so use the code supplied for your specific eSIM.
QR code on another screen or on paper
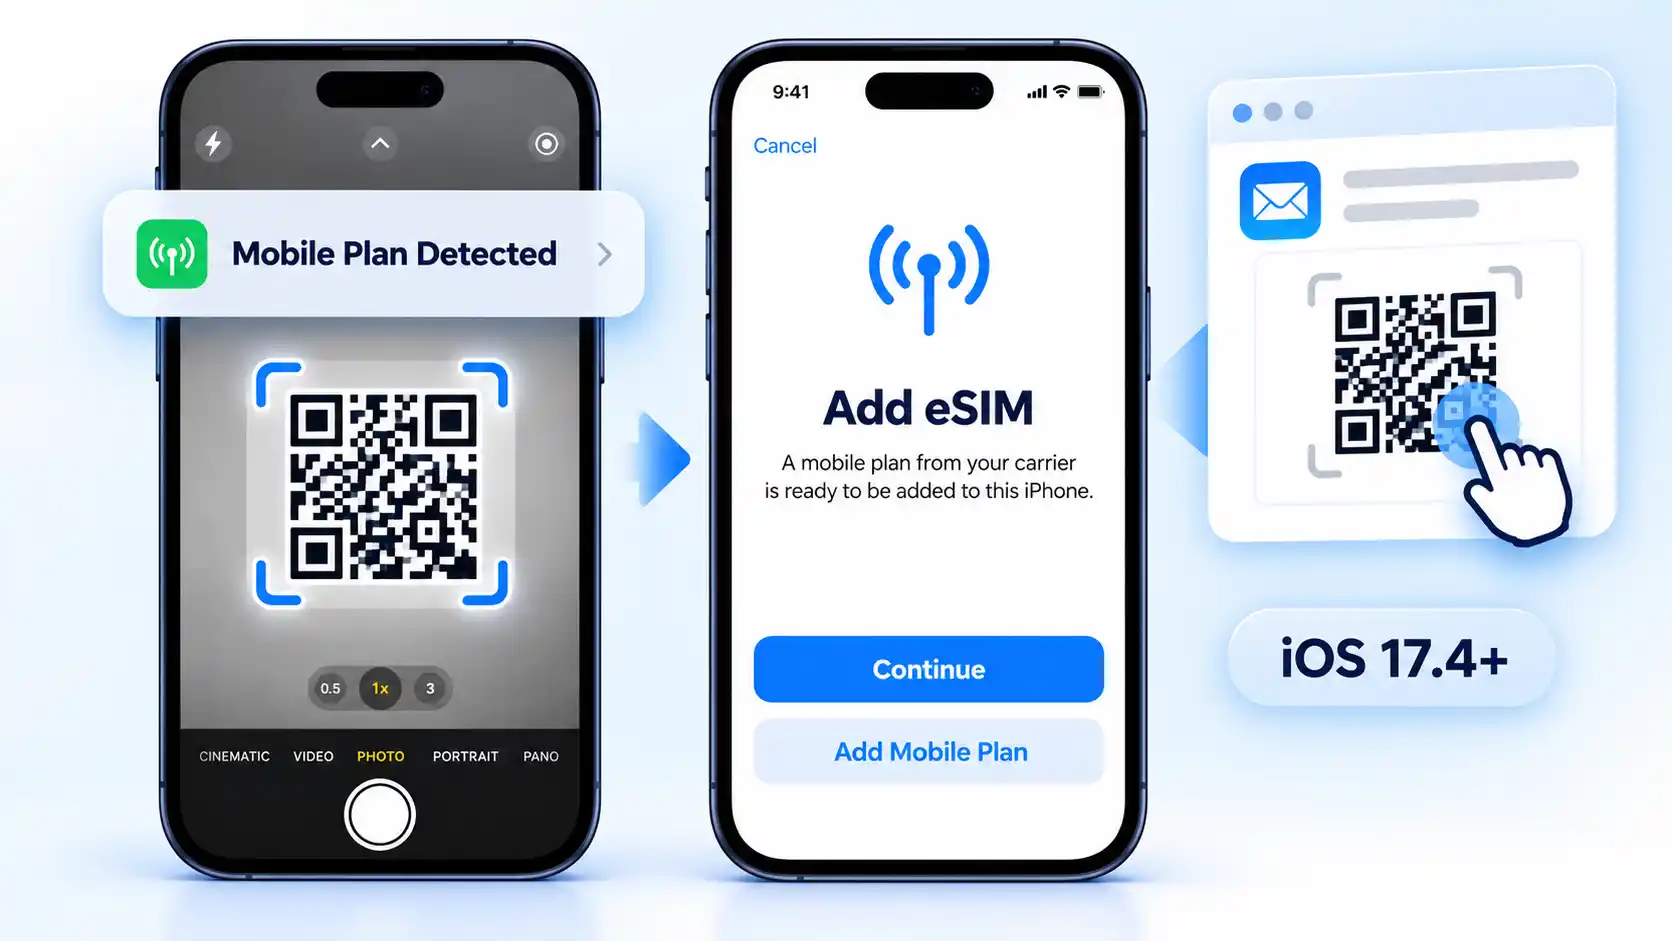
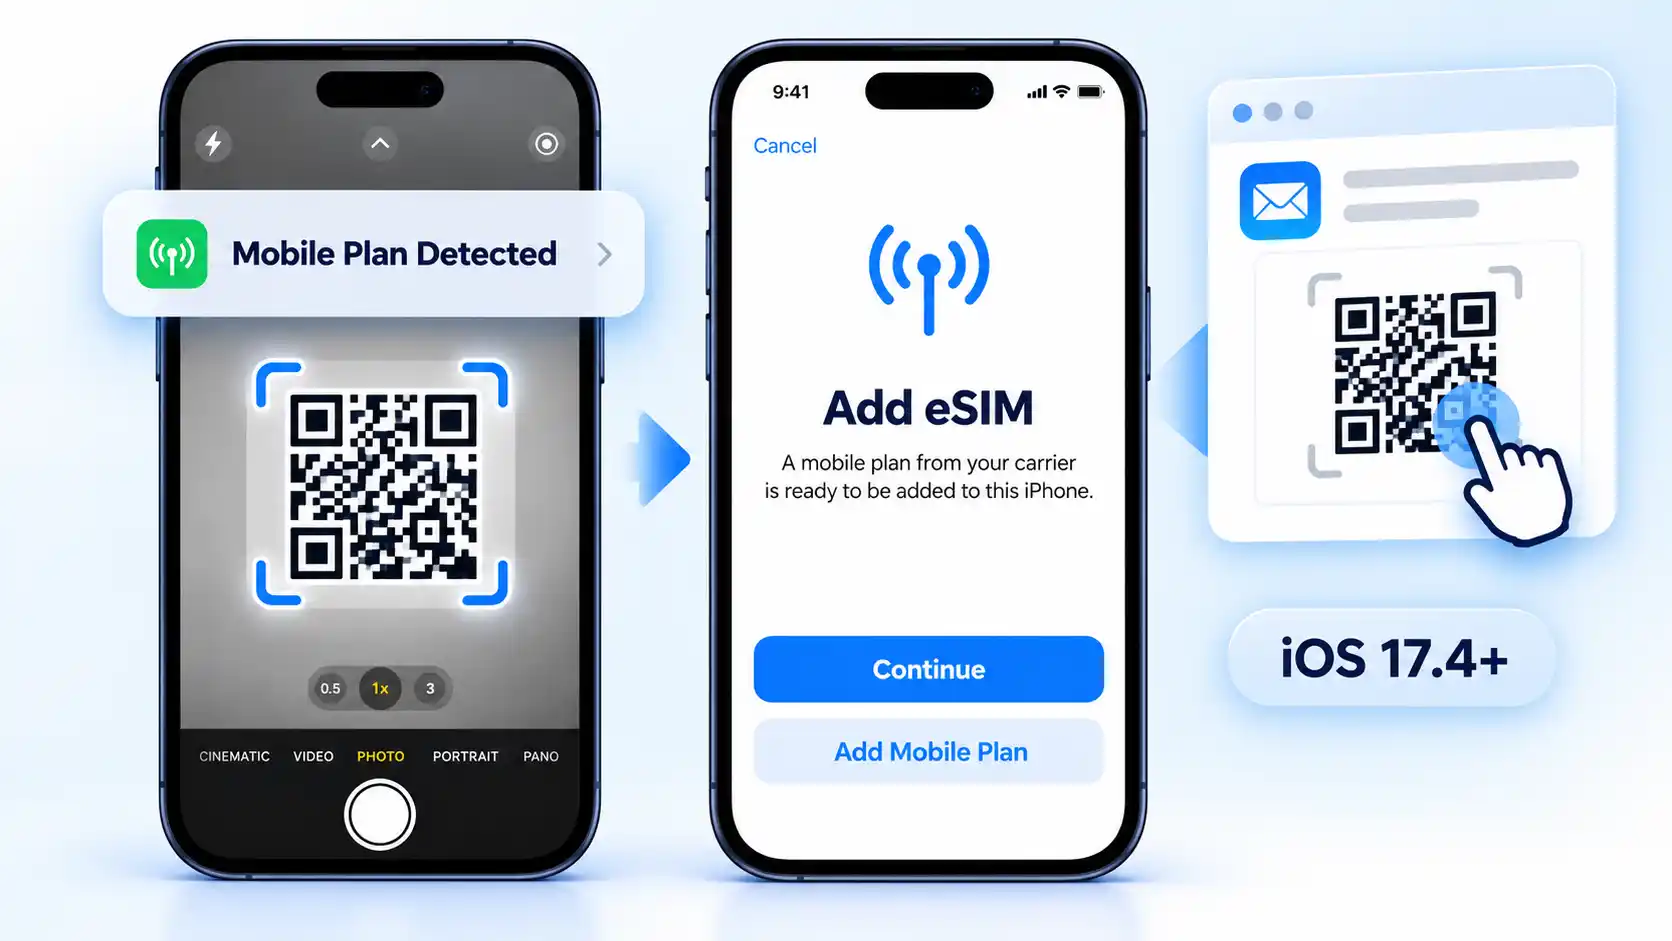
Display the carrier-issued code on a computer, tablet, or another phone, or use a printed copy. Open the iPhone’s Camera app and scan it, then tap Cellular Plan Detected (or Mobile Plan Detected).
Advertisement
QR code on the same iPhone
On iOS 17.4 or later, if the carrier’s code is displayed in the default email app or browser, touch and hold it and tap Add eSIM. Use this instead of trying to scan the same screen with the camera. If that option is unavailable, display the code on another screen or ask the provider for a supported activation method.
Finish either QR route
Confirm the detected plan. Tap Continue, then Add Cellular Plan or Add Mobile Plan, as shown on your iPhone.
Enter a confirmation code if requested. Use the code supplied by your carrier. Do not guess one.
Complete the onscreen prompts. Wait for activation to finish, then check the new line using the verification steps below.
If you are still going through initial iPhone setup, the route is different: when Set Up Cellular or Set Up Mobile appears, tap Use QR code and complete the onscreen activation instructions. Both QR routes are documented in Apple’s current QR-code activation procedure.
Transfer an eSIM From Another iPhone
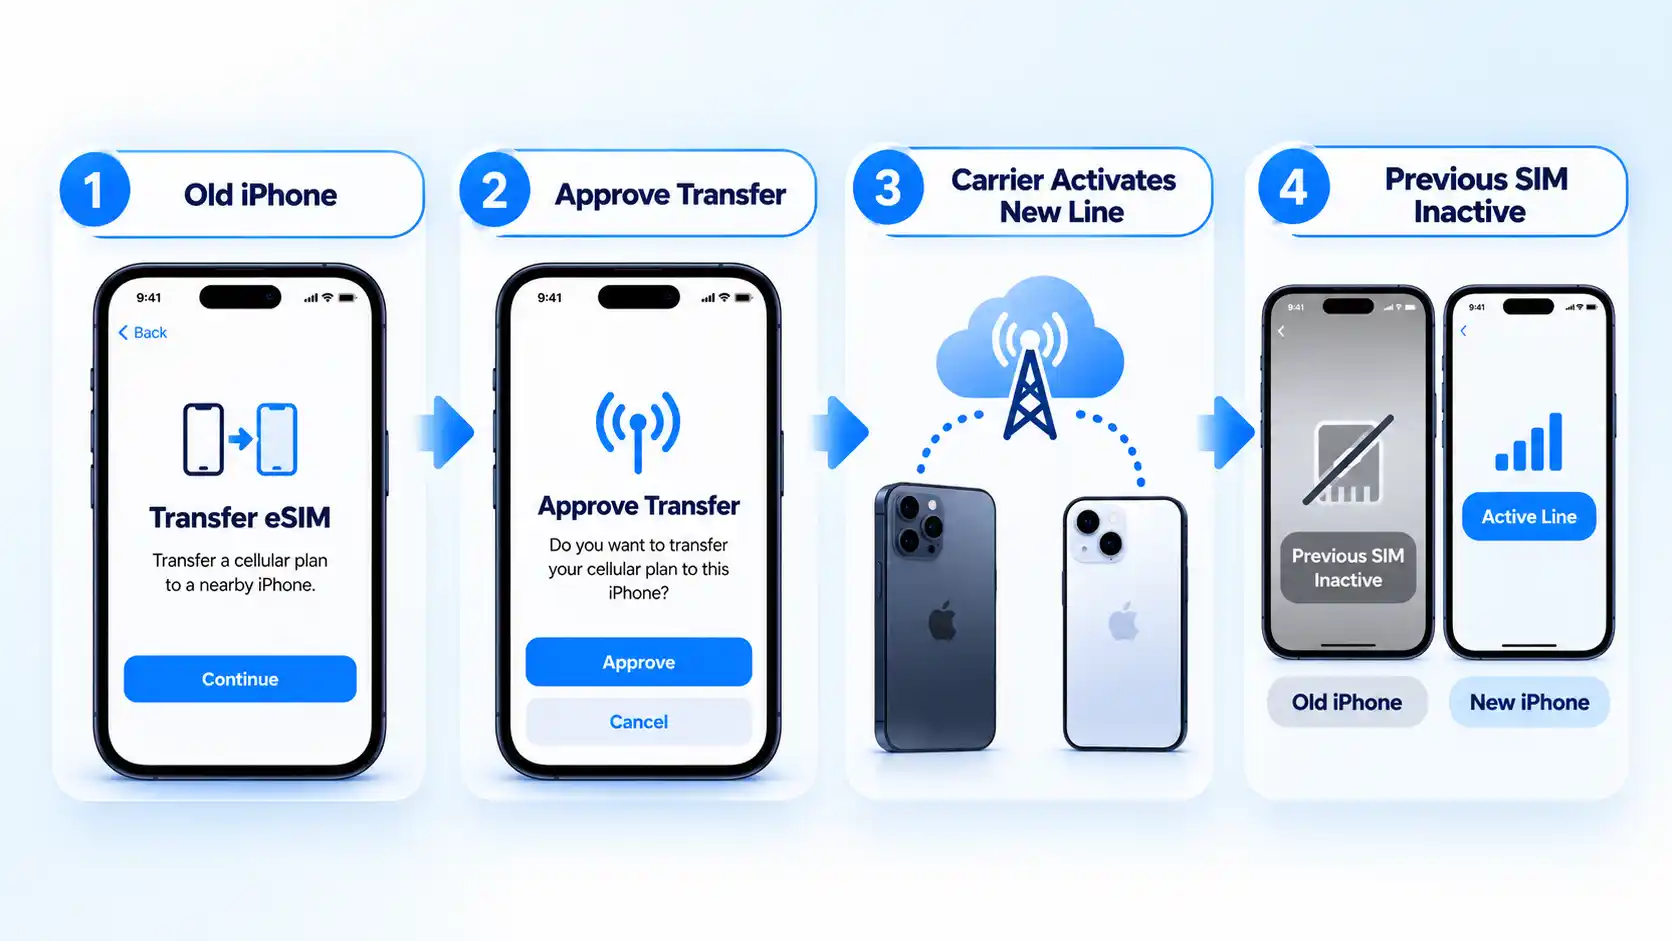
Use eSIM Quick Transfer when the number is already on your previous iPhone and your carrier supports Apple’s device-to-device transfer. Instead of installing a newly issued QR code, you authorize the existing line to move to the new iPhone.
Before starting, sign in to both iPhones with the same Apple Account, unlock the previous iPhone, keep the phones nearby, and turn on Bluetooth. Apple’s current Quick Transfer procedure requires iOS 18.4 or later on both devices.
Open the cellular settings on the new iPhone. Go to Settings > Cellular.
Start adding the line. Tap Set Up Cellular or Add eSIM.
Choose the number to transfer. Select a mobile plan offered from the other iPhone. If no numbers appear, tap Transfer From Nearby iPhone.
Approve the transfer on the old iPhone. Follow the instructions there and tap Transfer. If the old iPhone asks for a verification code, enter the code displayed on the new iPhone.
Wait for the new line to activate. Do not treat the transfer as complete merely because it has started. When the mobile plan activates on the new iPhone, the previous SIM for that line becomes inactive.
Complete a carrier handoff if one appears. If the new iPhone displays Finish Setting Up Your Network Provider’s Mobile Plan, tap the banner. Apple says this redirects you to the carrier’s webpage to finish the eSIM transfer.
Quick Transfer can also appear while you are setting up a new iPhone. In that case, use the transfer option presented during setup instead of starting another transfer in Settings. With iOS 26 or later, Apple says supported transfers can include more than one phone number.
Install a Carrier-Assigned eSIM
Carrier Activation applies when your carrier digitally assigns an eSIM to the iPhone. If the carrier sends the plan after your iPhone has already been set up, a notification tells you that the mobile plan is ready to install; you do not need to obtain a QR code as a second method.
Advertisement
Open the carrier-plan notification. When Network Provider Mobile Plan Ready to Be Installed (or Carrier Cellular Plan Ready to Be Installed) appears, tap it.
Open the assigned plan in Settings. Open Settings and tap Network Provider Mobile Plan Ready to Be Installed (or Carrier Cellular Plan Ready to Be Installed).
Install the plan. Tap Continue at the bottom of the screen and wait for activation to finish.
Test the connection. If the plan includes voice service, make a call using the new line to check mobile connectivity. For a data-only plan, use the data test below instead. Contact the carrier if the included service does not work.
Remove a replaced physical SIM only when instructed by the situation. If the newly activated eSIM replaces the plan on a physical SIM, remove that physical SIM and restart the iPhone. Do not remove an unrelated physical SIM that you intend to keep as another line.
If the carrier assigned the eSIM when you bought the iPhone, activation can instead happen during initial device setup. Turn on the iPhone and use the carrier activation presented there. Apple’s Carrier Activation procedure distinguishes this carrier-assigned workflow from QR-code and Quick Transfer setup.
Install an eSIM With a Carrier Link
Use this route if your carrier supplied an activation link. Apple supports this method on iOS 17.4 or later.
Open the carrier link. Tap the activation link on the iPhone where you want to install the plan.
Allow the new eSIM. When Activate New eSIM appears, tap Allow.
Finish activation. Tap Continue and complete the onscreen prompts, then verify the new line below.
Install Through Your Carrier’s App
If your carrier supports app-based activation, download its official app from the App Store and follow its activation instructions. The controls and account requirements are carrier-specific. Some carriers also support moving an existing number through their app.
Enter eSIM Details Manually
Use manual entry when the provider supplies activation information for this purpose. Do not guess server addresses or activation codes.
Open cellular settings. Go to Settings > Cellular.
Start adding the plan. Open the add-plan option shown on your device, such as Add eSIM or Add Cellular Plan. If prompted to choose a method, select Use QR Code.
Choose manual entry. Tap Enter Details Manually at the bottom of the activation screen.
Enter the provider’s values. Copy the supplied activation information into the matching fields. Enter a confirmation code only if your provider supplied one and it is requested. Ask the provider if a required value is missing.
Finish the setup. Follow the onscreen prompts to install the plan, then verify its service below.
Apple documents carrier links, apps, and manual entry in its alternative eSIM activation methods. If your device presents a different screen, use the provider’s instructions for your iPhone and iOS version.
Moving an eSIM From Android or Another Phone
If you are moving a number from a non-Apple device, contact your carrier for the supported transfer route. Apple says carriers can use Carrier Activation or issue a QR code. With iOS 26 or later, some participating carriers and smartphone manufacturers also support direct Android-to-iPhone transfers; check Apple’s cross-platform transfer requirements before attempting that route.
Verify the eSIM Is Working
Installation and working service are not quite the same thing. A new line can appear on the iPhone while activation or network connectivity still needs checking, so verify the service before relying on it.
Advertisement
Verify the result
Open Settings > Cellular, tap the new line, and confirm that Turn On This Line is enabled. An installed profile alone does not prove that its included service works.
Open Control Center and check that the expected carrier appears in the status area.
For a plan that includes voice service, open the Phone app and enter a number in the keypad. If you have two lines, tap the line shown near the top and select the new eSIM before placing the test call.
For a data plan, go to Settings > Cellular > Cellular Data (or Mobile Data) and select the new eSIM. If available, temporarily turn off Allow Cellular Data Switching on that screen. Then go to Settings > Wi-Fi and turn Wi-Fi off. With no voice call in progress, open a new web page in Safari to check that data works on the selected line.
After the test, turn Wi-Fi back on and restore your preferred data line and switching setting. Apple explains how to select the data line and switch numbers for calls. Turning data switching off can affect data availability during calls on the other line.
For a travel eSIM, follow the provider’s instructions on when to install or activate the plan and whether to enable Data Roaming on that line. Do not assume every travel plan has the same settings or validity start time.
Test only services that the plan actually includes. A data-only eSIM, for example, should not be judged by whether it can make a conventional carrier voice call. Apple’s iPhone guide likewise says you can verify activation by checking that the new eSIM line is turned on.
If the eSIM Won’t Install or Activate
If the correct installation method fails, avoid changing several settings at once. Check one condition, see whether the carrier appears, and move to the next step only if the problem remains. Before troubleshooting, confirm the plan is active, the iPhone has the latest iOS version it supports, and you have the internet connection required for activation. Apple’s current troubleshooting guidance then checks the connection after each action before escalating to the carrier.
The carrier does not appear after eSIM setup
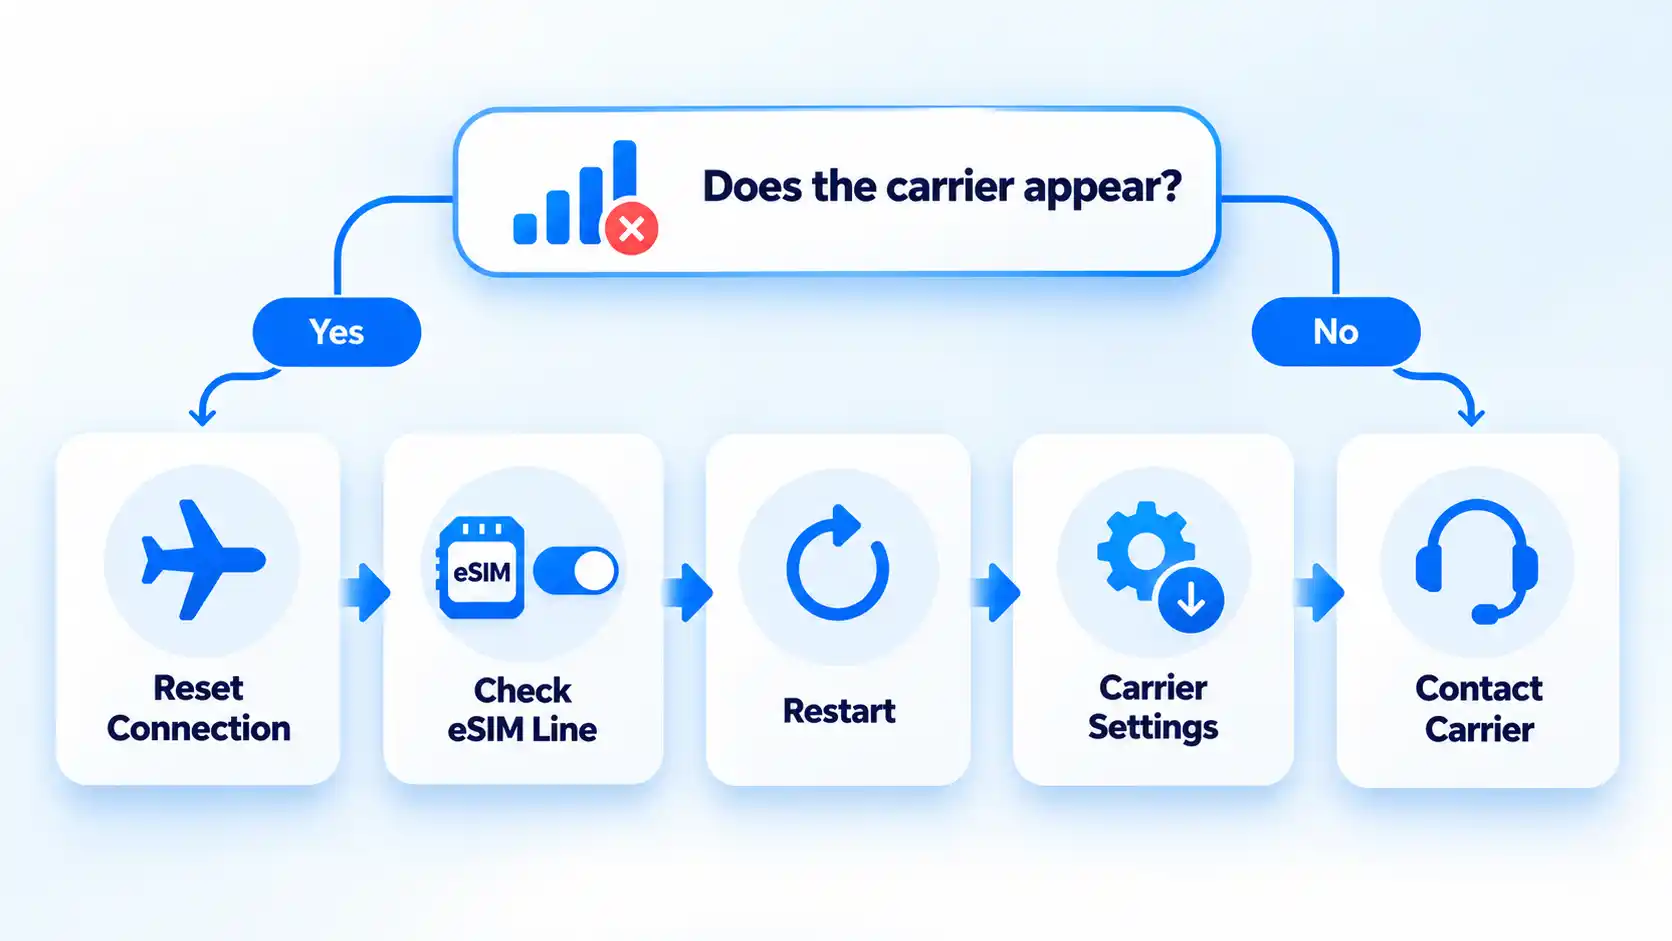
Open Control Center and check the status area. If the carrier is absent, turn Airplane Mode on and then off. Check again before moving to another troubleshooting step. Apple uses the carrier appearing in the status area as the observable check during its eSIM troubleshooting sequence.
Advertisement
The eSIM line appears in Settings but will not connect
Open Settings > Cellular. If the number you are trying to activate appears, turn that line off and then back on. Recheck the carrier status afterward.
Airplane Mode and the line toggle did not fix it
Restart the iPhone, then check again. If the device runs iOS 18 or later, Apple also says the current Apple Support app can run additional diagnostics that may help identify the source of the problem.
The eSIM is still not activating after a restart
Go to Settings > General > About and scroll to the eSIM section. The carrier name and version number appear there. Tap the version number; if an update is available, choose OK or Update, then check the connection again.
The eSIM still fails after the device checks
Contact the carrier that issued the eSIM. Before contacting support, note the exact error message and collect your phone number, carrier account password or PIN, and the iPhone’s IMEI or EID. IMEI identifies the phone on mobile networks; EID is the identifier associated with its embedded SIM. You can find both under Settings > General > About. Apple recommends gathering these details before escalating an eSIM setup failure to the carrier.
Advertisement
The installation is complete when the intended eSIM appears as an enabled line and the cellular service included with that plan works without Wi-Fi or another active line masking the result.

















































You must be logged in to post a comment Login