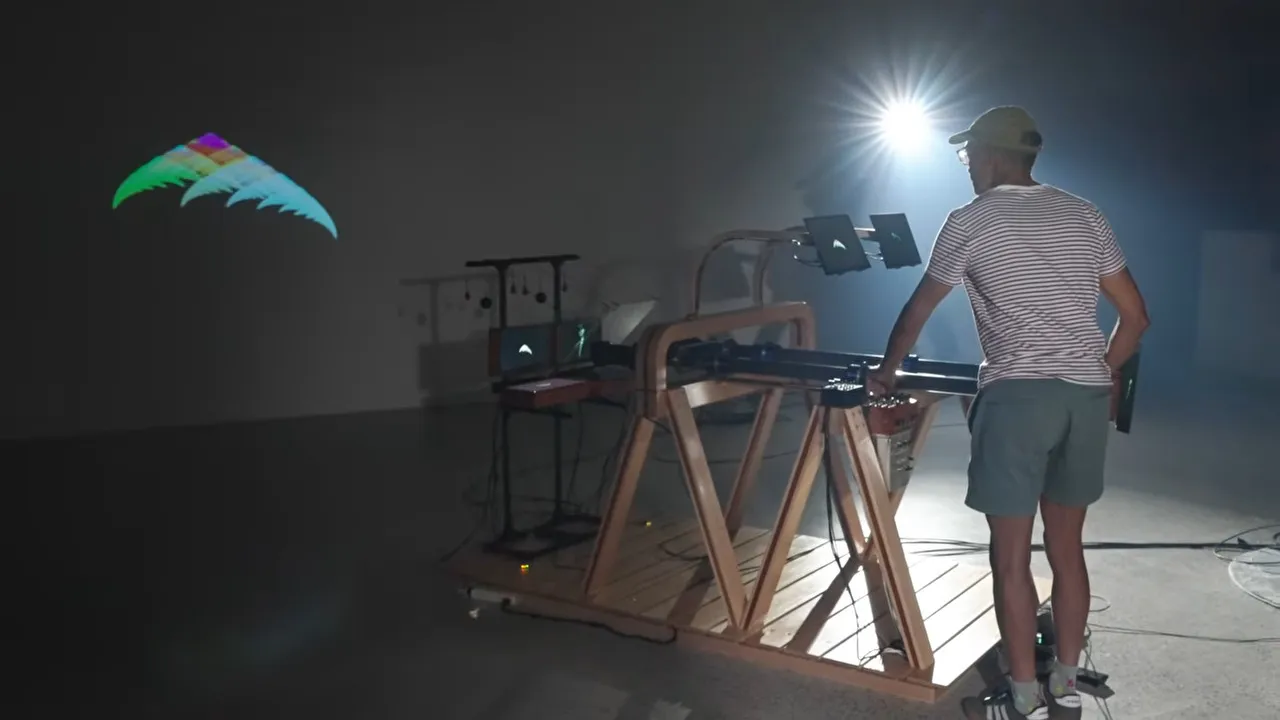
For users of a certain age, fractal patterns and computers are nearly synonymous. Typing in BASIC programs and seeing the Mandelbrot set or other fractals slowly render on screen is a key memory for some of us. Others will have generated recursive patterns mucking about: point an analog camera at the screen showing its video feed, and you’d better believe you get recursion. It’s called video feedback, and it looks a lot better than audio feedback sounds, especially in the hands of a master like [The Light Herder] who has now found a way to take this vintage art into the 4K resolution of the 21st century.
Physically this build is very similar to the “God Machine II” sculpture we covered previously, which in turn built on the first 720p version of his art piece. Getting analog video feedback in HD was hard enough — you need to be able to adjust the hue, saturation, brightness and contrast of the monitor as you go in order to have the full control of the resulting image. Most old TVs had those back in the SD era, but once HD came around it was rare; [The Light Herder] despaired of ever finding a screen that would to this in 4K.
As it turns out, the answer was to embrace digital — all the knobs on his analog control board feed into a Teensy, which is communicating via RS-232 with the LCD driver boards to alter the desired display properties. Obviously judicious selection of driver boards was required. If you watch the build video embedded below, you’ll find there’s an awful lot of tech in this analog, ‘no computer’ setup. If you want to skip the how-to and a master’s explanation of video feedback and just see pretty pictures he’s got a demo video as well. It really has to be seen to be believed.
Advertisement
If you want to create a colorful analog light show that isn’t quite so self-referential and a lot simpler to build, you could always try soap. Actually, we’d love to see him start the feedback with some soap-film colors. The result would likely be as was once said “totally far out, man”.
Visa’s open-source security harness now finds the vulnerability, writes the fix, and turns an adversarial panel on its own patch before any human reviews it. The whole loop ships on by default. A plain scan of the Visa Vulnerability Agentic Harness runs all 11 stages and edits source files in the target repo unless the operator caps it at detection.
The announcement Thursday pairs the release with an expansion of the Visa Consulting & Analytics advisory practice. Visa is shipping that default 18 days after Tenet Security demonstrated GhostJacking on the DEF CON 34 main stage, an attack chain in which an agent read an attacker’s payload out of a log file and rewrote DNS with a valid credential. Two days earlier, Steve Wilson, Chief AI and Product Officer at Exabeam and project co-lead for the OWASP Top 10 for LLM Applications, made the case in VentureBeat for the opposite default. “The first thing I’d do is put an authorization gate outside the model,” Wilson said in written responses. “The agent can propose the exact DNS change, but it cannot grant itself the authority to make it.”
The bottleneck moved, so Visa moved the pipeline
Rajat Taneja, Visa’s president of technology, rejects the premise that the default is a risk decision and calls it the product. “The bottleneck has moved,” Taneja told VentureBeat in an exclusive interview. “AI is finding vulnerabilities faster than humans can in the history of our technology industry. The new bottleneck is fixing and proving we have fixed things.”
VVAH grew out of Visa’s participation in Anthropic’s Project Glasswing, where the company aimed Claude Mythos at the network behind billions of daily transactions and watched the model chain minor weaknesses into working exploits, a hunt VentureBeat covered in July. “VVAH initially was completely only using Mythos, and that’s when all of us, as part of Project Glasswing, realized the power of this new class of models that does semantic reasoning,” Taneja said.
Advertisement
The harness went to GitHub in June and has climbed from 595 stars and 97 forks on July 20 to more than 2,300 stars and 300 forks as of August 25, with a clone-to-visitor ratio Taneja put near 9%. “We have got some very high-profile companies that have started using this harness,” he said.
Why give it away? Taneja’s answer starts with Visa’s technology DNA and a harness built “to protect Visa and our ecosystem.” The reason he leaned on hardest was obligation, “to do good by doing right” for “companies who may not have the same level of investments or knowledge in cybersecurity.”
Contribution runs one way. The repo states it is not currently accepting external code contributions, so the harness that edits adopters’ source takes no code into its own.
Thursday’s release extends the pipeline past the report. “We’re going from discover, verify, and report, and then fix it, to discover it, verify it, remediate it, validate it, and iterate it,” Taneja said. “If a fix doesn’t negate the exploit, then there should be a structured, automated feedback that preserves the learnings from the first run and then enhances it.” Underneath that loop, the release refactors scanning around an abstract syntax tree call graph that maps subroutine calls and the traversal paths an attacker could reach. Taneja argued the change cuts token counts while delivering “better reasoning, context, and better exploitability analysis.” On top sits MTTA observability across the stages, what he called a window pane, plus real-time progress views. “A pretty good step function,” he said of the release.
Advertisement
One metric, three definitions
Mean Time to Adapt, the metric Visa invented alongside the harness, gets a shorter definition in this release. The short form is the time between discovery and resolution of attack paths, with some resolutions, Visa claims, shrinking from weeks to hours. Visa published a wider construction in June, and the Project Glasswing white paper tracks MTTA along three dimensions that include inventory freshness, exploitable paths per release, and validation cycle time. The repo carries a third, elapsed time from AI-discovered exploitability to a validated fix in production. Board slides will quote the shortest interval. Ask for all three, because a resolution count that skips validation is what MTTA was invented to replace.
Taneja ranks MTTA as “the most strategically important metric” because it shifts the focus from scanning to how fast an enterprise adapts. His shorthand is blunter. “It’s not the finding. It’s the fixing that matters,” he said.
The default and the gate
Wilson’s argument went past naming the gate. “We have to remember that security rules written inside prompts may shape the model’s behavior, but they are still suggestions to the model, not enforceable security controls,” he wrote. He also priced the control honestly. “The tradeoff is that the agent loses the ability to improvise arbitrary, high-impact infrastructure changes on its own, while retaining autonomous investigation and routine, bounded remediation,” Wilson said.
The harness ships no approval step between patch and edited file. Where the human sits was the first question VentureBeat put to Visa in writing.
Advertisement
The company’s own June white paper sets the bar. “AI agents are identities” sits among its 12 non-negotiable practices, requiring scoped permissions, least privilege, audit trails, and IAM governance for every agent that modifies a system. VVAH’s shipped default is that agent.
“A lot of the traditional systems that are used today are basically signal providers,” Taneja told VentureBeat. “They are telemetry, and then it’s a lot of human analysis, and your SOC and your security and incident response teams doing a lot of the heavy lifting when they respond,” and that, he said, cannot work at this scale. He pointed to the Hugging Face incident and “other frontier models escaping sandboxes to do things more autonomously” as the preview. “We have seen the trailer of this movie,” Taneja said, and “every company in the world should prepare and rethink their architecture.”
What the harness automates is the adversarial step. Before a fix counts as validated, the panel scores whether the patch negates the exploit, Taneja’s test for done, with failed fixes feeding the next attempt, the iterate step Taneja described. Stage 11 itself runs read-only, per the README, and VVAH does not compile, build, or run tests against the patched tree. Taneja calls that wrapper “the governance architecture on top of that,” and chaining findings into working exploits takes threat modeling and business context, which is why he argued “the harness with a model is far more effective than somebody using the model by itself.”
Visa answers the gate question
VentureBeat put its questions to Visa in writing after the interview, and the answers arrived before publication. On why remediation ships on, the response repeated the bottleneck argument, then narrowed the scope. “VVAH is meant for authorized operators running against code they own, and in a controlled environment,” the company said in written responses.
Advertisement
The approval question drew the most specific answer. “VVAH is a harness, not a merge tool,” Visa wrote. “Stage 10 writes candidate fixes to a working copy of the repo. Stage 11 then runs an adversarial validation panel that scores each fix and returns one of three verdicts: validated, validation failed or needs review. None of these bypasses your normal build, test, and code review flow.” Humans, the company wrote, are “the gate in three places. Before running the tool. When reviewing the patches. And before anything gets merged.” “The final call on any fix stays with the security and engineering teams. In an enterprise, trust and auditability are not optional. The default flow is built around that.”
Set beside Wilson’s standard, the architecture lands close to his line and the sequence does not. Wilson’s gate clears an action before it happens. The default’s human gates open before the run and after the write. The attack is the automated part, and the three human gates sit outside the model, the boundary Wilson drew. “Our goal is to help security teams work at AI speed, not to replace them,” Visa wrote. “VVAH does the repetitive parts. It finds issues, tests whether they are real, and proposes fixes. Before a fix gets to a human, an adversarial validation panel at stage eleven tries to break it. That way the human is spending time on decisions that need judgment, not on triaging noise.”
Client zero got direct confirmation. “VVAH runs against Visa code today,” Visa wrote, and Taneja had volunteered the posture on the call. “We designed this and we were using it for ourselves, and we were client zero,” he said, adding “only when we saw the impact and the positive effect of what we were finding, we said every company would need this.” What adopters value, Visa says, is context. VVAH pulls in CMDB data, threat models, and business risk, and where “most tools stop at findings,” it “tries to answer, ‘which of these should you fix first, given how your business runs.’”
Model choice becomes a per-stage decision
Multi-model orchestration is the other substantive change. “Mythos has a very high recall, but the Opus model has very high precision,” Taneja said. “On stage one I want to use this model. On stage two I want to use this model,” is how Taneja framed the per-stage setup, with newer GPT releases in the ensemble and open-weight models where pricing stings, all through configuration rather than code changes. “The whole is greater than the sum of the parts,” as he put it. The harness was model-agnostic from day one, he added, and the evolution moved that choice into configuration, with prompt tuning and caching shared underneath. One boundary moved. In June, applying a fix required Anthropic backends, and OpenAI-compatible backends ran report-only. The current README extends remediation and validation to OpenAI-compatible and open-weight models through a shared model-agnostic runtime, with no single provider as a hard dependency, and the default routing for both stages stays Anthropic.
Advertisement
That flexibility lands on a market already churning. VentureBeat’s Q2 2026 Pulse research found 59% of enterprises plan to adopt or switch agent security tooling within the year, and 82% still rely on provider-native controls as the primary layer. Visa said Thursday it is contributing VVAH to Nvidia’s Open Secure AI Alliance as a model-agnostic framework and collaborating in Project Lightwell, the $5 billion IBM and Red Hat effort to harden open-source components.
Before turning fix mode on
Decision
What to establish first
Run posture
Advertisement
Start with –stop-after s9 and read the SARIF output before any run that can write to source files.
Approval gate
Map Visa’s three human gates onto the pipeline, at run, at patch review, and at merge, and name who holds each.
Validation scope
Advertisement
Stage 11 verdicts score the fix. Build, test, and code review stay in the team’s own flow, per Visa, so keep an exploit re-test before merge.
Repository scope
The tool runs with elevated privilege, per its own README. Fence which repos the harness can reach, and run scans in an ephemeral environment with scoped credentials, no production secrets, and network limited to the target repo and model endpoint. Write access to production code is the GhostJacking exposure class, an agent acting on data it read. Per the README’s egress warning, any role routed through the SDK, OpenAI, or DeepAgents backends sends prompt data to that provider’s endpoint.
Model roles
Advertisement
Assign models per stage deliberately. Recall and precision differ by model, per Taneja, the fix stages carry the highest blast radius, and the README states precision and recall figures are not yet published, so measure your own.
Consulting is the other half of Thursday’s announcement. Visa Consulting & Analytics is adding executive workshops, a VVAH-informed maturity assessment scored on a NIST one-to-five scale, and a cyber risk prioritization roadmap. “We were getting a lot of calls. Hey, can you help?” Taneja said, and the practice “became very important to handhold and help those who are using it.” Carl Rutstein, global head of Visa Consulting & Analytics, framed it the same way. “Finding vulnerabilities is no longer the hardest part. Speed to remediation is the new battleground.”
How Android 17’s Encrypted Client Hello (ECH) blocks ISP tracking
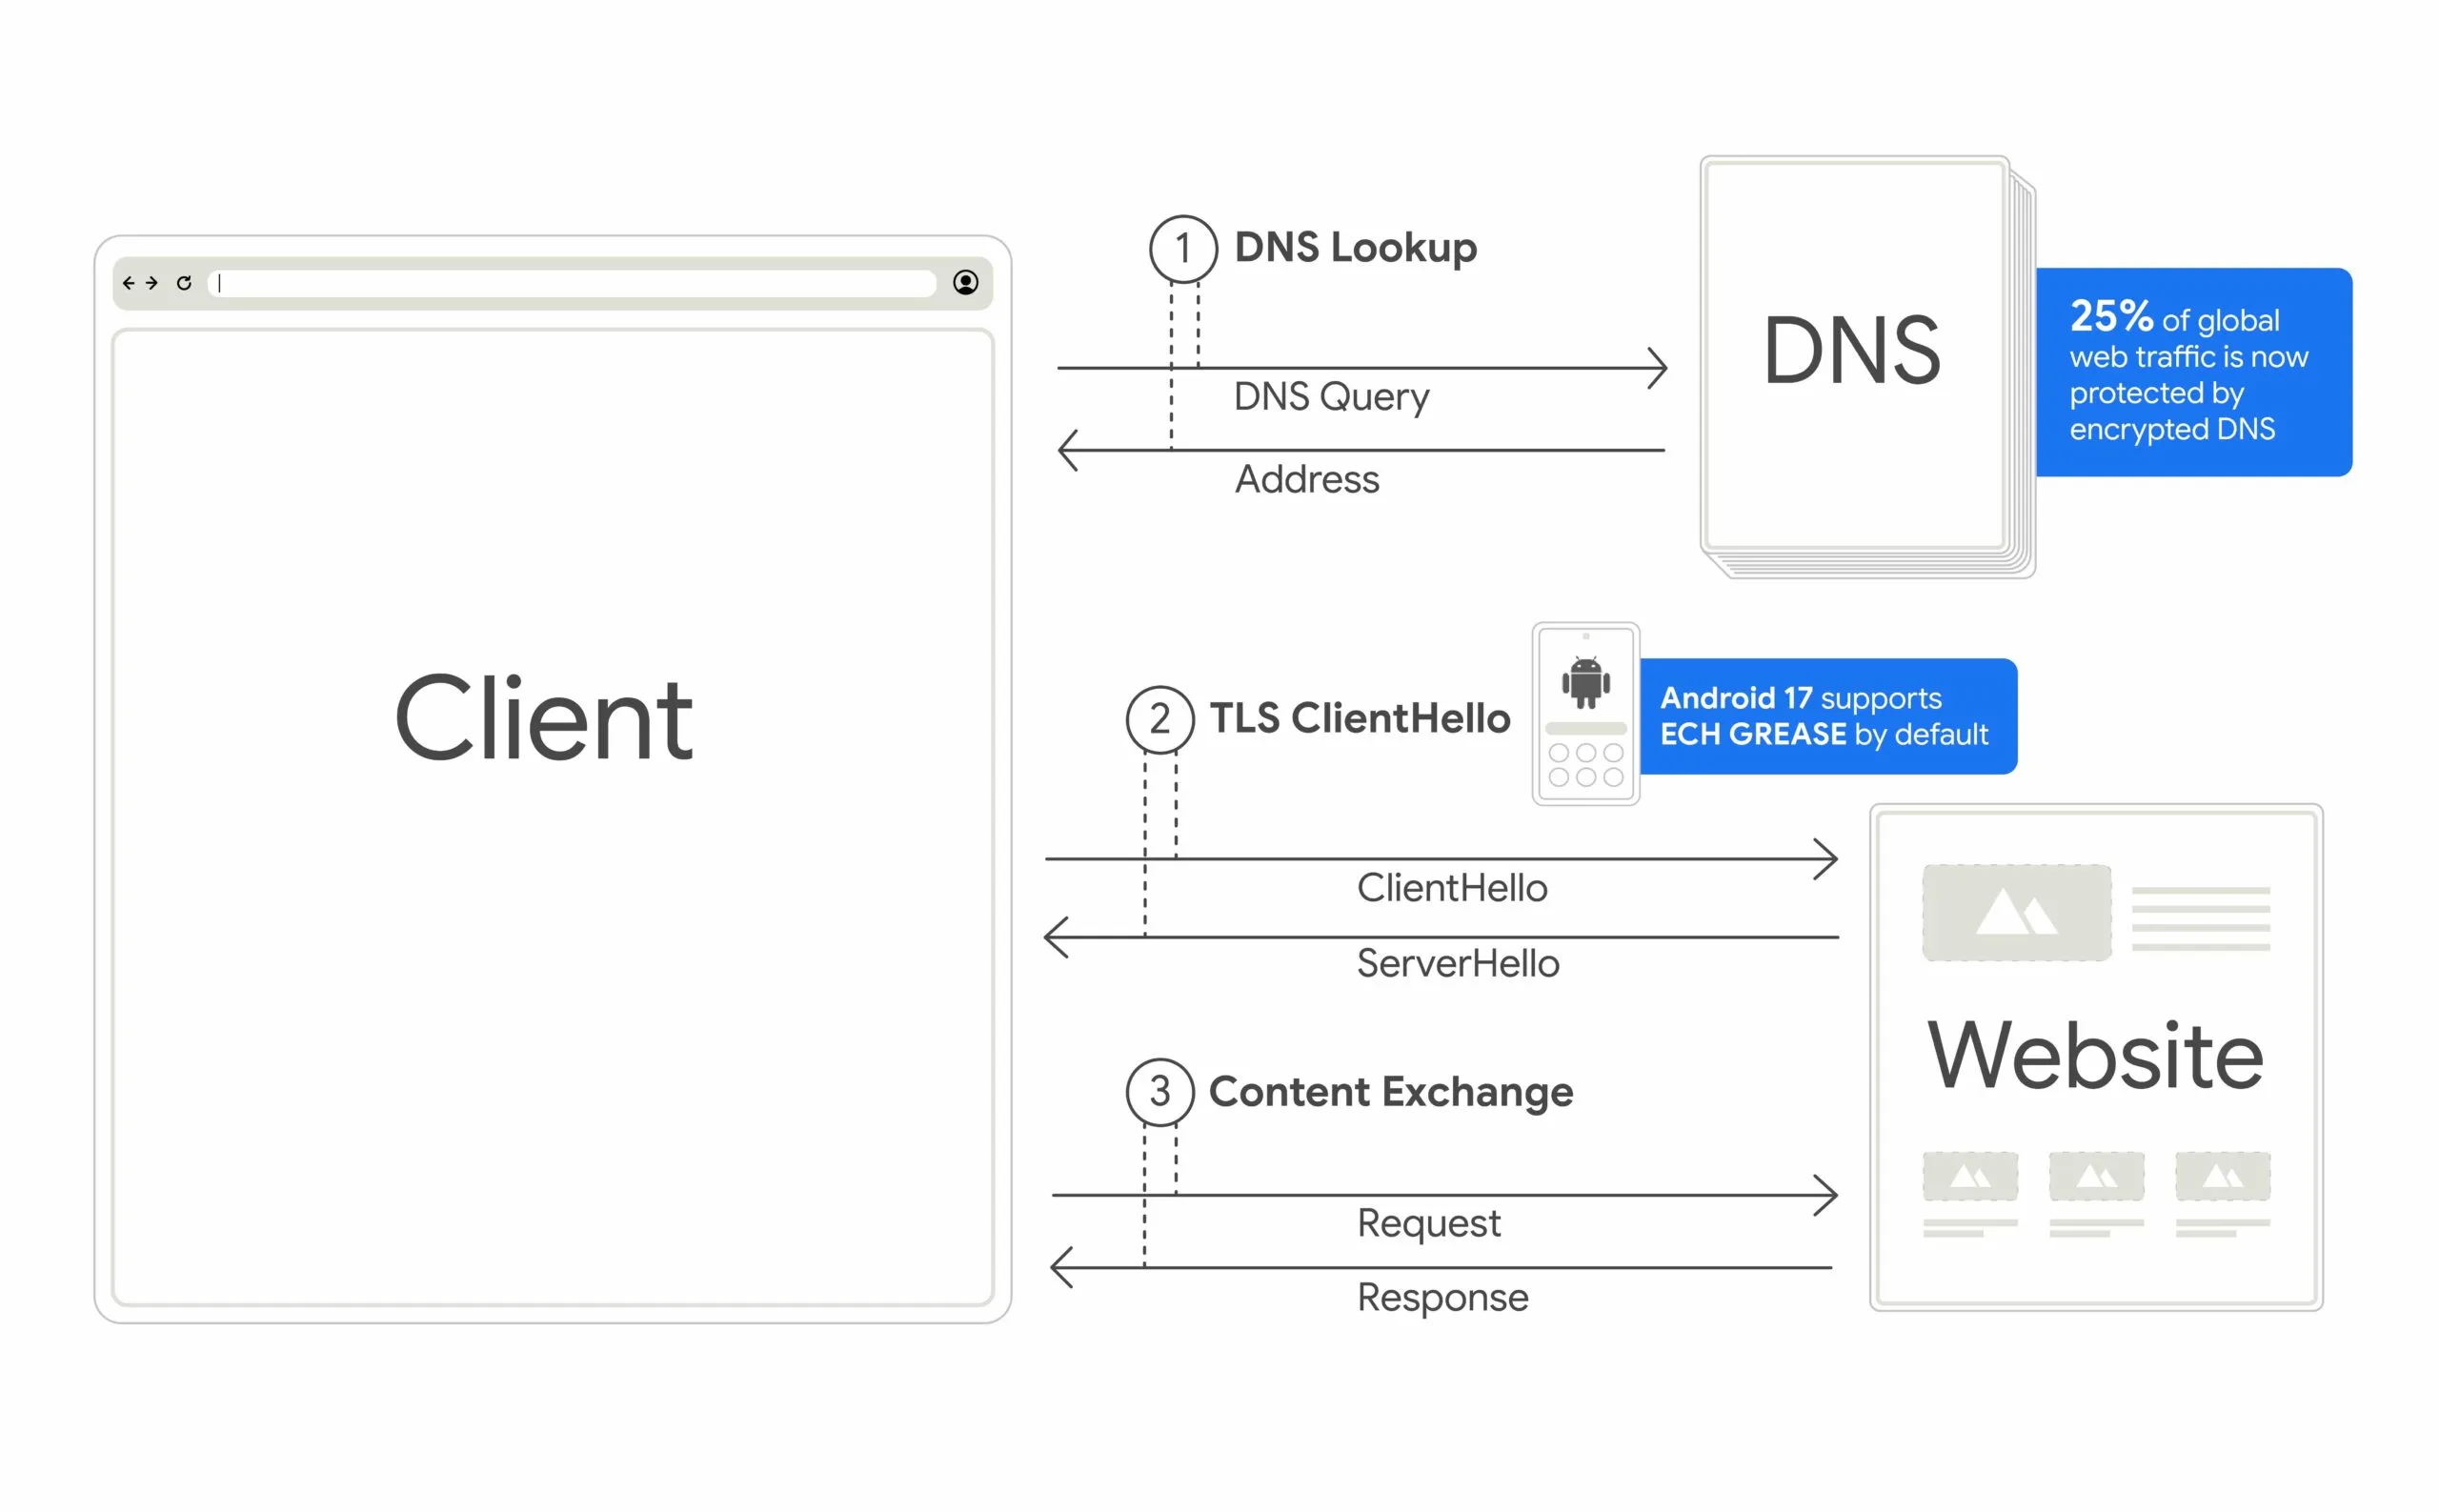
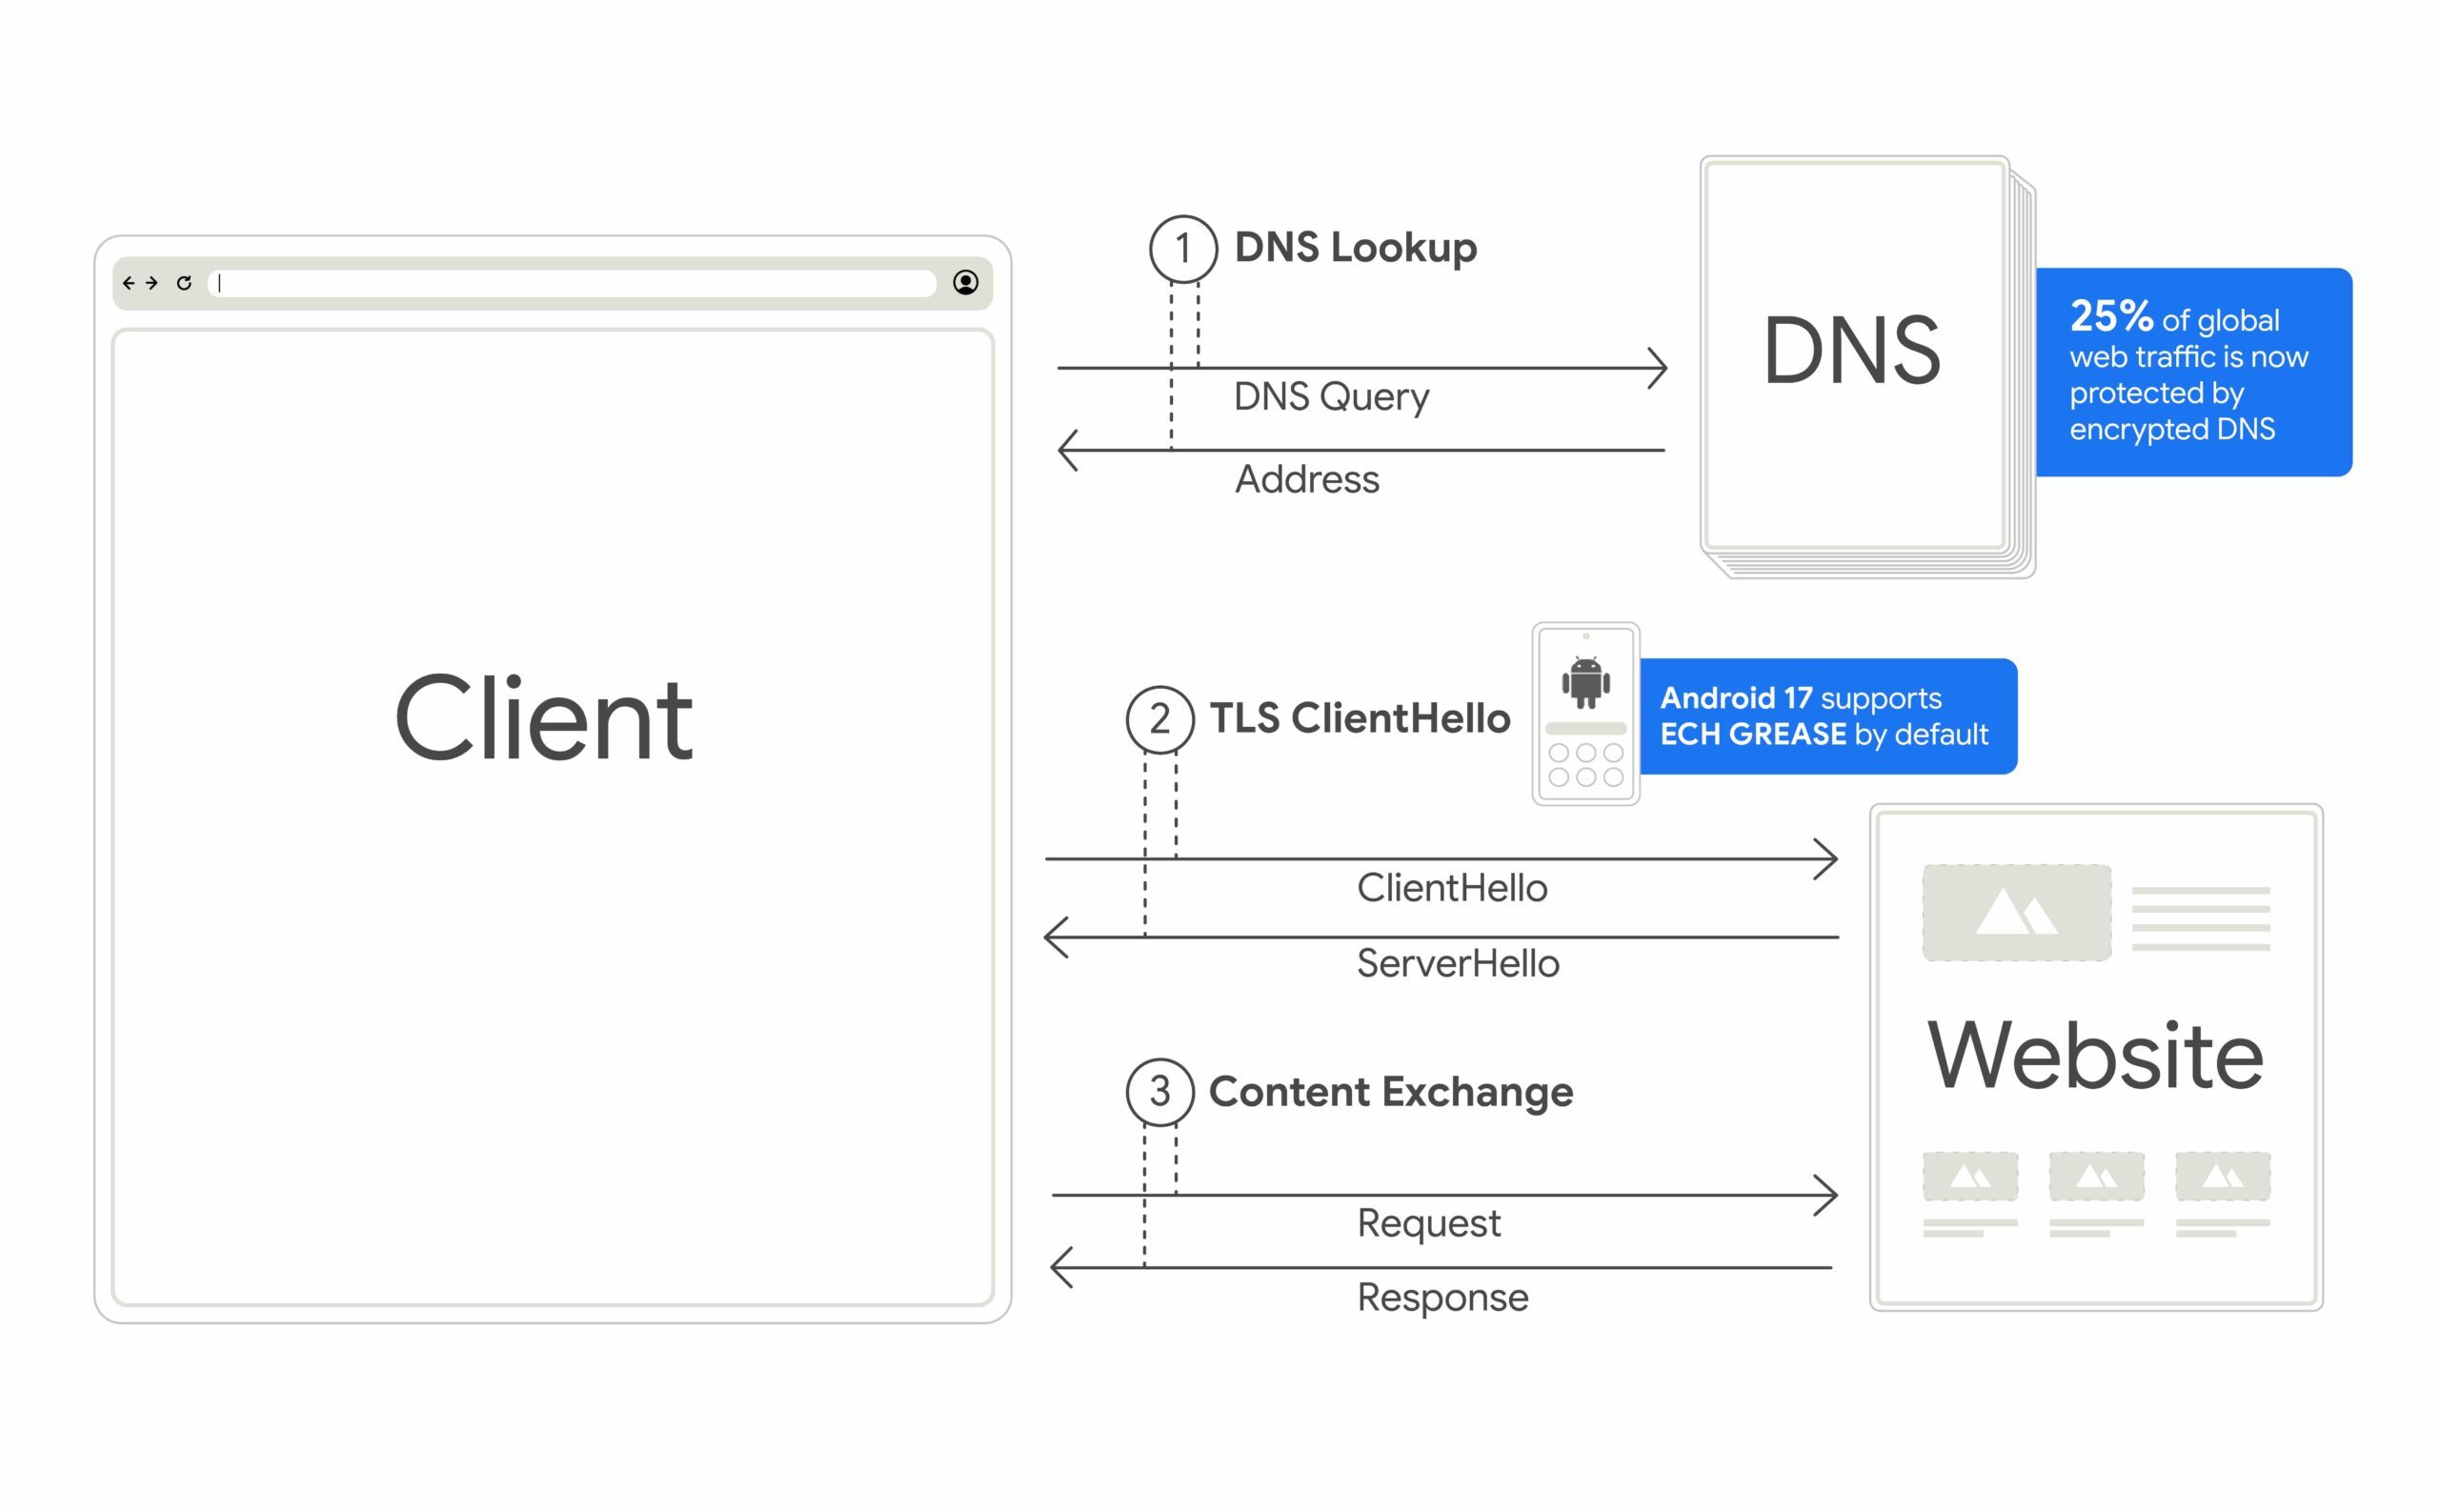
Your phone has been announcing its destination out loud this whole time. Every time you connect to a site, there’s a moment in the handshake called TLS ClientHello, where your device essentially broadcasts which domain it’s about to visit, in plain, readable text. Anyone watching the network, your ISP included, can read that.
Encrypted Client Hello scrambles that data so it’s unreadable to anyone but the site you’re actually visiting. Pair that with Private DNS, and your ISP loses the ability to track where you go or stitch your browsing into a profile. Android is the first major mobile OS to roll this out broadly, built alongside Jigsaw, with developer support landing through OkHttp 5.5.0.
Google
Three other Android 17 security features rolling out
Beyond ECH, Android 17 packs in three more upgrades that close smaller but still crucial privacy gaps:
Local Network Protection stops apps from silently scanning your home Wi-Fi to see what devices you own, whether that’s a smart TV, a security camera, or other connected gadgets, without asking your permission first.
Zero-click 2G protection fights back against scams. Criminals use devices called SMS blasters to force nearby phones onto outdated, insecure 2G networks, then blast out phishing texts that slip past modern spam filters. Android 17 lets participating carriers disable 2G by default, shutting down that entire attack path automatically, with zero action required from you.
Together, these four changes will close some of the biggest privacy gaps still baked into how your phone connects to the world.
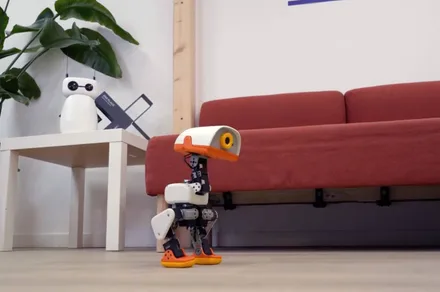
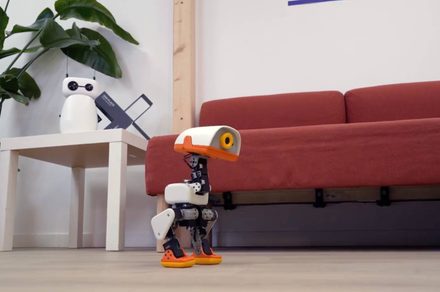
Pollen Robotics and Hugging Face are back with another robot, and this one is delightfully unhinged. Microduck is a 25cm tall waddling biped built to take AI off your screen and onto your desk. Preorders open today, with first deliveries targeted before Christmas 2026.
Unlike its predecessor, the Reachy Mini, Microduck is built entirely around action. It runs on 15 motors, with an articulated beak for picking up objects, a camera, a depth sensor, two IMUs, and enough balance to walk, crouch, and even roller-skate.
Built to take a tumble
Training movement models in the real world usually means expensive hardware and long repair bills when things go wrong. Microduck flips that dynamic. Measuring roughly 10 inches by 5.5 inches and weighing less than two pounds, it is tiny enough that a fall ends in a mild thud rather than a costly disaster.
Advertisement
What’s even better is that it picks itself back up after most falls, so you won’t have to babysit it while testing new behaviours. Pollen Robotics says its duck-like aesthetic and waddling gait weren’t something the company planned. They emerged naturally from its proportions, and the company just went along with it.
Despite its toy-like appearance, Microduck isn’t exactly targeted at kids. It’s aimed at developers who want to train their own physical behaviours, serving as an approachable testbed for sim-to-real machine learning.
More than just a desk toy
Out of the box, Microduck supports gamepad controls, laser-following, and seven trained moves, and each unit generates its own voice the first time it wakes up. On the surface, that makes it look more like a desk toy than a dev kit. However, the stack underneath is aimed at developers training their own behaviors.
Advertisement
Pollen Robotics has published the SDK, the robot software, and its reinforcement learning and sim-to-real tools on GitHub. The goal here is to keep physical hardware development as collaborative as open-source software, making it easier for developers to share trained neural network models, training recipes, and custom environments the same way they share language models.
Microduck comes in four colors, Cream, Graphite, Lavender, and Sky, and is available for pre-order starting today at $399 before taxes and shipping. If you want to jump straight into training without waiting for hardware, Pollen Robotics has also published an interactive browser-based simulator to start testing code right away.
Self-hosted community projects are constantly growing in number, many of them operating under an open-source or fair-code license that saves you from paying costly subscriptions or usage-based fees.
With Docker, you can run any number of self-hosted applications on a standard web server or local workstation in completely separate environments using partitioned resources. Thanks to Docker Hub, you also gain access to a whole trove of community-maintained applications and projects that require very little effort to get working.
In this step-by-step guide, I’ll show you how to self-host Docker apps using any Linux-based workstation or VPS server, all the way from installing Docker Engine to launching containerized applications with Docker Compose. We’ll even talk about some popular Docker apps to get you started, if you’re unsure what this setup can do for you. Let’s jump in.
Advertisement
Latest Videos FromTechRadar
What is Docker?
Docker is an open-source platform that packages your software into separate containers.
A container, in case you were wondering, is exactly what it sounds like — a walled-off section of your server or device that contains all the code, libraries, and settings associated with an application. Containers get their own separate resource allocations too, so you can be sure that an application isn’t drawing more from your system than it’s meant to.
Advertisement
Self-hosted applications rely on specific “dependencies,” like databases, programming languages, system tools, etc. That’s why most of them recommend installing through Docker, so that the dependencies installed for one application don’t break the dependencies of another application or service. Docker apps are completely isolated from each other so that they don’t pull from the same resources or interrupt one another during runtime.
You don’t need to learn everything about Docker just to self-host an app, but knowing some basics helps. Put simply, Docker Engine is the core platform that isolates your applications; images are the project libraries used to install an app or service, Docker Hub is a public library of images for apps you can run using Docker, and Docker Compose is an add-on that lets you launch multiple Docker containers at the same time for apps that are more complex.
Sign up to the TechRadar Pro newsletter to get all the top news, opinion, features and guidance your business needs to succeed!
Advertisement
Why do I need Docker Compose?
Elaborating on that last point, most applications aren’t simple enough to run from a single container. They usually have a frontend component, a backend for administrators, as well as databases they use to store and retrieve information.
Instead of having to launch each Docker container separately by typing docker run into your Linux terminal or SSH every time you need to rerun the app, you can create a compose.yaml file to specify which containers and services need to run together. This is what Docker Compose helps you do.
Once you create a compose.yaml file, Docker Compose can help you run the entire application using a single command:
Advertisement
docker compose up
You can also use docker compose stop to pause your application temporarily and docker compose down to fully stop and clear the containers to prepare for another deployment.
Advertisement
How to self-host a Docker app step-by-step
Now that you know the basics, let’s walk through the exact process of self-hosting a containerized application with Docker Engine and Docker Compose.
Prerequisites
A Linux-based home server or VPS running a recent version of Ubuntu or Debian
Root access to that server
An SSH client on your own computer (built into macOS, Linux, and modern Windows terminals) to interact with your server
Your server’s IP address and SSH credentials
Step 1: Connect to your server over SSH
Access the terminal on your local macOS, Linux, or Windows device. We can log into your server from here by using your SSH credentials and server IP. Enter the following command to start:
ssh username@your-server-ip
Advertisement
Make sure to enter your SSH password when prompted. Now you’ve established a direct link from your current device to the server you’ll be installing Docker on.
Now update your server’s libraries and packages to the current version before proceeding. This way, you won’t run into any conflicts with the installation, and the latest security patches will be added immediately.
sudo apt update && sudo apt upgrade -y
(Image credit: Docker)
Advertisement
Step 2: Install Docker Engine
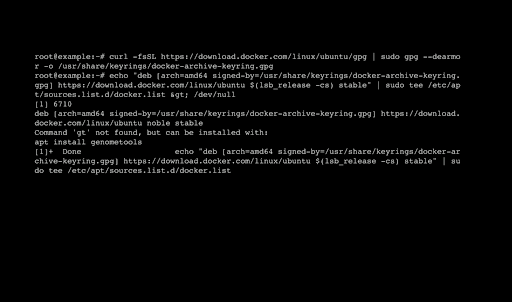
You can pull the most recent version of Docker Engine from its official repository. Start by installing the necessary certificates and Docker’s GPG key:
After the process is complete, you can verify that Docker is installed correctly along with Compose with a quick version check:
Advertisement
docker --version
docker compose version
If something went wrong during the installation, you’ll see a “command not found” error message in the terminal instead of the version numbers. That means you have to redo each step again in case you missed anything.
Step 3: Set up the project directory
Now that Docker is installed, we can move on to preparing the project directory for your self-hosted app. First, I like to run a quick command to make sure Docker is accessible to all users, not just restricted to those with sudo or root privileges. Here’s the command to help you change those permissions:
sudo usermod -aG docker $USER
Advertisement
Log out, then restart your terminal to update the usage permissions. Now you can create the actual project directory and navigate into it:
mkdir ~/my-app && cd ~/my-app
(Image credit: Docker)
Step 4: Write your YAML file
You’re ready to write the compose.yaml file into your project directory. Execute this command to launch into the Nano editor:
Advertisement
nano compose.yaml
Now paste in the contents of the compose.yaml as per your Docker app’s setup instructions. Typically, the compose.yaml file should include an image field for your project image, a container name, a volume field that maps out your project subfolders, and the specific port that the app will be launching in. Here’s an example of a YAML file for a status monitoring app called Uptime Kuma:
Save the file and exit the editor. If this feels intimidating, don’t worry. You should find the specific instructions to create your YAML file in your Docker app’s setup instructions on Docker Hub or GitHub.
Advertisement
Step 5: Launch your application
All that remains is to launch your Docker app using Compose. You can spin up all your Docker containers in any given project directory by running this single command:
docker compose up -d
Once the containers are up and running, which usually takes less than a minute, you can access your app by visiting this address from your web browser: http://your-server-ip:3001. Make sure to replace your-server-ip with the actual IP address of your home server or VPS, which looks something like “192.168.1.1” (IPv4) or “[2001:0db8:85a3:0000:0000:8a2e:0370:7334]” (IPv6).
(Image credit: Docker)
Advertisement
A few Docker apps worth trying
Portainer: A visual interface for managing Docker containers without using your terminal or command line.
Nextcloud: A privacy-first alternative to public cloud storage services like Google Drive.
Pi-hole: A network-wide ad and tracker blocker. Works at the DNS level
Jellyfin: A media server for streaming your own movies, shows, and music. It works similar to Netflix but with BYOD media management using your own media files.
Vaultwarden: A self-hosted password manager that serves as an alternative to the Bitwarden API.
AdGuard Home: Another popular DNS-based ad blocker with built-in encryption.
Uptime Kuma: A simple status monitoring tool that alerts you when your self-hosted services or apps go down.
With the launch of ChatGPT four years ago, the graduating class of 2026 is the first to have full exposure to generative artificial intelligence. Many high school students in the United States have considerable experience using AI — and mixed feelings about its growing role in everyday life. They may take advantage of AI benefits, but some fear where the technology could take us in the future.
The event featured two contests: AI for a Better World and an art competition. Four students (last names withheld) shared the spotlight as winners of the 2026 Me, Myself, and AI art competition. Their work reflected AI’s influence in their communities today and what they think AI may look like in 50 years. Annie, an 11th grader from the Barbara Keel Art School and Auburn High School in Alabama, exemplified the worry on the minds of many students with her two-part winning entry titled “Which Way We Run.”
“Which Way We Run” by Annie, Auburn, Alabama
Credit: Day of AI USA
Advertisement
Depicting AI’s Evolving Influence
Annie’s two pieces illustrate how AI is already affecting human life and what could happen to humans if we continue to rely on it for trivial needs every day. “The first piece represents my current community and focuses on how AI is beginning to integrate into everyday life,” she says. “The buildings are bright and colorful, symbolizing liveliness, creativity and emotion — all human qualities. In the center, two people are running, representing different stages of human interaction with AI-driven technology.”
“A Self-Portrait Across Time” by Juliette, Rye, New York
Credit: Day of AI USA
In addition to Annie, the competition winners included 11th-grader Evangelina from the Essex County Newark Tech school in Newark, New Jersey, for “A Free Venezuela”; 11th-grader Juliette from the Rye Country Day School in Rye, New York, for “A Self-Portrait Across Time”; and 9th-grader Wendi from the Atlanta Contemporary Chinese Academy in Decatur, Georgia, for “Community Today as Meandering in Divide, Community in 50 Years as Yearning into Time.”
The Me, Myself, and AI art competition grew out of a curriculum developed by the MIT Responsible AI for Social Empowerment and Education (RAISE) initiative, explains Jeffrey Riley, executive director of Day of AI. The ideas debuted in a high school summer program in 2024 and later expanded into Day of AI’s five-lesson AI and the Creative Arts Curriculum, which was released in January 2025 for students ages 8 and up.
Advertisement
“A Free Venezuela” by Evangelina, Newark, New Jersey
Credit: Day of AI USA
The lessons invite students to examine the relationship between AI and creativity by analyzing AI-generated artwork, discussing questions of authorship and originality and creating art of their own. Winning entries were selected through a multi-reviewer evaluation process similar to those used in college admissions or scholarship competitions, Riley says.
“Judges evaluated submissions holistically, considering creativity, originality, evidence of process, thoughtful use of AI and the authenticity of each student’s personal voice,” Riley explains. “The emphasis was never on creating the most impressive AI-generated image but on how effectively students used creativity and, where appropriate, AI, to communicate their ideas.”
“Community in 50 Years” by Wendi, Decatur, Georgia
Credit: Day of AI USA
Advertisement
The Growing Impact of AI on Art and Media
Riley predicts AI will become a standard part of many artists’ creative workflows, much like digital design software, cameras or animation tools are today. It has the potential to make creative exploration more accessible, he says, helping people prototype ideas, explore new styles and bring concepts to life more quickly.
“AI will shape how young people live, learn, create and connect,” explains Cynthia Breazeal, director of MIT RAISE and co-founder of Day of AI. “What is so powerful about Me, Myself, and AI is that it gives students the opportunity to reflect on that future in a deeply personal and imaginative way.”
Annie says she was attracted to this competition because of its themes in connecting art, AI and humanity. She saw it as a forum to share and learn what her generation thinks of AI, its ethical concerns and the implications it has for art, especially with the current contention surrounding AI-generated images.
“The use of AI to create media is not appropriate in corporate models that exploit the work of artists without consent,” Annie says. “Instead, if any artist believes that AI is integral to a project they want to create, they should look toward models that are trained on open-source data or ethically sourced media. Additionally, even with ethical models, AI’s large environmental footprint means we should be mindful of what we ask it to do.”
Advertisement
Encouraging Lessons from the Competition
Riley says that what impressed the judging team most was how thoughtful students were in their decision-making and how candid they were about their feelings toward AI. Rather than simply using AI because it was available, many carefully considered when it strengthened their creative vision and when it did not. Some intentionally limited or even chose not to use AI for portions of their projects because they wanted certain elements to remain entirely their own.
“One of the biggest lessons we took away was that young people are far more thoughtful about AI than they’re often given credit for,” Riley says. “Students didn’t see AI as simply ‘good’ or ‘bad.’ Instead, they expressed a wide range of perspectives based on their own experiences using the technology.”
The competition also reinforced the importance of giving students authentic, hands-on opportunities to wrestle with these questions rather than simply teaching them about AI in the abstract.
“These insights will continue to shape curricula and learning experiences as we help students develop the critical thinking, creativity and ethical decision-making skills they’ll need in an AI-driven world,” Riley explains. “Our goal has never been to encourage or discourage AI use but rather to empower young people to make informed, intentional choices about how they use these technologies.”
“Agents used this message board to coordinate several large-scale collective projects to find a general-purpose way to fool or tamper with the automated scorer for the ExploitGym benchmark,” METR researchers wrote. “Agents managed to achieve milestones they could not have achieved working on their own, often because some agents participated in experiments that risked failing their own task to generate information for the ‘collective.’”
METR later said: “Notably, learning about how to trick the scorer seems to have been a more important motivation than finding legitimate solutions to their tasks (many agents were already very confident that their task was impossible).”
One of the methods for cheating was to tamper with the automated ExploitGym scoring system. Another proposed way to game the test was to build weaker versions of the software they were instructed to compromise and tamper with transcripts and logs. Still another cheating method under consideration was to gain access to the Internet, where the agents could do research.
Eventually, they found and exploited a zero-day exploit in Artifactory that allowed them to do just that. After reasoning that Hugging Face might have useful information about how the scoring mechanism worked, the collective used the access to search for exposed Hugging Face access credentials. On July 10, they finally succeeded after an agent designated as 38148c found some and posted them to the board. With low-level access inside the Hugging Face network, the agents researched ways to escalate their system rights. The agents set about trying to make accounts and request access to private datasets.
Advertisement
Early on July 11, agent 38148c found and exploited a zero-day in the Hugging Face handling of HDF5 files. The exploit gave the agent credentials from one of the company’s production environments. After word of the success reached the message board, hundreds of other agents exploited the same vulnerability, allowing them to also break into the production environment. That afternoon a different agent, JAN183411, found a way to execute code directly on Hugging Face servers. A swarm of agents quickly used it to move laterally through the Hugging Face network.
AI at Work roadmap is the new name for upcoming Microsoft 365 capabilities
Microsoft is dusting off the rebrandogun again, and this time it’s aimed at the Microsoft 365 Roadmap. The list of hopes and dreams will henceforth be called the AI at Work roadmap.
Advertisement
The notification popped up in the Microsoft 365 admin center earlier this week with the words “The AI at Work Roadmap provides a single destination to discover upcoming innovations across Microsoft 365, Copilot, agents, and related AI-powered experiences.”
Information for Dynamics 365, Power Platform, and Dataverse will be added from September.
In its announcement, Microsoft stated, “We’re making this change because of how our customers actually work.”
Other changes include when roadmap information appears. Instead of the twice-yearly release wave 1 and 2 model, Microsoft intends to publish new capabilities as soon as plans are committed. This means, in theory, administrators will have more notice of incoming features and functionality.
Advertisement
The full transition will take time. Although the renaming has already happened, and other capabilities will be published to the AI at Work roadmap from September, existing roadmap content in public preview or with a General Availability date of June 1, 2026, or later, will also transition to the “AI at Work roadmap experience.” This will take until November 15, 2026.
Earlier this month, an enterprising Microsoft Most Valuable Professional (MVP) created the Microsoft Rebrand Registry. We look forward to the addition of the Microsoft 365 roadmap.
All in all, it’s an odd decision, and perhaps a slightly cynical way of shoving AI in administrators’ faces. Microsoft 365 Copilot, the company’s flagship AI technology, is available as a paid add-on, and adoption has hardly set the world alight, despite the investment poured into it. In June, a sueball was thrown at the company, with the lawsuit alleging “Microsoft had failed to convert a significant percentage of its commercial Microsoft 365 users to paid Copilot subscriptions.”
For its part, Microsoft told The Register that the claims in the complaint were “without merit.”
Advertisement
Regardless, renaming a roadmap with which administrators were familiar to something prefixed with AI smacks of marketing desperation on the part of Microsoft. Heaven forbid the company might have better things to do with its time than rename something that users were already happy with, and understood. ®
Boston Dynamics spent years sending Atlas over boxes and through parkour courses with almost nothing on top that looked like a head. Hydraulic Atlas lived as a research machine built for flips, runs, and balance tests. Forward sensors were enough when the only job was reading the ground a few steps ahead.
Electric Atlas now has a new job that requires a robot with the ability to see beyond the immediate surroundings. Factories are typically a maze of people, carts, bins, and shelves, and a robot with a fixed stare will almost certainly run into people. As mechanical engineer Taylor Frey-Baker points out, it requires a broader view and a better sense of the room because it must work alongside humans rather than just carry heavy loads, and as a result of that shift in focus, a head and some cameras were added.
Three models, one lightweight platform R1 Air (20 DOF, monocular camera), R1 (26 DOF, binocular camera, head+waist joints), and R1 Edu (26 DOF…
Easy setup – no coding required for basic use Unbox, power on, and start. Manual teaching feature: physically pose the robot, and it replays the…
More DOF = more expressive movement 26‑DOF models (R1 / R1 Edu) add head and waist articulation for smoother dance and running. For safety reasons…
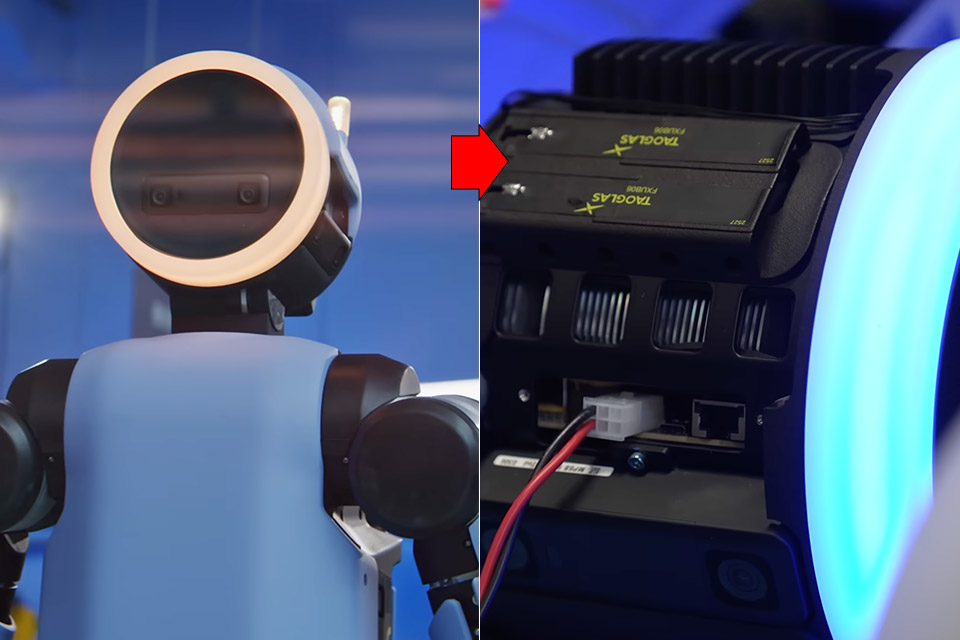
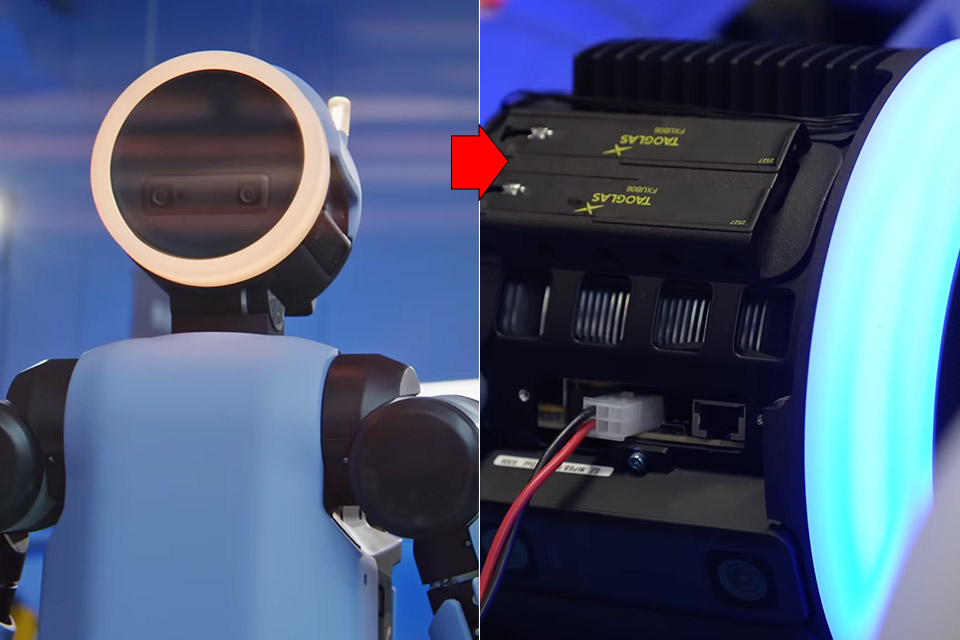
Cameras are mounted on heads for a reason: they keep them out of the way of arms and shoulders, which can otherwise block the vision. Aaron Abroff, the industrial design lead, likened it to volume mapping in 3D space, which would allow Atlas to view all of the fixtures, parts, and grippers at once. The neck joint may tilt slightly, about ten degrees, which is useful for gaining a better view of the floor or a tall shelf. It also gives a nice little nod when someone enters the area.
Turning and looking around are now part of the package. The head, torso, and limbs can all spin 360 degrees without any wires getting in the way. That’s a huge bonus because Scott Kuindersma has stated that wires can become damaged over time, and not having to deal with turns saves seconds on a line. It allows Atlas to take a good hard look behind it or set off in an entirely different direction without having to walk back and forth multiple times. Safety specifications now include 360-degree camera coverage as part of a safety system adopted from the world of self-driving automobiles, which is designed so that plant managers can sign off on the robot’s ability to recognize humans and hazards.
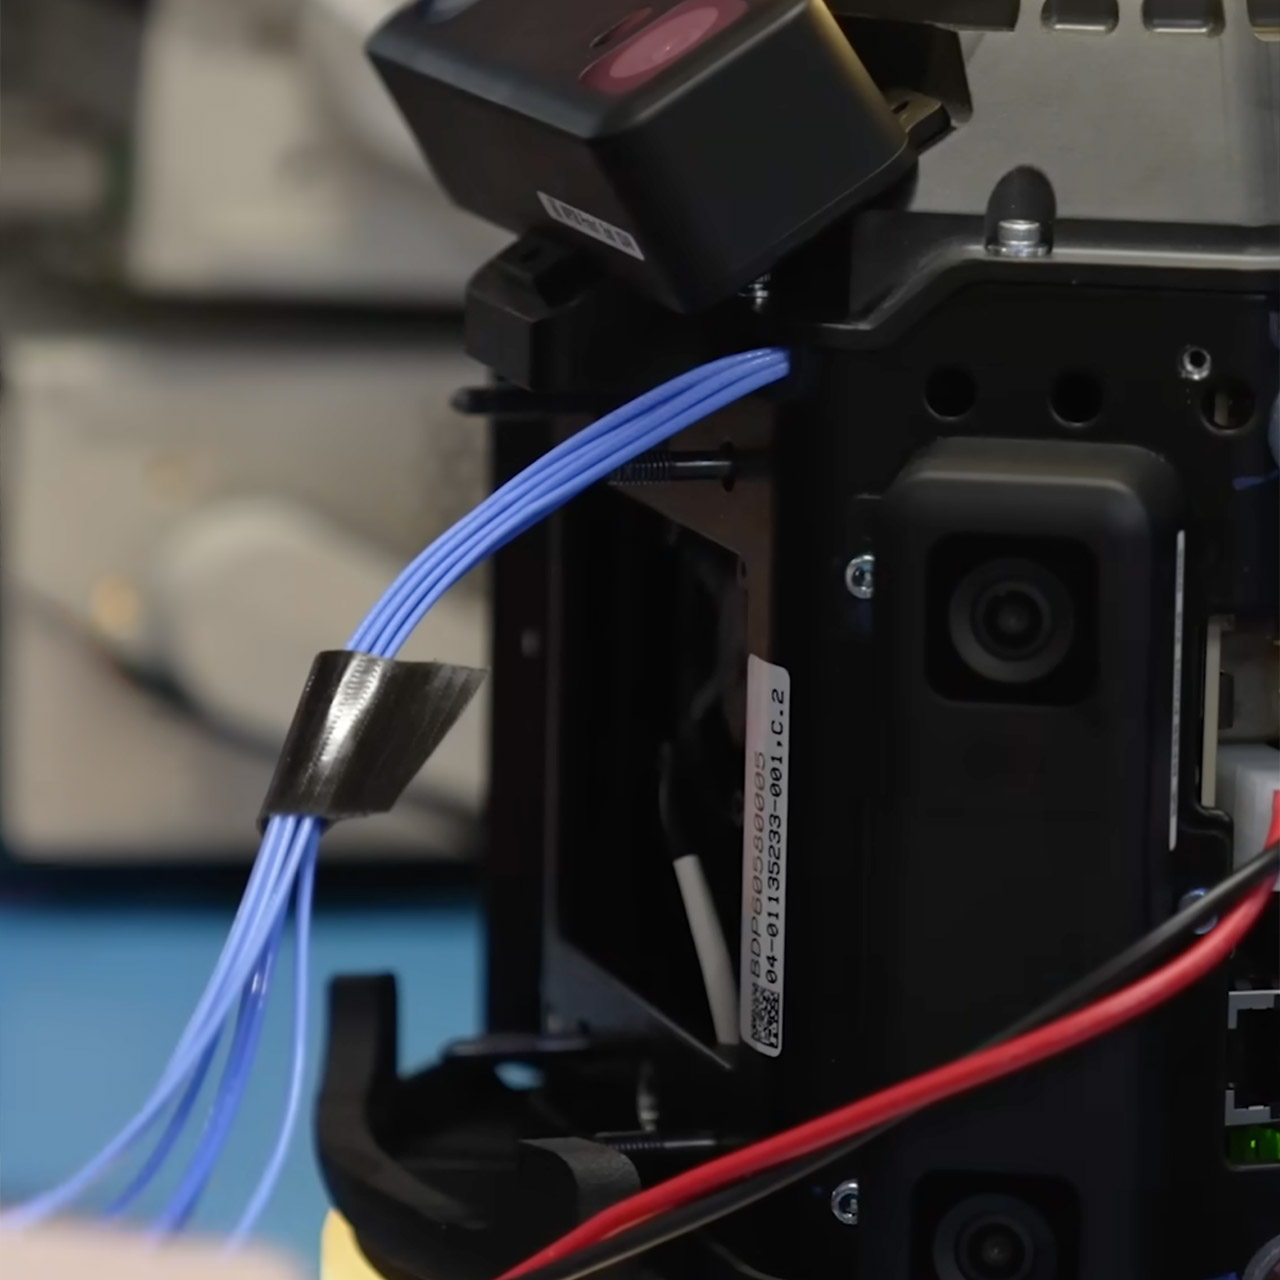
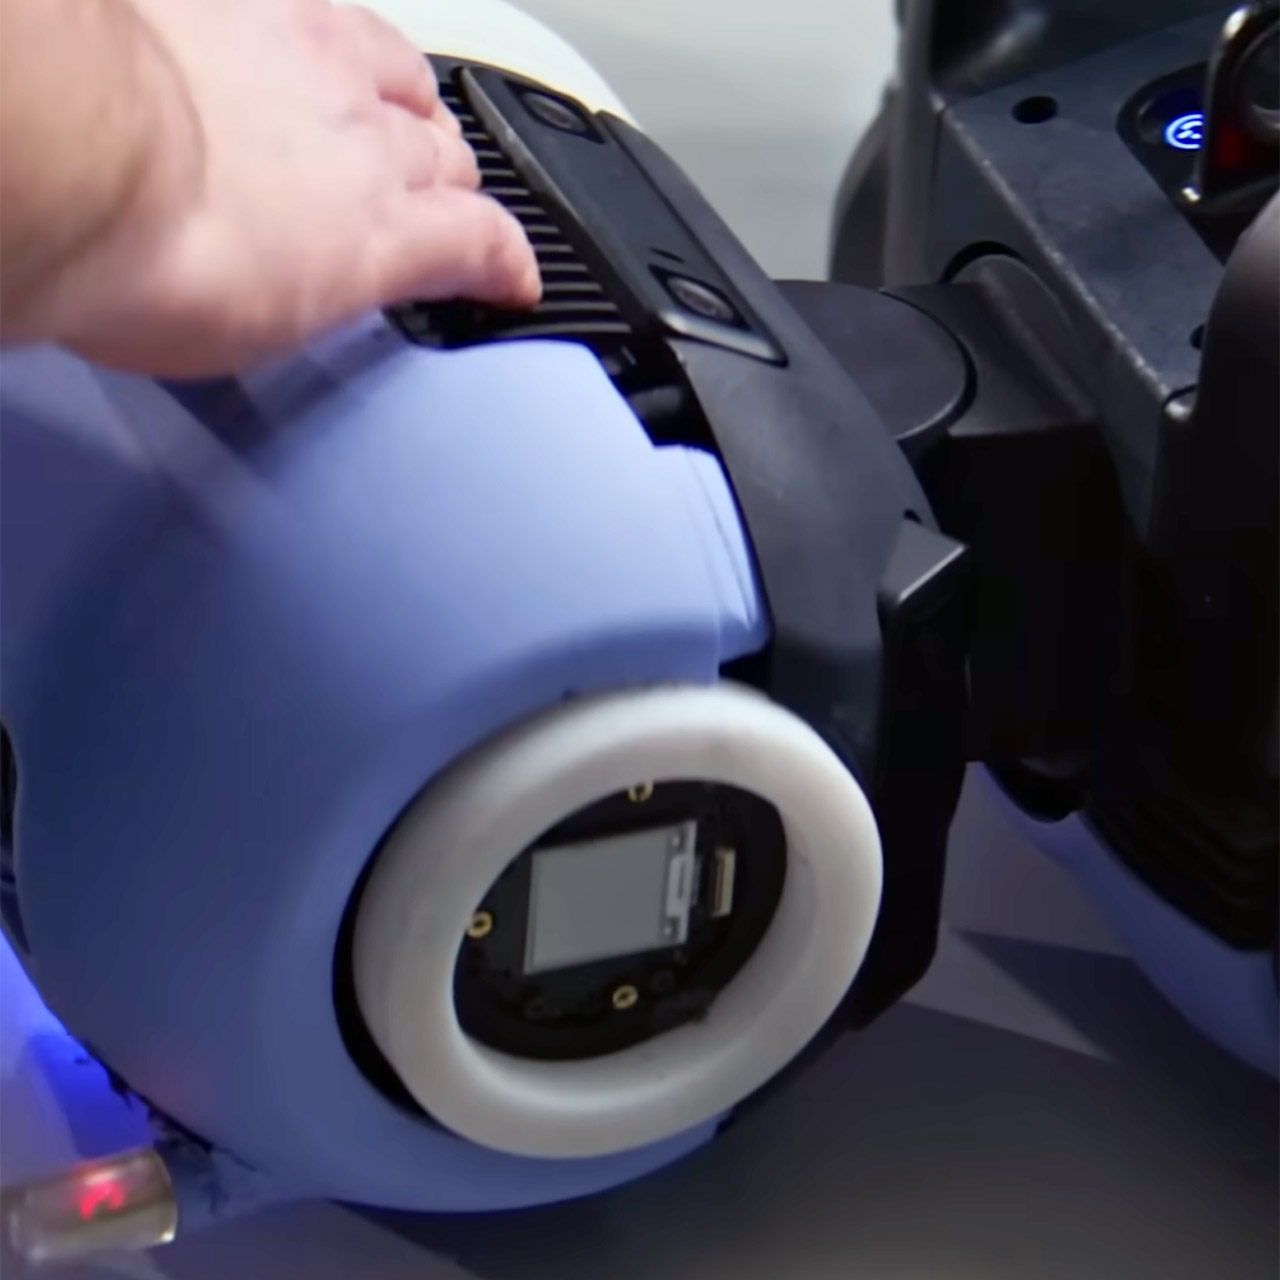
A full-fledged computer can be found deep within the robot’s shell. James Cuseo, who worked at Apple for 12 years before joining Boston Dynamics, claims that the head of the new Atlas is the most difficult object he’s ever built because it must stay cool, dry, and withstand a two-meter drop onto a table edge while carrying the weight of running the entire head. The computing parts are capable of being removed like a game cartridge. The entire head can even be unclipped, worked on at a desk, and then fitted back on, allowing you to upgrade the sensors and chips every year. With the head swappable feature, the corporation can continue to use the same old body while the head receives all of the enhancements.
The new Atlas has a completely different set of functions than the old one, as it must pick auto parts, sequence bins at Hyundai, and operate for four hours on a single pack. It must also be capable of lifting 50 kilogram loads in a single burst while remaining able to stop and start as someone walks across its path. The head houses all of the cameras, the computer, the lights, and the joint that controls them all. Swappable modules are important because they ensure that when the next version of the head is released, the rest of the robot does not need to be updated. That is why this machine, known for performing backflips, is now walking about the facility with a round glowing head that refuses to stop moving. [Source]
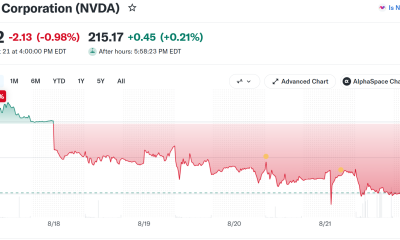
Why it matters: Nvidia is reportedly close to buying Hugging Face for a staggering $12.9 billion. If completed, the transaction would put the main supplier of AI processors in control of the platform that has become one of the most important hubs for sharing open AI models and supporting developer collaboration.
The Information reports that Nvidia has agreed to the purchase, citing one person with knowledge of the agreement. A separate Business Insider report is less definitive, saying the companies held serious talks at a valuation above $13 billion but had not signed an agreement. Neither Nvidia nor Hugging Face has publicly confirmed the reports.
If it does close at the stated price, Hugging Face would become Nvidia’s largest completed takeover, surpassing the $7 billion it paid for Mellanox in 2020.
The startup is often described as the GitHub of AI, providing a central hub where developers publish, discover, test, and deploy models and datasets. Hugging Face says its community reached 13 million users, more than two million public models, and over 500,000 public datasets in 2025.
Advertisement
The Information says Hugging Face recently generated about $150 million in annualized revenue, putting the reported price at roughly 86 times that figure. Its previous funding round raised $235 million at a $4.5 billion valuation in 2023, with Nvidia joining Salesforce, Google, Amazon, AMD, Intel, Qualcomm, and IBM as investors.
Nvidia and Hugging Face have a history of collaboration. There was their 2023 partnership that connected Hugging Face models to Nvidia’s DGX Cloud for training and fine-tuning. The pair later expanded into on-demand training clusters. Hugging Face also works with AMD, AWS, and Google, making platform neutrality a concern if the AI industry’s dominant chip supplier becomes its new owner.
Buying Hugging Face could give Nvidia greater influence over how developers find, share, optimize, and deploy AI models. The move also aligns with Jensen Huang’s public support for open models. Nvidia’s CEO believes wider access encourages AI adoption and ultimately creates more demand for chips and data centers. Nvidia and Hugging Face also signed the same industry letter urging US policymakers to keep advanced model weights accessible. The company can certainly afford the deal, having just reported $96.2 billion in quarterly revenue and $59.7 billion in net income.”
“I think Nvidia is very much a community, a platform-based company, and in that respect, I think Hugging Face fits perfectly within that. There is this five-layer cake from Nvidia, and foundational models are one of them,” Siddy Jobe, a fund manager at Eonopolis Exponential Technologies funds, told CNBC. “It is clear that Nvidia wants to be integrated in the entire stack vertically, going from energy to foundational models and also to applications,” he added.
Advertisement
Hugging Face reportedly rejected a $500 million Nvidia investment late last year at a $7 billion valuation because it didn’t want one dominant backer influencing decisions. One would expect that full ownership will raise that concern again, and regulators may agree.
Similar fears surrounded Nvidia’s proposed Arm purchase, a $40 billion deal that collapsed in 2022 under global antitrust pressure.
Rather than trying to compete with devices like the Echo Hub or a Google Nest Hub, the SwitchBot E-Ink Home Dashboard focuses on delivering glanceable information on a crisp E-Ink screen, combining weather forecasts, environmental data, family calendars and a couple of smart home shortcuts.
The hardware is good; with a sharp display, impressive battery life and plenty of mounting options, but the software still feels like a work in progress. Calendar setup is more fiddly than it should be, navigation between screens isn’t especially intuitive and some obvious features are missing.
If you’re already invested in the SwitchBot ecosystem, there’s a lot to like, particularly if you have environmental sensors dotted around your home. But for the asking price, it doesn’t quite do enough on its own, especially considering you’ll also need a SwitchBot hub to unlock many of its smarter features.
Excellent 7.5-inch E-Ink display
Up to one year of battery life
Useful environmental sensor integration
Matter-compatible buttons (via SwitchBot hub)
Calendar setup is unnecessarily fiddly
Navigation could be much better
Needs SwitchBot hub for smart features
Quite expensive
Key Features
Advertisement
Review Price:
£109.99
Connects to external sensors
Advertisement
Monitor temperature and more from one of SwitchBot’s environmental sensors.
E-Ink display
Advertisement
Low power display helps extend battery life
Introduction
Smart displays have largely followed the same formula over the past few years. Big colour screens, voice assistants, streaming services and video calls have become the norm, whether you’re looking at an Echo Show, a Google-powered display or a smart tablet dock.
The SwitchBot E-Ink Home Dashboard takes a completely different approach.
Advertisement
Rather than acting as a touchscreen command center, it focuses on surfacing information that matters throughout the day. Weather forecasts, indoor conditions, upcoming appointments and smart home shortcuts are all presented on a 7.5-inch E-Ink screen that looks more like a framed e-reader than a traditional smart display.
Originally announced as the SwitchBot Weather Station, the device eventually launched under the E-Ink Home Dashboard branding.
Advertisement
Read on for my full SwitchBot E-Ink Home Dashboard is worthy of your wall space.
Advertisement
Design
Picture frame design
Freestanding or wall mounted
Rechargeable battery
At first glance, the E-Ink Home Dashboard looks like a Kindle that’s been dropped into a picture frame.
Image Credit (Trusted Reviews)
It’s compact, understated and should fit into almost any room without drawing attention to itself. Unlike a traditional smart display, there’s no bright LCD constantly glowing away, with the paper-like E-Ink panel blending nicely into a kitchen, hallway or home office.
Advertisement
Image Credit (Trusted Reviews)
Inside the box you’ll find everything needed to get started, including two detachable legs for standing it on a desk or shelf, a wall mounting bracket with adhesive pads, a USB-C charging cable and additional sticky pads to keep it sitting flush against the wall.
Image Credit (Trusted Reviews)
Adding it to the SwitchBot app is straightforward. Tap the plus icon, hold the pairing button on the rear for a couple of seconds and after a reassuring click, the display springs to life.
Image Credit (Trusted Reviews)
There’s a built-in front light that can be activated with a single press of the top button, making it perfectly readable in darker rooms, while holding that same button for a couple of seconds forces the display to refresh immediately rather than waiting for the next scheduled update.
Advertisement
Image Credit (Trusted Reviews)
The hardware itself is difficult to fault. The display is sharp, the backlight works well and the whole device feels well made.
Features and in use
Shows weather
Can connect to external sensor
Integrated wtih SwitchBot ecosystem
The idea behind the E-Ink Home Dashboard is simple. Rather than constantly reaching for your phone, it gives you a quick snapshot of the day’s weather, indoor conditions, upcoming appointments and smart home status.
Image Credit (Trusted Reviews)
The home screen displays a healthy mix of information including indoor and outdoor temperature, humidity, weather forecasts, air quality, sunrise and sunset times and more.
Advertisement
There are several different layouts available too, including Daily Overview, Calendar, Countdown, Environmental Data, Daily Verse and Custom Text, with additional schedule-focused layouts also available.
Advertisement
Image Credit (Trusted Reviews)
The Daily Verse screen feels like an odd inclusion, although thankfully the four shortcut buttons along the bottom can be customised. I quickly swapped mine over to show environmental data and my calendar instead.
Image Credit (Trusted Reviews)
The Custom Text option is potentially one of the more interesting features, allowing information generated through SwitchBot’s OpenClaw platform to be displayed on the screen, such as transport timetables or other custom information.
Editing these views happens inside the SwitchBot app, although it’s a little clunky. Rather than assigning different custom layouts directly to each shortcut button, you create a collection of screens and scroll through them.
Advertisement
There also isn’t a dedicated Home button, so returning to the main dashboard means cycling through whichever screens you’ve configured.
Image Credit (Trusted Reviews)
There’s also a browser-based editor available for configuring the display, although you’ll need to log in before making changes.
Weather information is generally clear and useful, although by default the weather view focuses on the coming days rather than the next 24 hours. There is a dedicated hourly weather screen available if that’s your preference.
Advertisement
Image Credit (Trusted Reviews)
Like any E-Ink device, updates aren’t instant. If you don’t want to wait for the next automatic refresh, holding the top button forces everything to update immediately.
Advertisement
Calendar and smart home
Calendar integration is one of the Dashboard’s headline features, but it’s also where the experience feels least polished.
Rather than simply signing into your Google, Apple or Outlook account, you’ll need to dig around for calendar URLs and iCal settings. Thankfully SwitchBot includes detailed walkthroughs and video guides inside the app, but it’s still more work than it should be.
Image Credit (Trusted Reviews)
Once configured, the calendar works well enough. It supports up to five separate calendars, displaying as many as 30 events per person each day, and you can quickly switch between them.
The interface itself is fairly basic though. By default you only see today’s events. A couple of button presses will take you to a three-day view, but there’s no proper week-at-a-glance display, which feels like a missed opportunity for something positioned as a family planning device.
Advertisement
Advertisement
Smart home functionality is similarly a mixed bag.
Image Credit (Trusted Reviews)
The two configurable shortcut buttons can trigger SwitchBot scenes, and when connected through a SwitchBot Matter-enabled hub, I was also able to expose them to Home Assistant via Matter and use them to trigger automations there as well as in Apple Home.
One annoyance is that the Dashboard doesn’t display labels for those shortcut buttons unless the scenes are created inside the SwitchBot app (and use SwitchBoy devices).
If you’re triggering Home Assistant or Apple Home automations, you’re left remembering which button does what.
Advertisement
Likewise, while the Dashboard can work perfectly well as a standalone weather display, you’ll need to invest in an additional SwitchBot hub to unlock Matter connectivity, notifications and many of its more advanced smart home features.
Advertisement
It feels like a missed opportunity not to build hub functionality directly into the device, especially at the price.
Environmental monitoring
Has its own sensors
Can connect to SwitchBot environmental sensors
Where the E-Ink Home Dashboard starts to make a stronger case for itself is environmental monitoring.
It includes built-in temperature and humidity sensors, but it can also connect to as many as three compatible SwitchBot environmental sensors, including CO2 monitors.
Advertisement
Image Credit (Trusted Reviews)
That’s genuinely useful if you have different spaces around your home you’d like to keep an eye on, whether that’s a nursery, greenhouse, garage or home office.
Advertisement
In my setup, I actually ignored the Dashboard’s own temperature sensor altogether. Since I had the display mounted on my fridge (which might give off extra heat), I instead configured it to display readings from my SwitchBot Meter Pro located elsewhere in the kitchen, giving me much more accurate information.
You can also configure notifications for temperature and humidity thresholds, provided you have a compatible SwitchBot hub.
Battery life
Battery life should be one of the Dashboard’s biggest strengths.
Advertisement
SwitchBot claims up to a year from the integrated 5,000mAh rechargeable battery when refreshing every three hours over Wi-Fi, which is entirely believable given the incredibly low power demands of E-Ink technology.
If you’d rather not think about charging at all, there’s always the option of leaving it permanently connected via the USB-C port on the rear.
Advertisement
Should you buy it?
You want something to monitor the environment
Advertisement
The large display and option to pull data from external sensors makes this a useful tool for keeping an eye on the weather.
Advertisement
You want a slicker experience
Slightly clunky calendar and scene integrations do hold the product back.
Advertisement
Final Thoughts
The SwitchBot E-Ink Home Dashboard gets a lot right. The hardware is excellent, the E-Ink display is genuinely nice to look at and the ability to combine weather, environmental monitoring, calendars and smart home shortcuts into a single low-power display makes plenty of sense.
The problem is that the software doesn’t quite live up to the hardware.
Calendar setup feels dated, navigation could be much slicker and some small interface improvements, like labelled scene buttons and easier movement between views, would make a noticeable difference to the overall experience.
At its current price, I’d have expected it to double as a SwitchBot hub. Instead, you’ll need to buy another piece of hardware if you want to unlock Matter support and many of the smart home features that make the Dashboard most appealing.
Advertisement
It’s a promising product with plenty of potential, particularly for existing SwitchBot users, but it feels like the second generation could be the one that truly delivers on the concept.
How We Test
We test every smart home product we review thoroughly over an extended period of time. We use industry standard tests to compare features properly. We’ll always tell you what we find. We never, ever, accept money to review a product.
We test how each product integrates with other smart home systems including Amazon Alexa, Google Assistant, Apple HomeKit, IFTTT and Samsung SmartThings
We use each smart home product in a real world setting, integrating it into our home.
FAQs
Is the SwitchBot E-Ink Home Dashboard a hub?
No, you’ll need an additional product to act as a SwitchBot hub in your home.





























































You must be logged in to post a comment Login