Back in May, we reported that Apple was testing future AirPods equipped with low-resolution cameras designed to give Siri and Apple Intelligence some idea of what the person wearing them was actually looking at.
At the time, Apple had confirmed nothing. Three months later, Cupertino appears to have done some of the leaking itself.
A demonstration video discovered inside the macOS Tahoe 26.7 Release Candidate shows what appear to be unreleased camera-equipped AirPods being used with Apple’s Visual Intelligence system. In the short clip, a man looks at a book and asks Siri to save what he is seeing for later. The AirPods resemble AirPods Pro 3, although the stems appear somewhat larger. Apple has still not formally announced the product, its name, price or release date.
That last part remains important.
Advertisement
But this is no longer just somebody claiming that a supplier in Asia saw an interesting prototype.
These Cameras Are Not for Vacation Photos
The cameras are not expected to turn AirPods into tiny GoPros.
Previous reporting described them as low-resolution sensors intended to give Apple’s AI systems visual context, which is exactly what the leaked demonstration appears to show. Instead of pulling out an iPhone, pointing its camera at a book and invoking Visual Intelligence, the AirPods could potentially see the object already in front of you and let Siri act on that information.
Apple has already expanded Visual Intelligence on the iPhone to recognize, search, summarize and act on visual information, while the new Siri AI architecture announced at WWDC 2026 includes multimodal image understanding. Camera-equipped AirPods would move some of that interaction away from the screen in your hand.
Advertisement
And that is where this becomes considerably more interesting than another AirPods upgrade.
When Do Headphones Stop Being Headphones?
AirPods Pro 3 already combine music playback, ANC, hearing assistance, heart-rate sensing, Live Translation and fitness tracking. Adding visual awareness would push the product even further away from being merely a pair of wireless earbuds.
Advertisement. Scroll to continue reading.
You could potentially look at a sign and ask Siri what it says, identify an object, remember a book or product for later, receive contextual navigation information or use the system to better understand your surroundings without holding up a phone.
Advertisement
There are obvious accessibility possibilities as well. Apple is already using Apple Intelligence to provide richer descriptions and natural-language navigation through VoiceOver and Magnifier. Giving a wearable device visual context could eventually make some of those capabilities far more immediate for visually impaired users. Apple has not announced those specific applications for camera-equipped AirPods, so that remains potential rather than a promised feature.
Consumers Should Also Ask Who Is Looking
There is, of course, another side to this.
People can generally recognize Meta Ray-Ban smart glasses and understand that a camera may be pointed at them. Tiny sensors embedded inside AirPods could be much harder to notice.
Apple would therefore need to explain what the cameras record, whether visual information is stored, where processing occurs, what reaches Apple’s servers and how bystanders know when the sensors are active. None of those questions has been answered because Apple has not officially announced the product.
Advertisement
That conversation will matter just as much as battery life or sound quality.
AirPods Pro 3 (current model without cameras)
The Bottom Line
The leaked video suggests Apple’s camera-equipped AirPods are not about improving music playback at all. They are about giving Siri eyes.
For consumers, that could make AirPods more useful for accessibility, navigation, translation and everyday information without constantly reaching for an iPhone. It also moves Apple directly toward the same wearable-AI territory occupied by camera-equipped smart glasses, only through a product millions of people already wear without thinking twice about it.
Apple still has to convince us that putting cameras in our ears solves more problems than it creates.
But the bigger change is already becoming clear: the next important AirPods feature may have almost nothing to do with how they sound.
Smart glasses have become a recurring accessory amid the immigration crackdown.
Karissa Bell for Engadget
Immigrations and Customs Enforcement (ICE) has reportedly told employees that they are not permitted to wear Meta glasses while they work. A memo sent to staff said that “the use of Meta Glasses or similar devices could unintentionally capture, record, or transmit sensitive information, potentially compromising privacy and legal protections,” The New York Timesreported.
The policy apparently covers all employees of the agency, not just agents in the field. A Department of Homeland Security spokesperson told The NYT that workers have “always” been barred from using “personally owned body-worn cameras.” While the memo may be more of a clarification of an existing policy, the fact that ICE sent such a memo underscores how Meta’s smart glasses have become increasingly visible amid the broader immigration crackdown in the US.
ICE and Customs and Border Patrol (CBP) agents have repeatedly been spotted wearing Meta’s smart glasses over the last several months. In one case, reported by404 Media, a CBP agent was spotted recording with his glasses despite the policy. In another instance, a member of Border Patrol wore a pair to an immigration raid. There have been similar sightings in at least six states, according to an investigation conducted byThe Independent.
Advertisement
But while DHS is now advising staff to not use smart glasses while they work, the agency is reportedly interested in pursuing an official version of the technology. Budget documents reported by independent journalist Ken Klippenstein indicate ICE is hoping to equip its officers with bespoke smart glasses that have “biometric identification capabilities” by next year.
While Meta hasn’t publicly weighed in on whether its product is well-suited to law enforcement, an association with ICE isn’t likely to win over any new fans. The company is facing an intensifying backlash against the product. An unreleased facial recognition created by Meta has increased fears about how the device could potentially be used for surveillance. The glasses’ supposedly privacy-protecting LED has also proved to be easy to bypass.
Google is promising a better modem with the Pixel 11 series. The company claims its new MediaTek-made hardware is both faster and more power-efficient than the modems used in previous generations.
The switch is a notable one for Google’s Tensor chips, as earlier Pixel phones were criticised for modem performance. Previous generations of Tensor relied heavily on Samsung’s Exynos-based technology; however, the Pixel 11 marks a key change as the Tensor G6 moves to a MediaTek modem.
This partnership seemingly aims to bridge the gap with formidable rivals like Qualcomm’s Snapdragon, which has long set the gold standard in the Android space for connectivity. For Google, finally securing a dependable, uncompromising cellular experience is crucial if the Pixel line is to truly compete at the premium end.
Google has confirmed on the Google Store that the new modem is “reliable, faster, and more power efficient.” The company’s claims come with an important caveat, though. They’re based on pre-production devices tested in lab-controlled conditions. So while the figures sound promising, we’ll need to see how the Pixel 11 performs in everyday use before calling this a genuine upgrade.
Advertisement
That’s potentially good news for more than just connection speeds. Modem efficiency can have a direct impact on battery life. Additionally, better network performance could help avoid some of the performance and heat issues that have affected earlier Pixel generations.
Advertisement
For now, though, Google’s claims remain just that. The real test will come once the Pixel 11 range gets into more hands. Then we can see whether the MediaTek modem actually delivers better speeds, reliability and battery efficiency away from controlled testing.
Pixel 11 pre-orders are now open, so it shouldn’t be too long before we have a better idea of whether Google’s modem gamble has paid off.
If you’ve spent any time down the gaming PC rabbit hole, you’ll have hit this fork in the road already: do you build the thing yourself, or do you let someone else do it for you? It’s one of those debates that never quite dies down and is always a matter of preference – some folks prefer to have the control of building their own system, configuring every element, while others want the experts to take the strain to make sure everything works as it should the first time the PC boots.
While this age-old debate hasn’t really shifted, what has changed, though, is the gaming PC market itself. Component choice has exploded, and folks have more choice now than ever before, making it perhaps easier than ever before to build or spec out a custom gaming PC for themselves. You no longer necessarily have to choose between “fully custom” and “convenient” — but to understand why that matters, it helps to look at both routes properly first.
The case for building your own PC
There’s a certain satisfaction in building a PC from scratch. You get to pick every component yourself and learn how it all fits together, not to mention the genuine sense of achievement when you hit the power button for the first time and everything boots. For PC enthusiasts and hobbyists, that process is half the fun, myself included.
However, it’s worth being honest about what it actually demands. Building a PC requires a decent grasp of compatibility, or how everything fits together. Motherboard sockets, RAM speeds, PSU wattage, case airflow, cooler clearance and more are all worth being mindful of. Getting any of that wrong can mean a system that underperforms, or worse, doesn’t work at all. Then there’s the time: sourcing parts, waiting on deliveries, the build itself, and the inevitable troubleshooting when something doesn’t quite play ball.
Advertisement
Cable management, in particular, is a skill in its own right, and a messy build isn’t just an eyesore. Poor airflow from bad cable routing can quietly hurt your thermals and performance over time.
For first-time buyers or anyone switching over from console to a PC for the first time, that’s a lot to take on before you’ve even played a game. And if something does go wrong down the line, you’re generally on your own to diagnose it, since self-built systems don’t come with the kind of unified warranty support you’d get from a manufacturer or someone doing it on your behalf.
Advertisement
The case for buying a pre-built PC
It’s precisely here where pre-built systems earn their reputation. Buying from a specialist manufacturer such as CyberpowerPC means every component has already been tested for compatibility, the cable management is handled by people who do it for a living, and the whole system has been through quality assurance before it ever reaches your door to make sure everything will work as it should.
Warranty support is the other big one. A proper prebuilt gaming PC comes backed by a manufacturer who’ll stand behind the hardware, which matters enormously if a component fails outside of what you could diagnose yourself. For parents buying a system for a teenager, or for anyone who just wants a machine that works reliably from day one, that peace of mind is worth a lot.
Advertisement
The trade-off historically has been choice. Prebuilt used to mean picking from a handful of fixed configurations, often with compromises somewhere in the spec sheet. Manufacturers used to have a reputation for using no-name components where it mattered to keep costs down, although it’s become less common these days. That’s the bit of the market that’s changed the most.
The best of both worlds: configure your own with professional help
There is a third way, which is perhaps the best of both worlds – speccing out a custom PC from a reputable builder such as CyberPowerPC UK. Rather than forcing a choice between full customisation and professional reliability, CyberPowerPC UK’s custom gaming PC configurator lets you build a system to your exact spec — choosing from the latest NVIDIA GeForce RTX graphics cards, AMD Ryzen processors, and Intel Core processors to suit your needs and specific games you’re playing – and then hands the actual build over to people who do it for a living.
Advertisement
You get the tailored spec of a self-build, without taking on the risk of compatibility mistakes, botched cable runs, or a PSU that’s not quite up to the job. Every system is assembled, tested and quality-checked before it ships, and you’re covered by proper warranty and after-sales support if anything needs attention later. If you’d rather skip the configurator entirely, the prebuilt gaming PCs page has ready-to-go options for anyone who just wants a great system without the decision fatigue.
It’s a genuinely useful middle ground for a lot of the people currently weighing this decision up — first-time PC buyers who want guidance rather than a blank canvas, console gamers making the jump who don’t want to go the whole hog right out of the gate, and upgraders replacing an ageing system who don’t want to relearn PC building from scratch. Enthusiasts benefit too, since a configurator this deep still lets you get properly specific about the build without doing the assembly yourself.
Advertisement
It’s also worth noting that the PCs on offer from CyberpowerPC don’t just have to be for gaming. The systems are also built with streaming and content creation in mind as well, so if you’re planning to start streaming your sessions or editing footage on the side, the hardware you choose through the configurator can be specced to handle it.
Likewise, because these are proper, professionally built towers rather than more sealed-off options, there’s genuine headroom to upgrade down the line. Swap in a new GPU in a couple of years, add more storage or whatever it turns out you might need later down the line.
If you want a hand working out what’s right for you, CyberPowerPC UK’s team offers expert advice throughout the configuration process, and the support page is there for anything that comes up after your system arrives.
Advertisement
So, do you build or buy?
This is what it all comes down to. If you love the process of speccing out a custom unit, putting it together yourself and troubleshooting anything that crops up, the self-build route is rewarding.
Advertisement
However, there is something to be said for letting someone else take the majority of the strain, especially anyone buying their first gaming PC, switching from console, or upgrading without the time to relearn PC hardware from scratch. A configurable prebuilt system offers the best of both worlds: a machine built exactly to your spec, assembled and tested by people who know what they’re doing, and backed by warranty support if anything goes wrong.
Garmin watches are some of the best fitness trackers you can get, but they aren’t exactly cheap—many of my favorite ones cost $500 or more. Thankfully, you can usually find a good Garmin watch deal with enough patience and a keen eye. Right now, some of my favorite models, including the Garmin Fenix 8, Garmin Vivoactive 5, and Garmin Forerunner 165, are over 20 percent off. If you’ve been thinking about trying out Garmin (or upgrading from an older model), now is a good time to buy.
This is the fitness tracker that lives on my wrist, and considering I’ve tested dozens, that’s a big accomplishment. It’s the brand’s flagship watch, meaning it has all of the brand’s hardware and software bells and whistles—think built-in flashlight, speaker, and microphone, plus offline maps, diving profiles, and advanced running stats.
I love the Fenix 8 because it’s one of the only Garmin watches with premium features like offline navigation and a built-in two-tone flashlight that comes in multiple size options, including a small-ish 43 millimeters. Most other Garmin watches with these features (Garmin Forerunner 970, Garmin Enduro 3) come in one size (read: big) and dwarf my wrists.
Advertisement
Garmin Vivoactive 5 for $190 ($110 off)
The Vivoactive 5 is a great first Garmin watch, and it’s 37 percent off right now. It’s an older model (it launched in 2023), but you still have many of the brand’s best fitness and health features available, including in-depth fitness metrics, Body Battery (basically your energy score throughout the day), sleep coaching, and stress tracking. It’s also small, lightweight, and a little sleeker than some of the brand’s more outdoor-centric watches.
Garmin Instinct 3 AMOLED for $300 ($150 off)
While it isn’t matching its lowest price ever (that was $250 during Prime Day), 33 percent off is still an excellent discount for the Instinct 3. And compared to Garmin’s other outdoor watches (the Fenix 8 and Enduro 3), it’s a steal. It’s a chunky, durable, retro-looking watch with crucial adventure features like a touchscreen plus five-button control scheme, built-in white and red flashlight, and accurate dual-band GPS.
Garmin Forerunner 265 for $350 ($100 off)
The Forerunner 265 is an oldie but a goodie—it launched in 2023 and still strikes a great balance between advanced running features and price, undercutting the newer Forerunner 570 and Forerunner 970 by hundreds of dollars. It has advanced running metrics and, crucially, dual-band GPS, meaning more accurate pace and route details compared to more entry-level Garmin watches. It also comes in two sizes, 43 millimeters and 47 millimeters, so you can pick the one best suited to your wrist size.
Over in our Insider Chat, someone recently pointed out a tiered “REAL Rating” five-tier scale designed to replace the fairly blunt and misleading question of “did you use AI on that?” with something a bit more nuanced. As someone who believes the discussion about AI could use a lot more nuance, I’m all for the premise. I ran my own usage through their wizard and came out with a “one” — the tier for automation. While this is technically accurate, it also tells you very little about how I actually use AI.
Which is why I thought it made sense to revisit the public discussion regarding my AI usage.
But going through that thought process reminded me that it’s been a little while since I last spoke about how I’m using these tools here, and given that some readers want more transparency, I thought I’d update you on the latest. I’ve written about it at length a few times before, starting in April of 2024, when I described how I used a tool called Lex to help me edit articles. The key was always that I’d write the articles myself, and then I had trained Lex on my own writing style to ask it how it might improve the article. Sometimes it would give good advice that would make me rewrite, and sometimes… it would give bad advice that I would skip or ignore. But all in all it was a useful forcing function.
In June of 2025, I wrote about how I had built a personal task management tool, using a vibe coding tool called Lovable, which I was using to keep track of various tasks, including what I wanted to write about each day. At the beginning of this year, mostly out of curiosity, I explored whether or not you could, with a ton of scaffolding and detailed instructions and effort, get AI tools to write a passable Techdirt article, and concluded no, you absolutely could not. Every attempt was still a weak facsimile of a Techdirt article with iffy language and clichéd phrases.
Advertisement
In the time since then I’ve run that test for myself a few times, and even as the models have improved, in my experience, my initial analysis stands. It cannot write Techdirt-style articles well, and even if I wanted to use it that way, the rewriting, changing, and fact-checking would take way more time than just… writing it myself. So, yes, I continue to write my own articles.
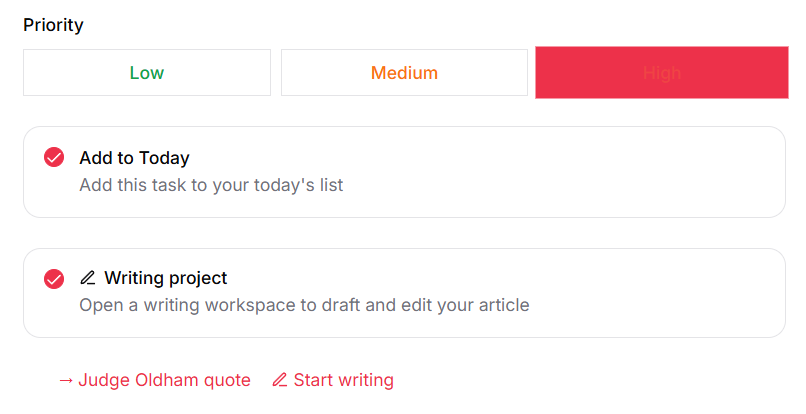
What’s changed in the last couple of years is that I’ve moved away from Lex (which has not received many updates in the past year or so as the team behind it appears to have moved on to other projects), and I ended up building my own editing tool, which is built directly into the task management tool I mentioned last year (which is now self-hosted and entirely within my control). The benefit now is that I can turn any task immediately into a writing project with a single click:
That was the task that turned into this article about Judge Andrew Oldham’s bizarrely out of context quote on mail-in ballots. From there I can go into the writing project which has a bunch of useful features. Within each writing project I can add sources, which turn out to be really useful during edits. I can upload PDFs, URLs, or just add text myself (and actually, as I was finishing up this article, I had it build a new feature that will automatically add all the sources I link to in a story, so the editor checks them even if I don’t add them manually, which is another example of realizing a potentially useful feature and having it created on the spot). I can also have the tool go out and research if there are other sources I should add, though I haven’t yet found that to be that useful as compared to just searching myself.
The tool is specifically trained on my writing, and has a detailed style guide regarding my voice and style, as well as a detailed system prompt of what I am looking for in editorial help vs. what I’m not looking for (e.g., yes, challenge my assumptions and facts, but no do not think you need to rewrite what I’ve written).
After I’ve written the full piece, there’s a button to open up the “AI review” tool (which lets me use any underlying LLM engine I choose, including local ones), which will give me a critical review and make general suggestions about what works and what doesn’t. I do switch up models from time to time to see how they work, but generally will default to either Claude Opus 5 or Sonnet 5. I am also using Gemma 4 locally and am increasingly trying to use that. It’s good on straightforward pieces, but less so once the argument gets more complicated. I’m hopeful that the next generation of local models will be more reliable.
For example here’s part of the initial review of my first draft on the Oldham ruling:
Advertisement
The only specific line edits tend to be suggestions on typos or confusing sections, such as here where it suggested a way to clean up and tighten a poorly drafted sentence in my initial draft:
You can also see that “Discuss” button in there, which I will frequently use to debate or discuss certain suggested edits if I think the suggestions miss the mark or are unnecessary. Or I’ll just reject them if I totally disagree.
Usually at that point I’ll do a more thorough rewrite based on my own reread of the article with an eye towards what it called out as problematic. For what it’s worth, this is where the inclusion of original sources is often quite helpful, because the AI will press me on things if its review felt that I’m not being completely fair and honest regarding the source material. Sometimes it calls me out for missing stuff and suggest I dig deeper (it’s not always correct, but often is, and pushes me to reread things even more carefully). Here’s one example, where the AI editor tool told me to go back and review the original documents more closely:
It also catches me when I start rambling, which often happens on a first draft when I’m trying to figure out the best way to nail down a certain point:
Again, I don’t always follow its suggestions, but it does make me revisit and look at rewriting sections to make them clearer and tighter.
Separately, I have a built in set of “sub-agents” that will check certain things, including suggesting better headlines (this is very hit or miss, but usually at least helps me think of something better than either my initial attempt or its suggestions) and one sub-agent whose whole job is to poke holes in the arguments in the piece (this one is fun, but annoying, as it’s basically trolling myself, but in a way that helps me make the arguments stronger):
You may notice that the features I appreciate the most here are the ones that in some sense make my life harder, by telling me to work harder, check my sources, and question my arguments. Considering how often we hear about the problem with these tools being how much smoke they blow up the asses of users, it’s certainly possible to set them up to deliberately challenge and provoke you. The parts I find most useful are the parts built to disagree, because it helps make my work stronger by stress testing it before it goes out in the world.
Anyway, once the piece is then written and edited, it’s a two-click process to import the final version into Techdirt’s WordPress system and hand it off to someone else on the team for a human review before it goes into the queue to get posted.
Compared to how I described the process two years ago, the actual writing process hasn’t changed — which is kind of the whole point. The human part (the thing that is central to what I do) doesn’t get automated away. What’s changed is the structure around it. I have total control over the tool now, it’s better trained and designed to help me write better.
Advertisement
There are a few other more experimental features, including one where after I’ve added all my sources to the writing project, I’ll also write a short paragraph (or two or three) about my focus on the article, and the system will ask me some questions based on the sources and how I want to frame the article. This is sometimes useful in testing some of my assumptions before diving into the writing. This has been most helpful when I’m a bit undecided on what the central backbone of a piece really should be. In the past I would just start writing, realize I went down the wrong path, and then start again. Using the “editorial interview” feature has helped me a few times to think deeper about which way I want to take the article before I get to the actual writing.
I also built in a tool to also write a potential outline of the article based on that “interview,” but I’ve only tried to use that a couple times, and neither time did I follow the outline, so I’ll likely just get rid of that feature. Once again, the benefit of having total control over the tool. For all the (reasonable! understandable!) complaints of big tech companies “shoving AI into everything,” with this tool, I decide what goes where, and if something doesn’t work, I can just remove it.
I’ve also built in a bunch of other features that are simply useful for organizing my day and focus. The same tool creates a morning and afternoon briefing based on my tasks, my email, my calendar, and a growing knowledge base about me and my work. It also texts me news stories it finds that might be interesting for Techdirt (based on search criteria I have provided), which I can turn into tasks/writing projects with one response. Just last week I received my Pebble Index 01 ring that I had mentioned last year, and one of the first things I did with it is hack it so that I can speak into it to create tasks. It can also research things and leave the notes in the task tool (and text me back quick facts if I need them).
In short, as I’ve suggested repeatedly, the power of AI tools is in empowering individuals to be able to accomplish what they want to do, rather than replacing humans or doing the fundamental work. Building very personalized tools that I can constantly update and tweak to meet my needs has made me less and less interested in using software that other people built for me. It’s shockingly empowering to look at a feature that doesn’t quite work the way you want, and to be able to just tell your tools “hey, make this work differently” and have it work properly.
Advertisement
As I mentioned up top, using the wizard on that REAL Ratings site, I came out with a score of “one,” noting that I used AI for automation. You could argue that it maybe should be somewhere between one and two, depending on how much you consider the “brainstorming” part of what the editor feature is doing. But I’d argue this is a long way from the assumption many have of “if you use AI you’re using it for slop.”
Either way, I’m still not writing articles with these tools, and I don’t plan to start. The assumption that any use of AI means you’ve handed your brain over to it misses the part I actually find interesting: building your own tools, on your own terms, and telling them what to do rather than the other way around.
A prevention score tells you what a control recognizes. It doesn’t tell you what that control stops.
Now in its fourth year, the Blue Report 2026 from Picus Labs measures how enterprise prevention and detection actually perform in production, across more than 338 million attack simulations run in real customer environments from January through June, 2026.
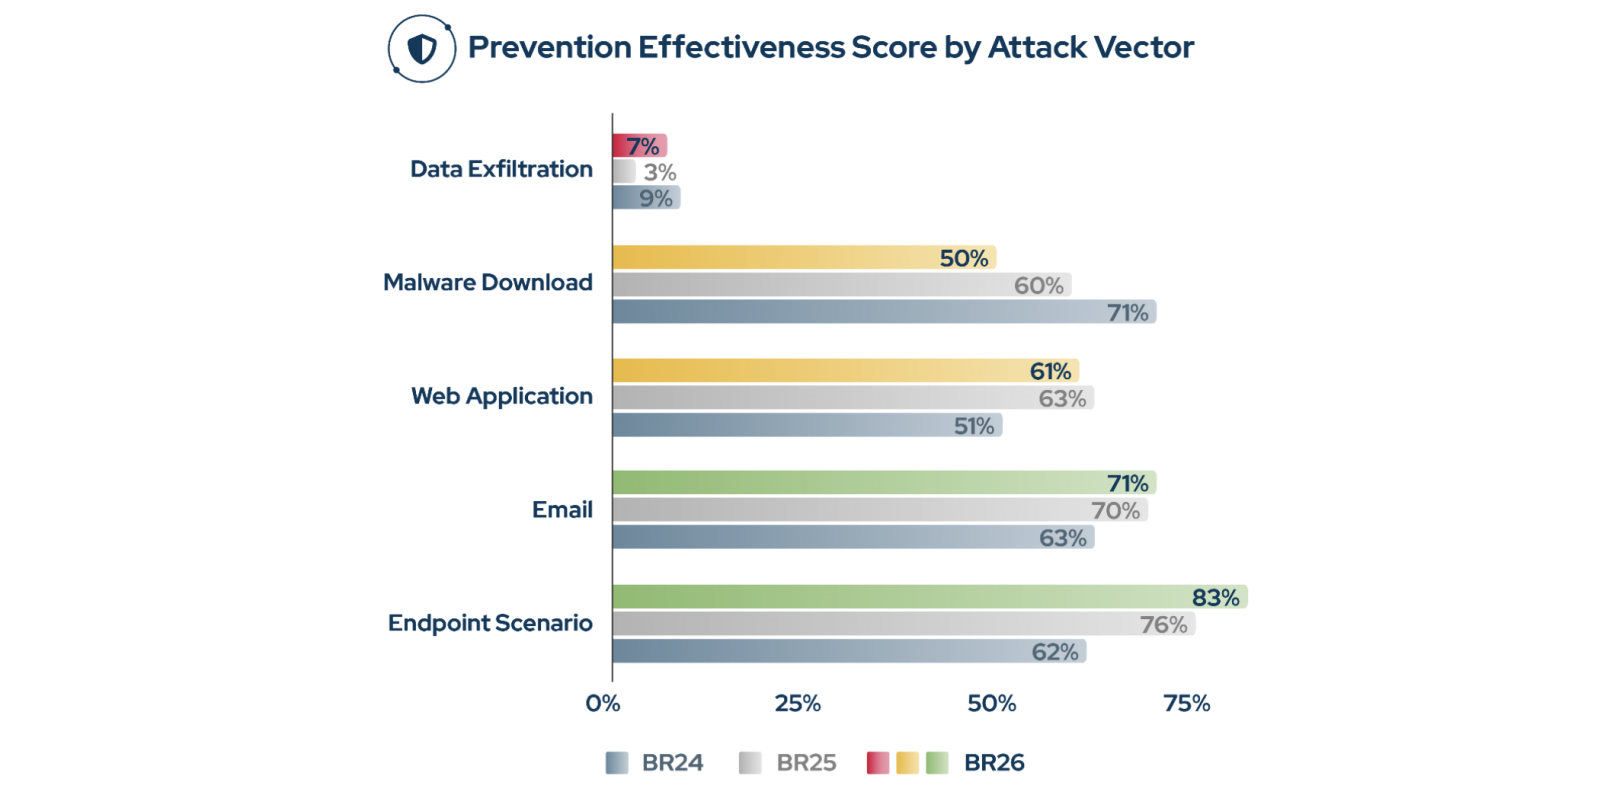
The headline is a genuine recovery, with a caveat: yes, prevention effectiveness rose from 62% to 69%, back to its 2024 peak.
Advertisement
But that number is a stack-wide average, and it masks a softer, more vulnerable interior.
The same controls that block a well-known attack tool let a quieter version of the same technique slip straight past your defenses. What decides the outcome isn’t the product in place, but how recognizable the attacker’s method is, and whether anyone tested for the quiet variant.
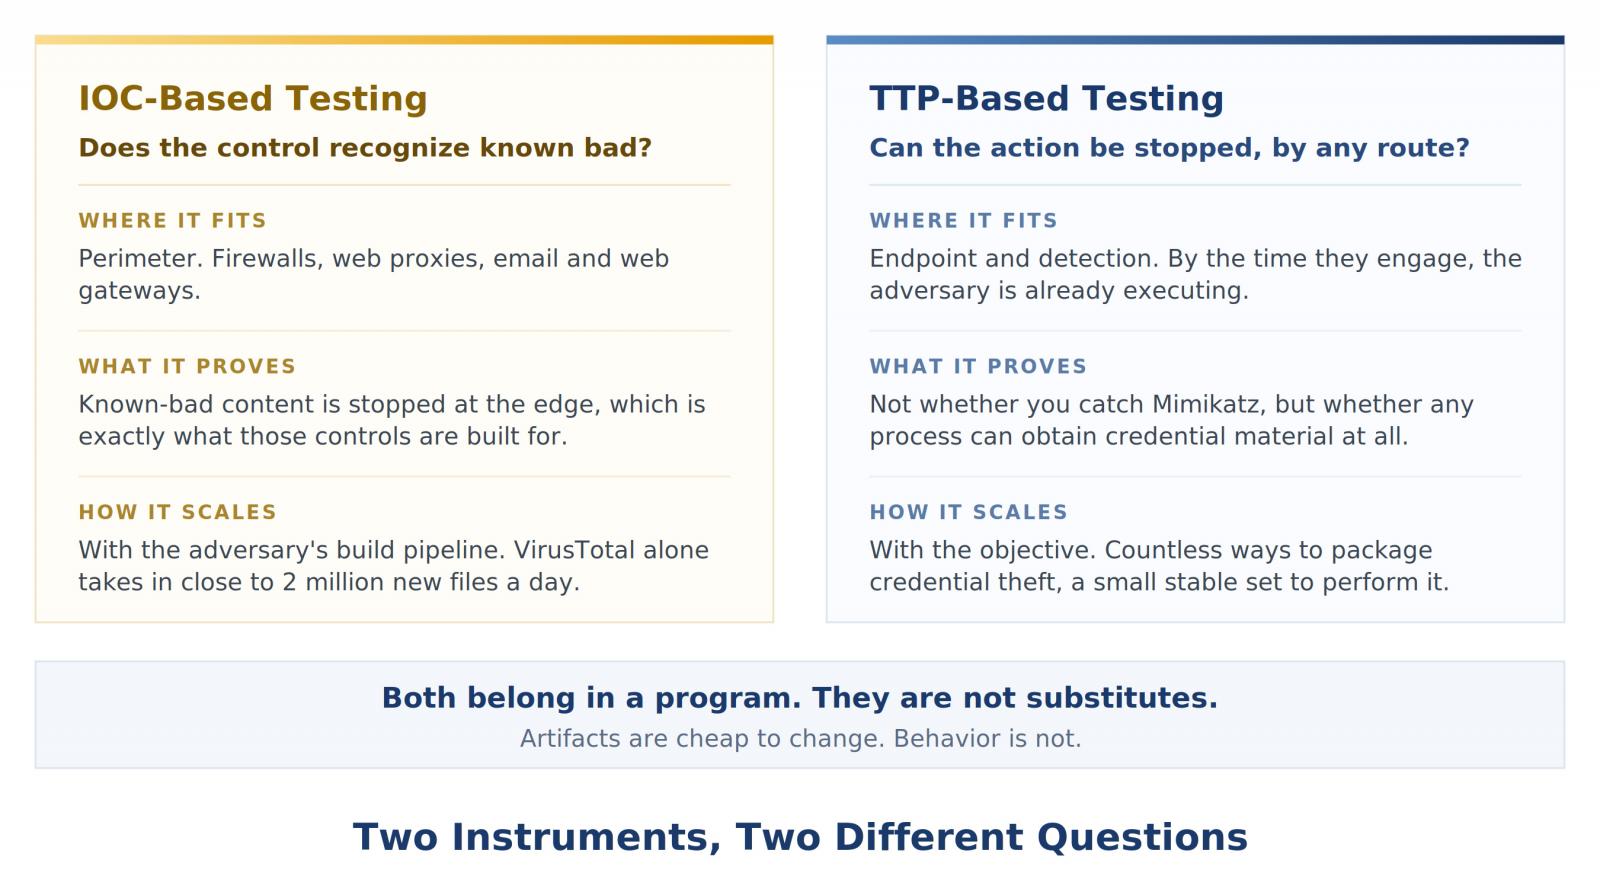
IOC-based and TTP-based security testing each measure different things
Whether a defense holds depends on which of two questions you put to it.
IOC-based testing asks whether a control recognizes known bad. Malware samples circulating in the wild are delivered as download attempts, and perimeter controls such as firewalls, web proxies, and secure email gateways either block them or don’t.
Advertisement
For this layer this is the right instrument: stopping known-bad content at the edge is what those controls are for.
Behavioral, TTP-based testing asks whether a control stops the action, by any route. Not “do you catch Mimikatz?” but “can a process on this host obtain credential material at all?”
That is the question endpoint and intrusion detection controls have to answer, because by the time they get involved, the adversary is almost always already executing.
Artifacts are cheap to change; behavior is not.
Advertisement
Yes, you need both. And yes, you should challenge the finance folks who’ll say you don’t.
The asymmetry is structural, and intentional.
Unfortunately, the edge is slipping too.
In this year’s data, the IOC-based prevention rate for malware downloads fell to 50% across customer environments, from 60% last year and 71% in 2024.
Advertisement
Even the layer that signatures cover best is giving way. And a passing score here says nothing about the behavior underneath, which is where the Mimikatz result comes in. Here’s a preview: it’s not good.
Your controls stop the version of the attack they recognize. Take the same behavior by a quieter route, and it walks through, while your last test still says covered.
See what your stack actually stops in the Blue Report 2026, and test the behavior instead of the procedure.
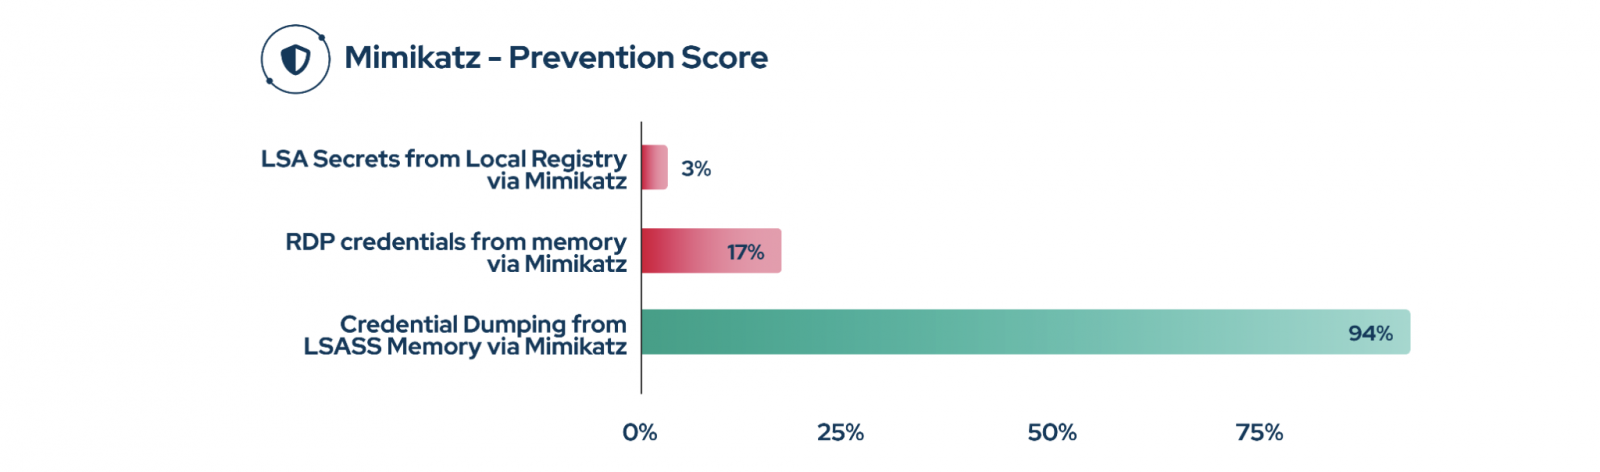
Change how Mimikatz dumps credentials, and prevention drops from 94% to 3%
With Picus Autonomous Penetration Testing, customer environments ran the same tool, Mimikatz, at the same objective three ways. The prevention scores were shocking, and could not have been further apart.
Advertisement
Dumping credentials from LSASS process memory, the classic and heavily signatured path, was blocked in 94% of attempts. Good.
Pulling RDP credentials from other memory locations with the same tool: 17%. Not good.
Reading LSA Secrets from the local registry: 3%. Appalling.
All three are siblings under one parent technique, OS Credential Dumping (T1003), and all three end with the attacker holding your precious credential material.
The only variable was how conspicuous the route was. In this case, Mr. Spock’s classic “live long and prosper” has morphed into “slip in quietly and succeed.”
Advertisement
The mechanics explain the spread.
The LSASS path is loud in a matchable way: a process opens a handle to lsass.exe and reads its memory, in other words, an event vendors have instrumented for years. Reading LSA Secrets never touches lsass; it runs as SYSTEM and reads a registry hive, indistinguishable from ordinary privileged activity. A control built around the first event has nothing to fire on for the second.
And even that 94% is thinner than it looks. It was measured against one known build of an open-source tool, whose recognizability lives in how it was compiled, not in what it does.
Rename the strings a signature keys on, or recompile it, and the hash and telltale markers become new.
Advertisement
Load it reflectively and the code never lands on disk to catch.
Or skip that build and take the same dump with a Microsoft-signed utility like ProcDump or comsvcs.dll, then parse it offline.
Each ends the same way, an attacker with your credentials in hand. The behavior never changes. Only the thing the signature was looking for does.
Inside the environment, prevention drops to 37%
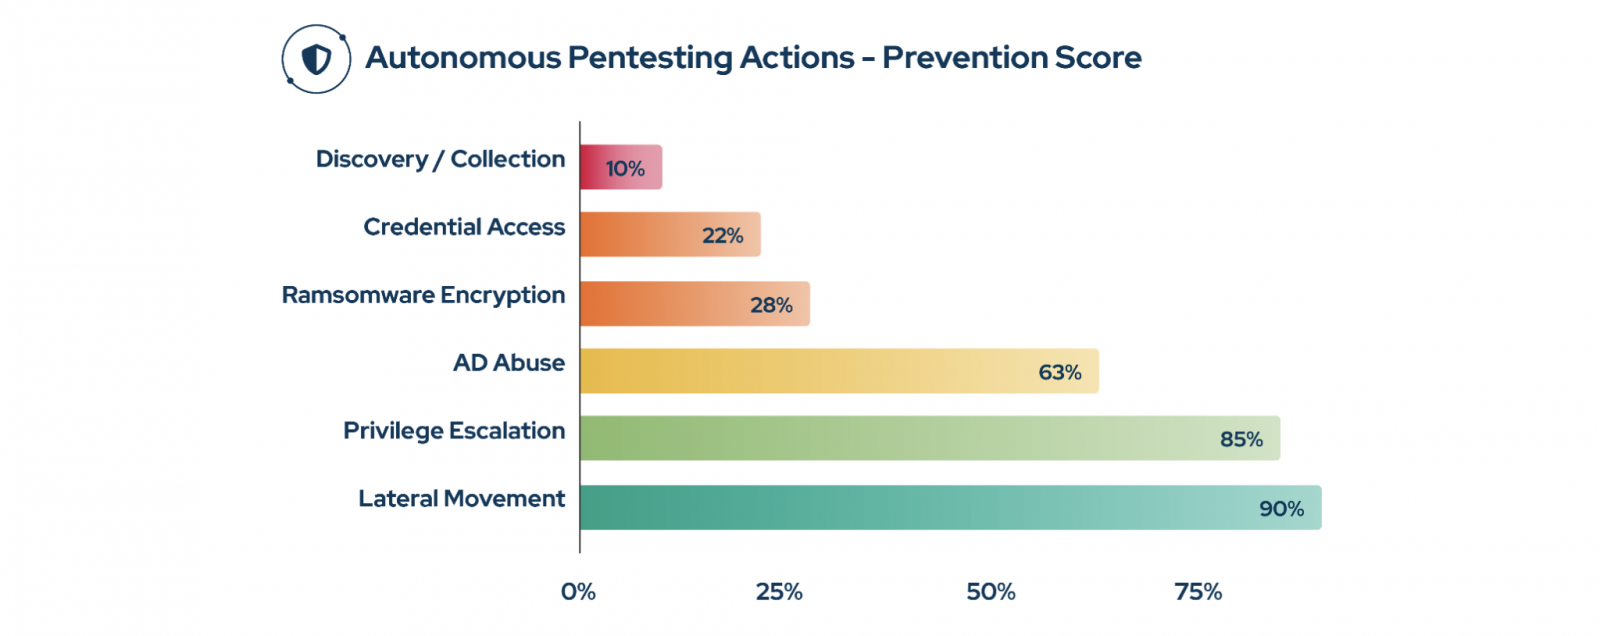
Mimikatz is one behavior; the same split runs across the whole interior. The 69% overall Prevention Rate measures how well controls stop attacks at the boundary. Autonomous penetration testing measures something harder: what an attacker can actually accomplish once they’re inside as an “authenticated user.” Across the full set of those post-compromise actions, only 37% were blocked.
The perimeter stops two attacks in three; once inside, this falls to barely one in three.
Advertisement
Loud actions were caught: lateral movement was discovered around 90% of the time, UAC bypass around 85%, credential reuse and Active Directory abuse around 63%.
Then, unfortunately, the floor drops out.
Credential material read passively from memory and the registry: 22%, with local registry secret extraction blocked in? Less than 1%. Discovery and collection: 10%, SharpHound domain enumeration and local file collection run almost entirely unopposed.
That 22% is the registry variant at scale, and the 10% is the same profile: with nothing for an indicator to bind to, it’s full-on, unfettered progress toward the attacker’s objective.
Advertisement
Closing the gap
Run both, and read each for what it measures.
Known-bad testing is the baseline for perimeter controls: firewalls, web proxies, WAFs, secure email gateways. They deliver known malicious samples as download attempts and check whether the edge blocks them, which tells you the perimeter is holding but nothing about the behavior underneath, and what happens inside.
Behavioral validation is the other half, and it belongs to the endpoint and detection layer: EDR, IDS, SIEM content. Proving credential access is covered means testing every route to it: LSASS memory, the registry, alternate memory locations, native tooling, recompiled builds.
Validate only the famous procedure and you close an item that’s actually still open, the most dangerously incorrect verdict a validation program can produce.
Advertisement
Doing that by hand doesn’t scale, which is where Picus Swarm comes in: the orchestration layer that runs the many behavioral variations of an attack across your environment and validates each against the controls you’ve deployed, so coverage is proven by the behavior, not by the one procedure a signature already recognizes.
Ready, finally, for some good news? None of this calls for a bigger stack. It calls for knowing which controls you already own will break the chain, so every exposure becomes a decision you can defend: Patch, Mitigate, Monitor, or Accept with Evidence.
Read the full report
The findings above represent just one thread in The Blue Report 2026, Picus Labs’ fourth annual study of how enterprise prevention and detection hold up in production, not in a lab.
There’s much more inside:
How your industry and region actually scored this year.
Advertisement
The year’s most-exploited vulnerabilities, most stopped in under 25% of attempts.
The threat groups and ransomware prevention lost the most ground to.
The detection failures behind a 58% log score and a 14% alert rate.
Media Player Classic – Home Cinema (MPC-HC) is a free and open-source video and audio player for Windows. MPC-HC is based on the original Guliverkli project and contains many additional features and bug fixes.
The player supports all common video and audio file formats available for playback. It has a built in DVD player with real-time zoom, support for AVI subtitles, built-in MPEG2/SVCD/DVD codec. Media Player Classic was created and is currently maintained by a programmer named “Gabest”. This is a mod of Media Player Classic design for home cinema usage.
Is MPC-HC still being developed?
The original MPC-HC project ended in July 2017 with version 1.7.13. However, a community fork maintained by “clsid2” on GitHub has continued development and is actively releasing new builds.
What is the difference between the original MPC-HC and the clsid2 fork?
The original team stopped due to a lack of developers. The clsid2 fork picked up the codebase and continues to maintain it. It focuses on bug fixes, updating internal libraries like LAV Filters and MediaInfo, and keeping compatibility with modern Windows versions.
Advertisement
How often is MPC-HC updated now?
The clsid2 fork is updated regularly with development builds and stable releases. These include codec updates (e.g., AV1, HEVC improvements), bug fixes, and minor feature improvements. Updates are less frequent than flashy media players, but they still occur several times a year.
Does MPC-HC support modern video formats?
Yes, MPC-HC comes bundled with LAV Filters, which allow playback of most modern formats, including H.264, HEVC, VP9, AV1, and high-resolution audio and video files without the need for additional codec packs.
Does MPC-HC support hardware acceleration?
Yes, MPC-HC supports GPU-accelerated decoding through DXVA2, D3D11, Intel QuickSync, and other APIs, helping reduce CPU usage during playback of high-definition or 4K video.
What are the main differences between MPC-BE and MPC-HC?
While both come from the same Media Player Classic codebase, MPC-BE features a modernized interface, more customization options, built-in dark themes, and broader codec support. MPC-HC is lighter and closer to the original classic design, while MPC-BE focuses on usability and new features, it can use a bit more resources due to extra features and UI elements.
Advertisement
Features
Play HDR video
This requires using either MPC Video Renderer (MPCVR) or madVR.
These renderers can be selected here:
Options > Playback > Output
With other video renderers, the colors will be wrong!
MPCVR is now included and is the recommended renderer for modern systems. MadVR needs to be installed separately. MPCVR also supports Dolby Vision. MadVR does not.
For optimal performance you should change the hardware decoder to D3D11 in LAV Video Decoder settings when using MPCVR on Windows 10/11, because this renderer uses DirectX11.
The installer of MPC-HC is very basic (and that will not change).
I therefore recommend using K-Lite Codec Pack. That includes MPC-HC and other essential components. It has a very advanced installation that can automatically create file associations, and helps you with easy configuration of important MPC-HC settings.
The Standard version should be sufficient for most people. Use Full version of you like to use MadVR.
Modern GUI Theme (Dark or Light)
Options > Player > User Interface
It is also possible to change the height of the seekbar and size of the toolbar buttons.
Video preview on the seekbar
Options > Player > User Interface > Hover type
Ability to search for subtitles
Press D for manual search.
Or enable automatic search in: Options > Subtitles > Misc
Adjust playback speed
Menu > Play > Playback rate
The buttons in the player that control playback rate take a 2x step by default. This can be customized to smaller values (like 10%):
Options > Playback > Speed step
Adjusting playback speed works best with the internal audio renderer. This also has automatic pitch correction.
Options > Playback > Output > Audio Renderer
MPC-HC can remember playback position, so you can resume from that point later Options > Player > History
You can quickly seek through a video with Ctrl + Mouse Scrollwheel.
You can jump to next/previous file in a folder by pressing PageUp/PageDown.
You can perform automatic actions at end of file. For example to go to next file or close player. Options > Playback > After Playback (permanent setting) Menu > Play > After Playback (for current file only)
Advertisement
A-B repeat
You can loop a segment of a video. Press [ and ] to set start and stop markers.
You can rotate/flip/mirror/stretch/zoom the video
Menu > View > Pan&Scan
This is also easily done with hotkeys (see below).
There are lots of keyboard hotkeys and mouse actions to control the player. They can be customized as well.
Options > Player > Keys
Tip: there is a search box above the table.
You can stream videos directly from Youtube and many other video websites
Put yt-dlp.exe in the MPC-HC installation folder.
Then you can open website URLs in the player: Menu > File > Open File/URL
You can even download those videos: Menu > File > Save a copy
Tip: to be able to download in best quality with yt-dlp, it is recommended to also put ffmpeg.exe in the MPC-HC folder.
Several YDL configuration options are found here: Options > Advanced This includes an option to specify the location of yt-dlp.exe in case you don’t want to put it in MPC-HC folder.
Note 1: You also need to install Microsoft Visual C++ 2010 SP1 Redistributable Package (x86)
Note 2: yt-dlp nightly build (very latest version made daily)
Note 3: yt-dlp win7 compatible build
Besides all these (new) features, there have also been many bugfixes and internal improvements in the player in the past years that give better performance and stability. It also has updated internal codecs. Support was added for CUE sheets, WebVTT subtitles, etc.
What’s New
Changes from 2.7.3 to 2.7.4:
Updates:
Updated LAV Filters to version 0.82-4-gab7ca
Updated MPC Video Renderer to version 0.10.6.2555
Changes/additions:
MPC Video Renderer is now the by default renderer on the majority of systems. Previously EVR-CP was the default. MPCVR is a more advanced modern renderer with support for HDR video.
MPC-HC will detect your GPU(s) (once) after updating to this new version and will adjust the video renderer and hardware decoding settings when it makes sense.
Added an option to show the playback timer next to the seekbar instead of inside the statusbar. By default it is placed at the right side. There is an advanced option to place it at the left side. Tip: seekbar height can be adjusted in the options. Timer text size is scaled accordingly.
Added a new customizable viewing preset (hotkey 4). By default this hides the menu and statusbar compared to the normal viewing preset (hotkey 3).
Added an advanced option to specify the default viewing preset when starting the player. By default it remembers to last used
viewing mode.
Added a submenu to playlist context menu for adjusting the playlist location.
Fixes:
A few crash fixes, bug fixes and small improvements.
OpenSubtitles download error 406
Subtitle downloads from OpenSubtitles may fail depending on time of day. This is due to our daily download quota being exceeded. Current amount of donations is barely enough to pay for the existing quota. So it is unlikely that quota can be increased and situation will get worse over time. If you create an OpenSubtitles account and configure it in MPC-HC settings then you may be able to bypass the quota. Options > Subtitles > Misc > Right-click on OpenSubtitles.com > Setup > Fill in username/password
Advertisement
Overview of features
A lot of people seem to be unaware of some of the awesome features that have been added to MPC-HC in the past years. Here is a list of useful options and features that everyone should know about:
Play HDR video
This requires using either MPC Video Renderer (MPCVR) or madVR.
These renderers can be selected here:
Options > Playback > Output
With other video renderers, the colors will be wrong!
MPCVR is now included and is the recommended renderer for modern systems. MadVR needs to be installed separately. MPCVR also supports Dolby Vision. MadVR does not.
For optimal performance you should change the hardware decoder to D3D11 in LAV Video Decoder settings when using MPCVR on Windows 10/11, because this renderer uses DirectX11.
(Automatic detection of GPU and configuration of the above settings is high on my ToDo list, so MPC-HC will have better default out-of-the-box settings on modern systems in the future.)
The installer of MPC-HC is very basic (and that will not change).
I therefore recommend using K-Lite Codec Pack. That includes MPC-HC and other essential components. It has a very advanced installation that can automatically create file associations, and helps you with easy configuration of important MPC-HC settings, such as preferred subtitle language. It also does automatic configuration of renderer and hardware decoding, for best performance and HDR support.
The Standard version should be sufficient for most people. Use Full version of you like to use MadVR.
Modern GUI Theme (Dark or Light) or the old classic theme
Options > Player > User Interface
It is also possible to change the height of the seekbar and size of the toolbar buttons.
Plus there are options to show audio/video details in the statusbar, such as codec and resolution.
Customizable toolbar buttons
You can add/remove/re-order the player buttons.
There are also several different toolbar designs to choose from.
Video preview on the seekbar
Options > Player > User Interface > Hover type
Ability to search for subtitles
Press D for manual search.
Or enable automatic search in: Options > Subtitles > Misc
Adjust playback speed
Menu > Play > Playback rate
The buttons in the player that control playback rate take a 2x step by default. This can be customized to smaller values (like 10%):
Options > Playback > Speed step
Adjusting playback speed works best with the internal audio renderer. This also has automatic pitch correction.
Options > Playback > Output > Audio Renderer
MPC-HC can remember recently played files and also their playback position, so you can resume playback from when you left Options > Player > History
You can quickly seek through a video with Ctrl + Mouse Scrollwheel.
You can jump to next/previous file in a folder by pressing PageUp/PageDown.
You can right-click on the framestep button to step backwards. Some other buttons also have right-click actions, such as closing file by right-clicking stop.
You can perform automatic actions at end of file. For example to go to next file or close player.
Options > Playback > After Playback (permanent setting)
Menu > Play > After Playback (for current file only)
A-B repeat
You can loop a segment of a video. Press [ and ] to set start and stop markers.
You can rotate/flip/mirror/stretch/zoom the video
Menu > View > Pan&Scan
This is also easily done with hotkeys (see below).
There are lots of keyboard hotkeys and mouse actions to control the player. They can be customized as well.
Options > Player > Keys
Tip: there is a search box above the table.
You can hide GUI elements even in windowed mode
Options > User Interface > Hide Windowed Controls
That hides most GUI elements during playback. To show them simply move your mouse to bottom of window.
You can even hide everything except the video by pressing 1 (restore normal view with 3).
You can seek inside the playlist by simply typing text (when playlist window has the mouse focus).
MPC-HC also supports Blu-ray playback.
Only limitation is that you need to use a decrypting tool.
And it also does not support Blu-ray menus, but you can use the navigate menu in the player to select the content to play.
You can stream videos directly from Youtube and many other video websites
Put yt-dlp.exe in the MPC-HC installation folder.
Then you can open website URLs in the player: Menu > File > Open File/URL
You can even download those videos: Menu > File > Save a copy
Tip: to be able to download in best quality with yt-dlp, it is recommended to also put ffmpeg.exe in the MPC-HC folder.
Several YDL configuration options are found here: Options > Advanced
This includes an option to specify the location of yt-dlp.exe in case you don’t want to put it in MPC-HC folder.
Note 1: You also need to install Microsoft Visual C++ 2010 SP1 Redistributable Package (x86)
Note 2: For optimal Youtube support you may also need to put deno.exe in same folder as yt-dlp.
Note 3: yt-dlp nightly build (very latest version made daily)
Note 4: yt-dlp windows7 compatible build
Besides all these (new) features, there have also been many bugfixes and internal improvements in the player in the past years that give better performance and stability. It also has updated internal codecs. Support was added for CUE sheets, WebVTT subtitles, etc.
You should really take a few minutes to look through all the options pages if you are a new user or if you are upgrading from a very old version. Don’t forget the advanced options page.
The big picture: Park-outside recalls are becoming a bigger issue for automakers and drivers as vehicles add more electrical systems, battery technology, and software-controlled components. For drivers, the warnings can mean months of inconvenient parking habits while manufacturers work to provide repairs.
In the first seven months of 2026, the NHTSA issued 17 park-outside recall campaigns affecting about 1.7 million vehicles. Eight of those recalls were announced in June and July, including a warning covering 1 million Jeep vehicles with an electrical connection issue involving power-steering pumps.
The notices tell drivers not to park in garages or near buildings because a vehicle could catch fire after it has been turned off. In some cases, owners are also told not to charge their vehicles until repairs are available.
The problem is not limited to electric vehicles. Fire risks can involve high-voltage batteries in plug-in hybrids, but they can also come from wiring, starter relays, seat motors and other components that still carry electrical current after the engine is shut down.
Advertisement
“The engine is off, but the circuits are still hot, and they stay hot all the time,” Frank Borris, a former NHTSA investigator who now works as a safety consultant, told the Washington Post.
“There is a lot more electronics in vehicles today,” he added, “and that means more stuff can go wrong.”
NHTSA created the park-outside designation in 2015 to draw attention to recalls involving fire risks in or near buildings. In 2022, it added a park-outside warning box to its online recall listings to make the notices easier for consumers to spot.
Advertisement
Carfax estimates that about 3.2 million vehicles nationwide currently have an unresolved park-outside recall. The notices can leave owners in a difficult position because repairs and replacement parts may not be immediately available.
“For consumers, there seems to be no easy choices,” said Sean Kane, president of Safety Research and Strategies, an auto-safety analysis firm. “Where are you going to park it?”
That issue is especially difficult for people who live in apartments, condos or other buildings with enclosed parking. “What if you live in a condo with a parking garage? What are you going to do?” Kane said.
The Jeep plug-in hybrid recall shows how serious the risk can be. More than 320,000 Jeep Wrangler and Grand Cherokee plug-in hybrid vehicles were recalled because of a high-voltage battery fire risk. Owners were told to park outside, away from structures, and not charge their vehicles until the fix was completed.
Sarah Lammersen received the recall notice for her 2022 Jeep Wrangler plug-in hybrid late last year. She texted her dealership, “I hope the car doesn’t catch on fire while we wait to schedule an appointment.” According to a lawsuit, the Jeep caught fire days later while her daughter was driving it. No one was hurt, but the vehicle was destroyed.
In another case, a man in Fargo, North Dakota, found his parked Hyundai Santa Fe on fire in his garage in December. He later learned that the vehicle had been subject to a park-outside recall. NHTSA has said it is aware of several injuries in recent years that appeared to be tied to similar vehicle fires.
“It can be a giant disaster when cars catch fire and no one is there to see it,” said Michael Brooks, executive director of the Center for Auto Safety.
Advertisement
Some owners face another problem: security. Millions of Hyundai vehicles have received park-outside recalls in recent years, including some models that lacked anti-theft technology and were widely targeted by thieves.
Kane said owners have described the choice as difficult. “I don’t want my house to burn down,” he recalled them telling him. “But I don’t want my car to get stolen. What am I supposed to do?”
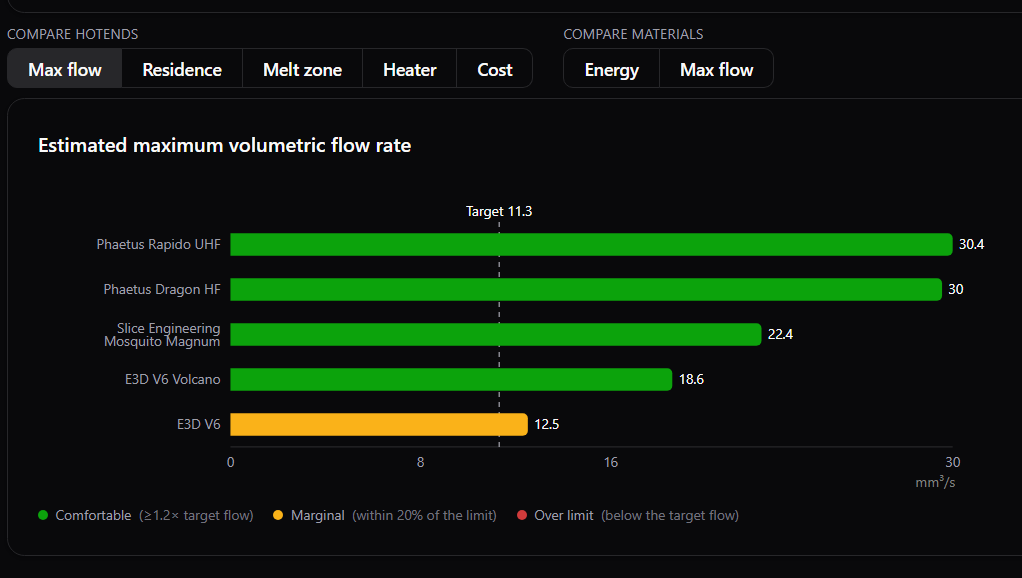
When it comes to 3D printing in the FDM world, you can go a long way just relying on standard settings that ship with your 3D printer and/or slicer. If you want to push the limits, though, it pays to better understand the hardware and materials you’re working with to know what you can get away with. To that end, [Robert Samples] put together the MeltCalc database to help.
The purpose of MeltCalc is simple—it collates data on hot ends and materials regarding factors like maximum flow rate, print speeds, and heater requirements. If you’re wondering whether a given hot end can flow a given filament at a given rate, for example, this tool is a great place to start. It features 64 different hot ends and 36 polymers typically used in the 3D printing world, and can spit out maximum flow rates and print speed estimations even accounting for fancy tech like Core Heating Technology (CHT) nozzles. It’s all based on thermodynamic modelling which [Robert] put together based on his experience as a chemist who works with polymers. His aim was to provide a tool with realistic flow rates for hot ends, so that end users don’t have to just rely on often-optimistic marketing numbers.
For those eager to dive deeper into the code and modelling, the project source is available on Github. We’ve featured all kinds of other useful hacks in this space lately, too, like our recent look at how to achieve wave overhangs. If you’ve got your own nifty 3D printing tools in the works, don’t hesitate to notify the tipsline.
Aaron from MacRumors shared the new findings in a post on X. If your hair happens to block the camera on your AirPods, you’ll get an error titled “Hair Detected.” The message reads, “To get the most accurate information about things in your environment, make sure AirPods are not covered.”
Some additional info about AirPods Pro 4 with cameras, found in macOS 26.7 RC:
If you have long hair that blocks the camera, there will be an error that is titled “Hair Detected” that says “to get the most accurate information about things in your environment, make sure AirPods… https://t.co/hUbWovpsyc
It’s a small detail, but it makes sense. Since the camera relies on a clear line of sight to feed information to Visual Intelligence, anything blocking it, including your own hair, would stop the feature from working properly. Apple seems to have thought this through so users aren’t left confused about why the camera suddenly isn’t picking anything up.
What is Secure Pairing all about?
The second detail is a feature called Secure Pairing. According to the string found in the build, it says, “Please put your AirPods in case to continue Secure Pairing.” While we don’t have the full picture of how this process works yet, it strongly suggests that setting up the camera feature will involve an added security step, likely to confirm you’re actually the owner before granting access to your surroundings.
Nadeem Sarwar / Digital Trends
Given that these AirPods will essentially be capturing and processing visual data from your environment, a dedicated secure pairing process makes a lot of sense from a privacy standpoint.
These two additions give us a clearer picture of how Apple is approaching both the usability and the security side of camera-equipped AirPods. With more details surfacing from the same macOS Tahoe 26.7 build, it looks like Apple is getting closer to making this feature official.











-Reviewer-Photo-SOURCE-Adrienne-So.png)

-Reviewer-Photo-SOURCE-Adrienne-So.jpg)


















































You must be logged in to post a comment Login