

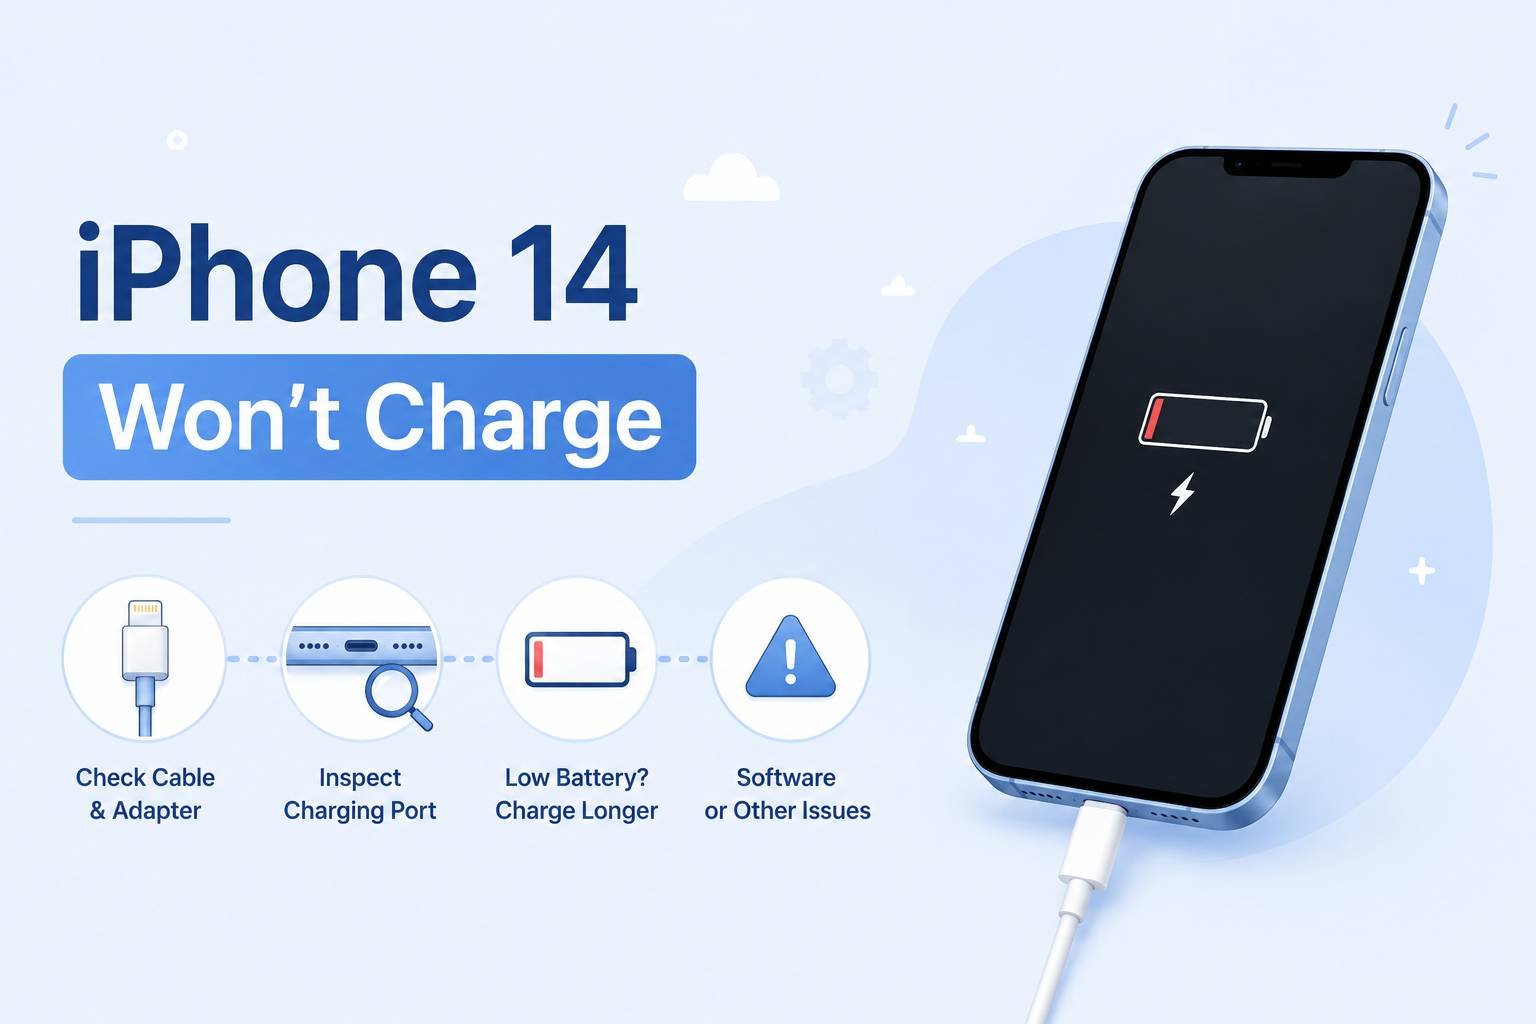
Your iPhone 14 won’t charge — and the cause is almost always one of four things: a damaged or non-certified cable, debris packed into the Lightning port, a software glitch stopping the charging process, or a battery that needs replacing. All of these are diagnosable at home. This guide walks through each fix in the order most likely to solve the problem first, so you’re not replacing hardware you don’t need to replace.
These steps apply to iPhone 14, iPhone 14 Plus, iPhone 14 Pro, and iPhone 14 Pro Max.
Quick Take: Start with the cable and port — the majority of iPhone 14 charging failures trace back to a faulty cable, a dirty port, or a low-wattage power source. Clean the port with a dry toothbrush before assuming anything is broken. If the hardware checks out, a force restart fixes most software-related charging blocks. If your phone charges fine but stops at 80%, that is Optimized Battery Charging doing its job — not a fault.
Before You Start: Rule Out These Two Things
Two scenarios look like charging failures but are not faults at all.
The first is Optimized Battery Charging. If your iPhone 14 consistently stops charging at around 80% overnight, that is a deliberate iOS feature — not a glitch. Apple’s Optimized Battery Charging holds the charge at 80% and finishes charging to 100% just before your typical wake-up time, based on your learned daily routine. It is designed to reduce battery aging. If you want to verify this is happening, go to Settings > Battery > Battery Health & Charging and check whether the feature is toggled on. It is enabled by default.
The second is a deeply drained battery. If the screen shows nothing at all when you plug in, that does not mean charging has failed. A battery at absolute zero charge may take 5–15 minutes before showing any indicator on screen. Give it at least 15 minutes before drawing any conclusions.
Step 1: Check the Cable, Adapter, and Power Source
This is where roughly half of all charging problems start. Inspect the Lightning cable for fraying near either end — the strain relief (the plastic collar where the cable meets the connector) is the most common failure point. A cable that looks intact from the outside can have broken internal wires from repeated bending. If you have another cable available, swap it in and test.
If you see the alert “This accessory is not certified” or “may not be supported” when you plug in, your cable either lacks MFi certification (Made for iPhone, Apple’s licensing standard for accessories) or the cable’s internal chip has failed. Non-certified cables trigger this alert by design and will often charge intermittently or not at all. Replace the cable with an Apple original or an MFi-certified third-party cable before trying anything else.
For the power source: plug directly into a wall outlet using an Apple or MFi-certified USB power adapter. USB ports on computers, keyboards, and older USB hubs frequently deliver too little current to reliably charge an iPhone 14. Apple’s official guidance specifies using a wall power outlet and checking for firm connections at every point in the chain — cable to phone, cable to adapter, adapter to wall.
Step 2: Clean the Lightning Port
Compacted lint and debris inside the Lightning port is one of the most underestimated causes of iPhone charging problems, and it is almost always invisible until you look closely with a light. Over time — particularly if you carry your phone in a pocket or bag — fibers accumulate at the back of the port and physically prevent the cable connector from seating fully. The cable appears to plug in, but the electrical contact is poor or absent.
Power off the iPhone before cleaning. Then, using a flashlight, inspect the interior of the port. If you see compacted gray or brown material at the back, clean it out as follows, per iFixit’s port cleaning guide:
- Insert the head of a dry, soft-bristled toothbrush into the port.
- Rotate the brush gently in small circles to break up compacted debris.
- Use a can of compressed air (dust blower) to blow loosened debris out — hold the can upright to avoid propellant spray.
- Repeat the brush pass if debris remains.
- Plug in the cable and check for the charging icon.
Do not use metal tools — toothpicks, pins, or SIM ejectors — inside the port. The Lightning pins are fragile, and a single bent pin means a port replacement. A dry toothbrush removes the vast majority of debris without any risk of damage.
Step 3: Force Restart the iPhone
A software crash or a frozen charging process can make a working charger appear to do nothing. A force restart clears this state without deleting any data and takes about 20 seconds.
- Quickly press and release the Volume Up button.
- Quickly press and release the Volume Down button.
- Press and hold the Side button until the Apple logo appears — then release.
Keep the phone plugged into the charger while you do this. When the Apple logo appears, release the Side button and allow the phone to finish booting. Once it has restarted, check whether the charging icon appears in the status bar.
One common mistake: releasing the Side button when the “slide to power off” screen appears. That is not the restart — keep holding through it. The Apple logo comes after, and the full sequence can take up to 20 seconds.
Step 4: Update iOS
iOS bugs occasionally interfere with charging behavior, and some have been resolved in point releases. If you have been delaying an update, this is a good reason to install it. Go to Settings > General > Software Update and install any available update. You do not need a full charge to initiate an update — connect to Wi-Fi, plug in, and let it run.
If your phone cannot charge enough to update over the air, you can initiate a software update through Finder (Mac) or iTunes (Windows) by connecting via Lightning cable. This method does not require a minimum battery level and will attempt to update rather than erase.
Step 5: Check Battery Health
A severely degraded battery can cause unpredictable charging behavior — the iPhone may refuse to charge past a certain point, charge very slowly, or drop charge percentage immediately after unplugging. To check battery health on iPhone 14: go to Settings > Battery > Battery Health & Charging.
The “Maximum Capacity” figure shows how much charge your battery holds relative to when it was new. Apple’s battery health guidance indicates that a battery at 80% or below warrants replacement. At that level, the phone will also begin displaying a message recommending service. A degraded battery is not a charging fault per se — the charger is doing its job — but the battery cannot accept and hold a full charge anymore, which reads like a charging problem to the user.
If the reading is above 80% and all other steps have been completed, the battery itself is not the cause of your charging issue.
Step 6: Try Wireless Charging as a Diagnostic
If you have a Qi-compatible wireless charger or a MagSafe charger available, try charging wirelessly. The iPhone 14 supports Qi wireless charging at up to 7.5W and MagSafe at up to 15W. If the phone charges wirelessly but not via Lightning cable, you have isolated the problem to the Lightning port or the cable — not the battery or software.
A few things to check if wireless charging also fails: the phone must be centered over the charging coil on the pad, as misalignment breaks the connection. A thick case, metal case, or a case with a magnetic wallet attachment can interfere with power transfer — remove the case and retry. If the iPhone is hot (warm to the touch), iOS will reduce or pause charging until the device cools. Move it away from direct heat or sunlight and wait a few minutes before placing it on the pad again.
| Scenario | What it likely means | Next step |
|---|---|---|
| Wired fails, wireless works | Lightning port or cable issue | Replace cable; inspect port; book port repair if cable swap fails |
| Both wired and wireless fail | Battery, software, or internal hardware fault | Force restart, update iOS, check battery health, book service if no improvement |
| Charges but stops at 80% | Optimized Battery Charging active (normal) | Leave overnight — it finishes to 100% before typical wake time. Or disable in Settings |
| Charges slowly on computer USB | Underpowered source | Switch to a wall outlet with Apple or MFi adapter |
| “Accessory not supported” alert | Non-MFi cable or dirty port | Replace cable with MFi-certified; clean port |
When to Stop DIY and Book a Repair
If you have worked through all six steps and the iPhone 14 still won’t charge, the problem is almost certainly hardware — a damaged Lightning port, a failed charging IC (the internal chip that manages charging), or a battery that is too degraded to accept current. None of these are DIY-fixable without specialized tools and components.
Your options at this point:
- Apple Store or Apple Authorized Service Provider: Apple’s service and repair page lets you book a Genius Bar appointment or mail-in repair. Out-of-warranty battery replacement for iPhone 14 is listed at $99 (USD) through Apple — verify current pricing when booking, as this can change. If the port is damaged, Apple will assess whether it is repairable or requires a device replacement.
- Independent repair shop: A legitimate alternative for port replacement and battery swaps at lower cost. Battery replacement at third-party shops typically runs less than Apple’s rate. Using an independent shop will not affect an already-expired warranty, but it will void any remaining warranty coverage. Ask whether the shop uses OEM-equivalent batteries and whether they provide a warranty on the repair itself.
- AppleCare+: If you have an active AppleCare+ plan, battery service is covered at no additional cost when battery health is below 80%. Check your coverage status at Settings > General > VPN & Device Management or at appleid.apple.com before booking a paid repair.
One scenario that is not worth attempting DIY: liquid damage to the port. If the iPhone was exposed to water and corrosion has formed inside the Lightning port, forcing a cable in risks shorting internal contacts. Let a technician assess and clean it before attempting to charge.
Key Takeaways
- Most iPhone 14 charging failures are caused by a faulty cable, debris in the Lightning port, or a low-power source — fix these before assuming the battery or hardware is at fault.
- Stopping at 80% is Optimized Battery Charging working correctly, not a malfunction. Check Settings > Battery > Battery Health & Charging to confirm and disable it if needed.
- A force restart with the cable plugged in clears software-related charging blocks in seconds, with no data loss.
- If wired charging fails but wireless works, the fault is isolated to the Lightning port or cable — not the battery.
- If all DIY steps fail, book a repair through Apple or an authorized provider rather than continuing to troubleshoot. Hardware faults do not resolve themselves and can worsen with repeated charging attempts on a damaged port.
Frequently Asked Questions
My iPhone 14 is plugged in but the charging icon isn’t showing. Is it charging?
Not necessarily. The charging icon in the status bar and on the lock screen only appears when the iPhone is actively receiving power. If the icon is missing, the phone is either not receiving current (cable, adapter, or port issue), too hot to accept a charge, or experiencing a software freeze. Work through Steps 1–3 above. If the icon appears after a force restart with the cable plugged in, the issue was a software block.
Can I charge my iPhone 14 faster?
Yes. The iPhone 14 supports fast charging when paired with a USB-C power adapter of at least 20W (Apple’s own 20W USB-C adapter or a compatible third-party equivalent) and a USB-C to Lightning cable. The standard 5W adapter included with older iPhones significantly slows charge times. Note that Apple no longer includes a power adapter in the iPhone 14 box — only a USB-C to Lightning cable is included. If you are using an older 5W adapter you already own, upgrading the adapter alone will noticeably improve charging speed.
Why does my iPhone 14 get hot while charging and then slow down?
iOS intentionally reduces charging speed — and can pause charging entirely — when the device temperature rises above its normal operating range. This is a protective measure to prevent heat damage to the battery. Charging generates heat by nature, and a thick case traps it. Remove the case while charging, avoid placing the phone on fabric surfaces that retain heat, and keep it away from direct sunlight. Once the phone cools, charging resumes normally. This is expected behavior, not a fault.
My iPhone 14 says “Charging on Hold” — what does that mean?
This message appears when the iPhone’s temperature is too high to safely charge. The phone is connected to power and will resume charging automatically once it has cooled to a safe operating temperature. Do not attempt to cool it rapidly — do not put it in a refrigerator or freezer, as condensation inside the device can cause damage. Move it to a cooler room-temperature environment and wait.
My charging cable looks fine but the phone won’t charge. Could the cable still be the problem?
Yes. Lightning cables frequently fail internally at the strain relief point while the outer sheath looks intact. The copper conductors inside break from repeated bending, but the insulation holds its shape and hides the damage. The simplest test: try the same cable on a different Apple device, or try a different known-good cable on your iPhone 14. If the cable fails on another device too, replace it. If a different cable charges your iPhone, the original cable is faulty regardless of how it looks.
How do I know if my iPhone 14’s Lightning port is damaged and needs replacing?
Signs of a port that needs professional repair: the cable feels loose or wiggles significantly when inserted; the charging icon appears only at specific angles; you can see bent, corroded, or missing pins inside the port with a flashlight; or cleaning the port with a toothbrush made no difference and the cable is confirmed good. At that point, booking a service appointment with Apple or an authorized repair provider is the correct next step. Continuing to insert and remove cables into a damaged port risks further damage to the internal contacts.
Will updating iOS fix a charging problem?
It can, in specific cases where a software bug is interfering with the charging management system. There have been documented instances where iOS point releases resolved battery and charging anomalies reported after a major update. Updating is a low-risk step that costs nothing — do it via Settings > General > Software Update or, if the battery is too low to update over the air, via Finder or iTunes on a computer with the Lightning cable connected. However, if the cause is physical — a damaged port, faulty cable, or degraded battery — no software update will fix it.


You must be logged in to post a comment Login