NordVPN is now Aston Villa’s Official Digital Security Partner
The deal aims to protect fans using public Wi-Fi on matchdays at Villa Park
It echoes a broader trend of top VPNs securing major sports partnerships
Aston Villa has officially named NordVPN as its new Official Digital Security Partner. The deal is designed to enhance data security for supporters attending matches at Villa Park, ensuring fans have access to safer internet browsing when connecting to crowded, public networks.
If you have ever tried to check live football scores, stream highlights, or message friends from a packed stadium, you know that public Wi-Fi can be incredibly vulnerable to snooping. By teaming up with the best VPN provider on the market, Aston Villa hopes to mitigate these everyday cybersecurity risks. A virtual private network (VPN) encrypts your internet traffic, actively keeping your personal data safe from prying eyes when connected to unsecured stadium networks.
According to a statement released by Aston Villa, securing fan data is becoming a growing priority for the club. “In the modern age, where internet usage is such a cornerstone of everyday life, online security is paramount, and this exciting partnership allows our supporters to engage with the club and with each other on matchdays in a fast and protected environment,” an Aston Villa spokesperson explained.
Advertisement
This latest partnership is not just about selling software; it is heavily focused on digital education. Bob Brinklow, UK Country Manager for NordVPN, noted that the company’s goal is to help fans better understand online privacy through dedicated digital activations.
“At NordVPN, we believe that strong partnerships are built around shared values, trust, and meaningful connections with communities,” said Brinklow. “Together, we aim to help fans better understand online security through digital activations and partnership initiatives, while supporting the club and its ambitions for success on the pitch.”
As technology brands increasingly seek to normalize everyday privacy tools, expect to see more VPN logos popping up on pitch-side advertising boards. For now, Aston Villa fans can rest a little easier knowing their matchday browsing is being taken seriously.
When we last left off, I had just set up a new SLA resin printer and was on the verge of doing the initial round of printing to see just how resin printing in 2026 compares to way back in 2020. Surely SLA printing had to be easier and less fussy than it was in 2020?
During these weeks of printing, setting up printers and taking a gander at the various workflows that certain printers and their manufacturers try to push you into I have both produced a series of not too shabby prints and some delightful spaghetti. I also flipped a few proverbial tables and formed some strong opinions on 3D printing workflows, of which some can considered to be family-friendly.
Without further ado, let’s get into some updates, a bit of ranting, and even some printing results.
Going With The Flow
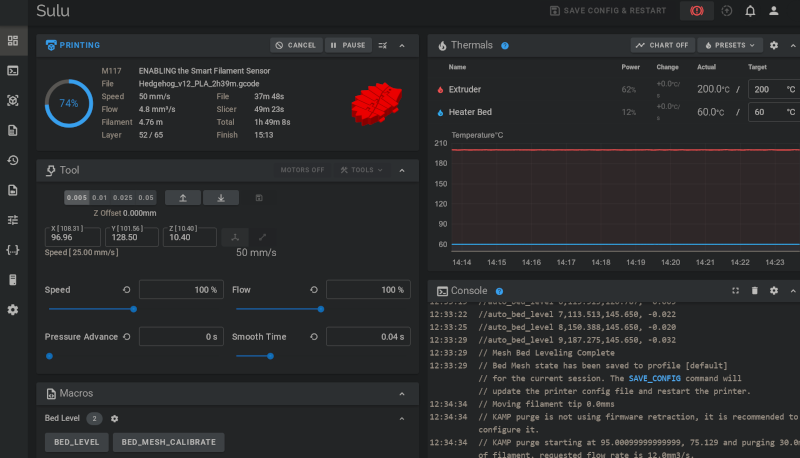
Part of the Fluidd main page during a print.
Although workflows are a fairly personal thing in terms of preferences, we’re all creatures of habit with a strong tendency towards laziness. We also tend to prefer workflows that are easier for that reason. This is where after the very manual approach of the Ender v2 I really liked much about the Neptune 4, ranging from its much faster and open source Klipper firmware to a semi-automatic bed-levelling procedure, and of course the Fluidd web interface.
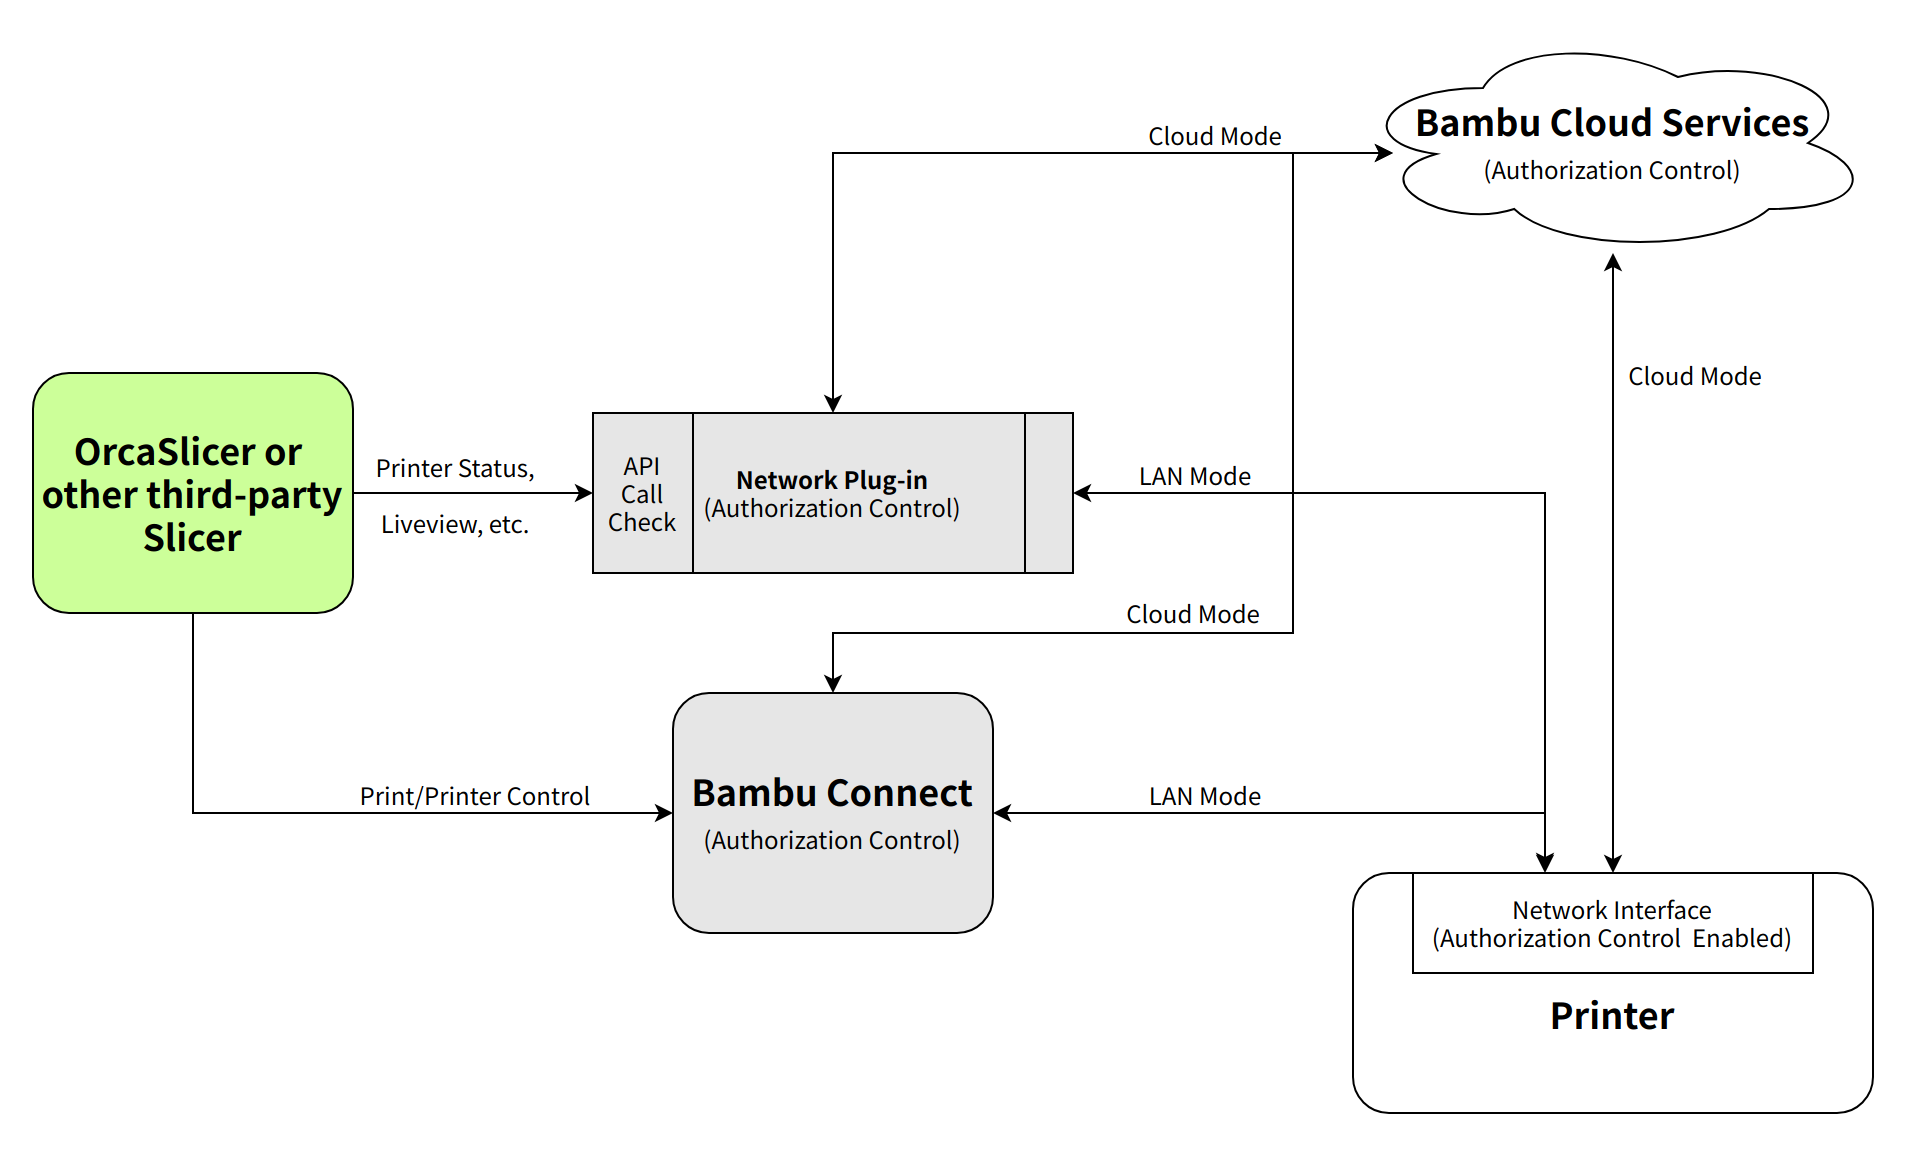
With this I can just pop open an interface in a browser tab and manage the printer, watch the webcam view, etc. from there. Somehow there’s now a third option that seems to be taking over, however. Although a web interface seems straightforward and easy for the average user, there’s been this move towards requiring the use of the slicer via a special API or such that leads to fun access situations as we have recently seen with Bambu Lab printers.
Advertisement
The remote printing future according to Bambu Lab. (Credit: Bambu Lab)
Out of a sense of morbid curiosity I decided to look at what I’d be dealing with if I were to upgrade to the latest & greatest Elegoo (CoreXY) printer if I ever grew tired of my Neptune 4, and noticed that they seem to have gone more in the direction of Bambu Lab. The firmware is Klipper-like but closed, with the most recent FDM printers like the Centauri Carbon series also requiring access via a slicer and/or a special mobile app with a lot of Cloud things mixed in.
To me this seems hugely cumbersome, since one of the things I like with the Neptune 4 is that I can access it from anywhere on a system with a slightly modern browser and print models that are stored on the internal memory. This is where the the GK3 Ultra scores pretty well in my book, too.
Certainly, this resin printer doesn’t do fancy web UIs or APIs, or much in terms of remote-anything. You do get Ethernet, a Wi-Fi USB dongle and the rather nifty ability to set up an SMB file share that you can dump sliced models onto before waddling over to the SLA printer. It’s low-tech yet also universally supported and open, while more convenient than plain Sneakernet, though that’s also an option using the front-mounted USB-A port.
Can I just briefly say how much I love having a USB-A port for Sneakernet purposes, rather than a tiny USB-C port or microSD slot? The Ender 3v2 offered either microUSB or microSD for inputs, none of which really made me like that printer more.
Finally Some Printing
For this first printing round, I printed the same parts on the Neptune 4 in white PLA and black PLA. For the GK3 Ultra I just used the ABS-like (AL) clear-blue resin, to not have to switch resins just yet. The prints include a range of items like bottles, some figurines and a bunch of LEGO Technic-compatible parts. The latter two serve to give dimensional accuracy a good workout, along with basic durability testing.
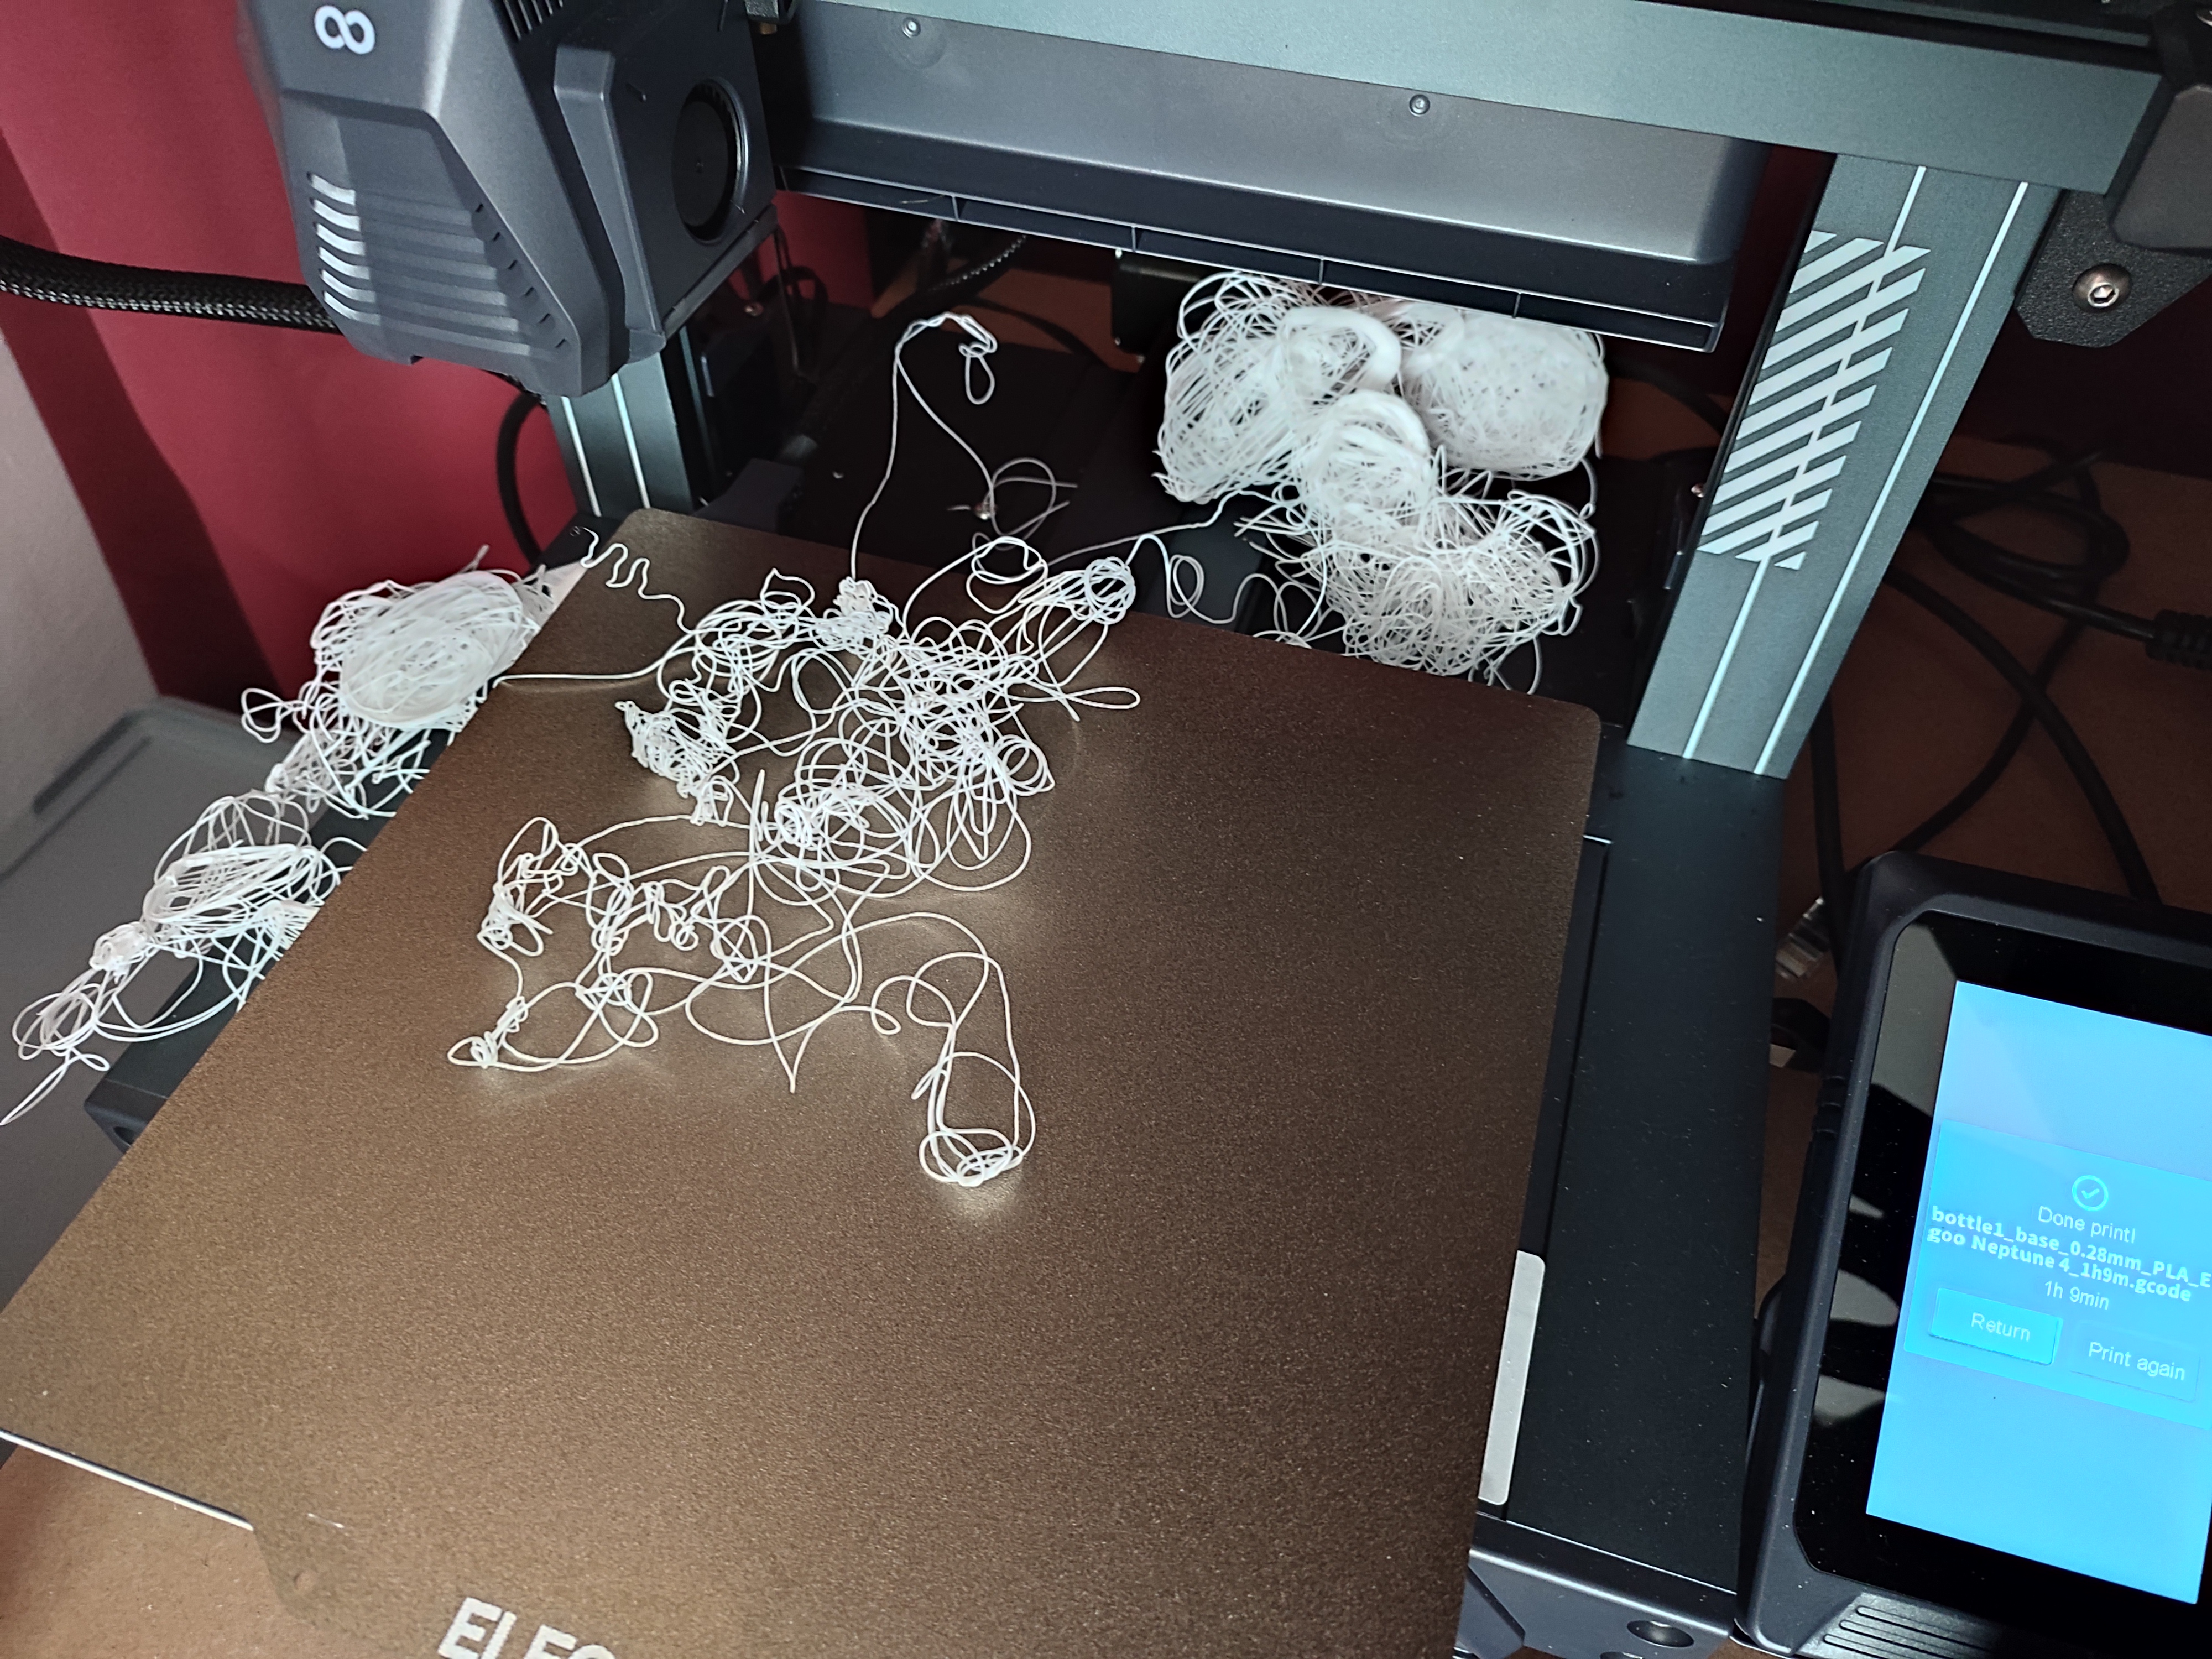
Starting with FDM printing, this was largely uneventful, though I upped the difficulty challenge with the N4 by using a spool of extra-brittle white PLA. Somehow even that came out fine, aside from an unfortunate spaghetti incident that required some PVA glue to be slathered onto the PEI build plate.
On the resin side of things, it was pretty much as I remembered it from my LD-002R days, just with an absolutely massive build plate, the auto-feeding of resin and of course the use of this rather nice transparent blue ABS-like (AL) resin.
On the slicer side of things I kept things as boring as possible, with OrcaSlicer for FDM, and ChituBox’s free version for SLA. I did look at Lychee as well, but they require registration for even the ‘free’ version, so that one was out for now. I’ll also say that ChituBox got a bit heavier resource-wise than since I used it six years ago, and somehow its UI still feels rather unintuitive, though that’s a bit of a central issue with slicers.
To be fair to Uniformation, they also provide their own slicer on the USB stick and as a download, but since the latter involves a random Google Drive, it triggered my system security-related anxiety. It’s probably a perfectly cromulent slicer, but using ChituBox was the less exciting option for me here as a first try.
Comparing Parts
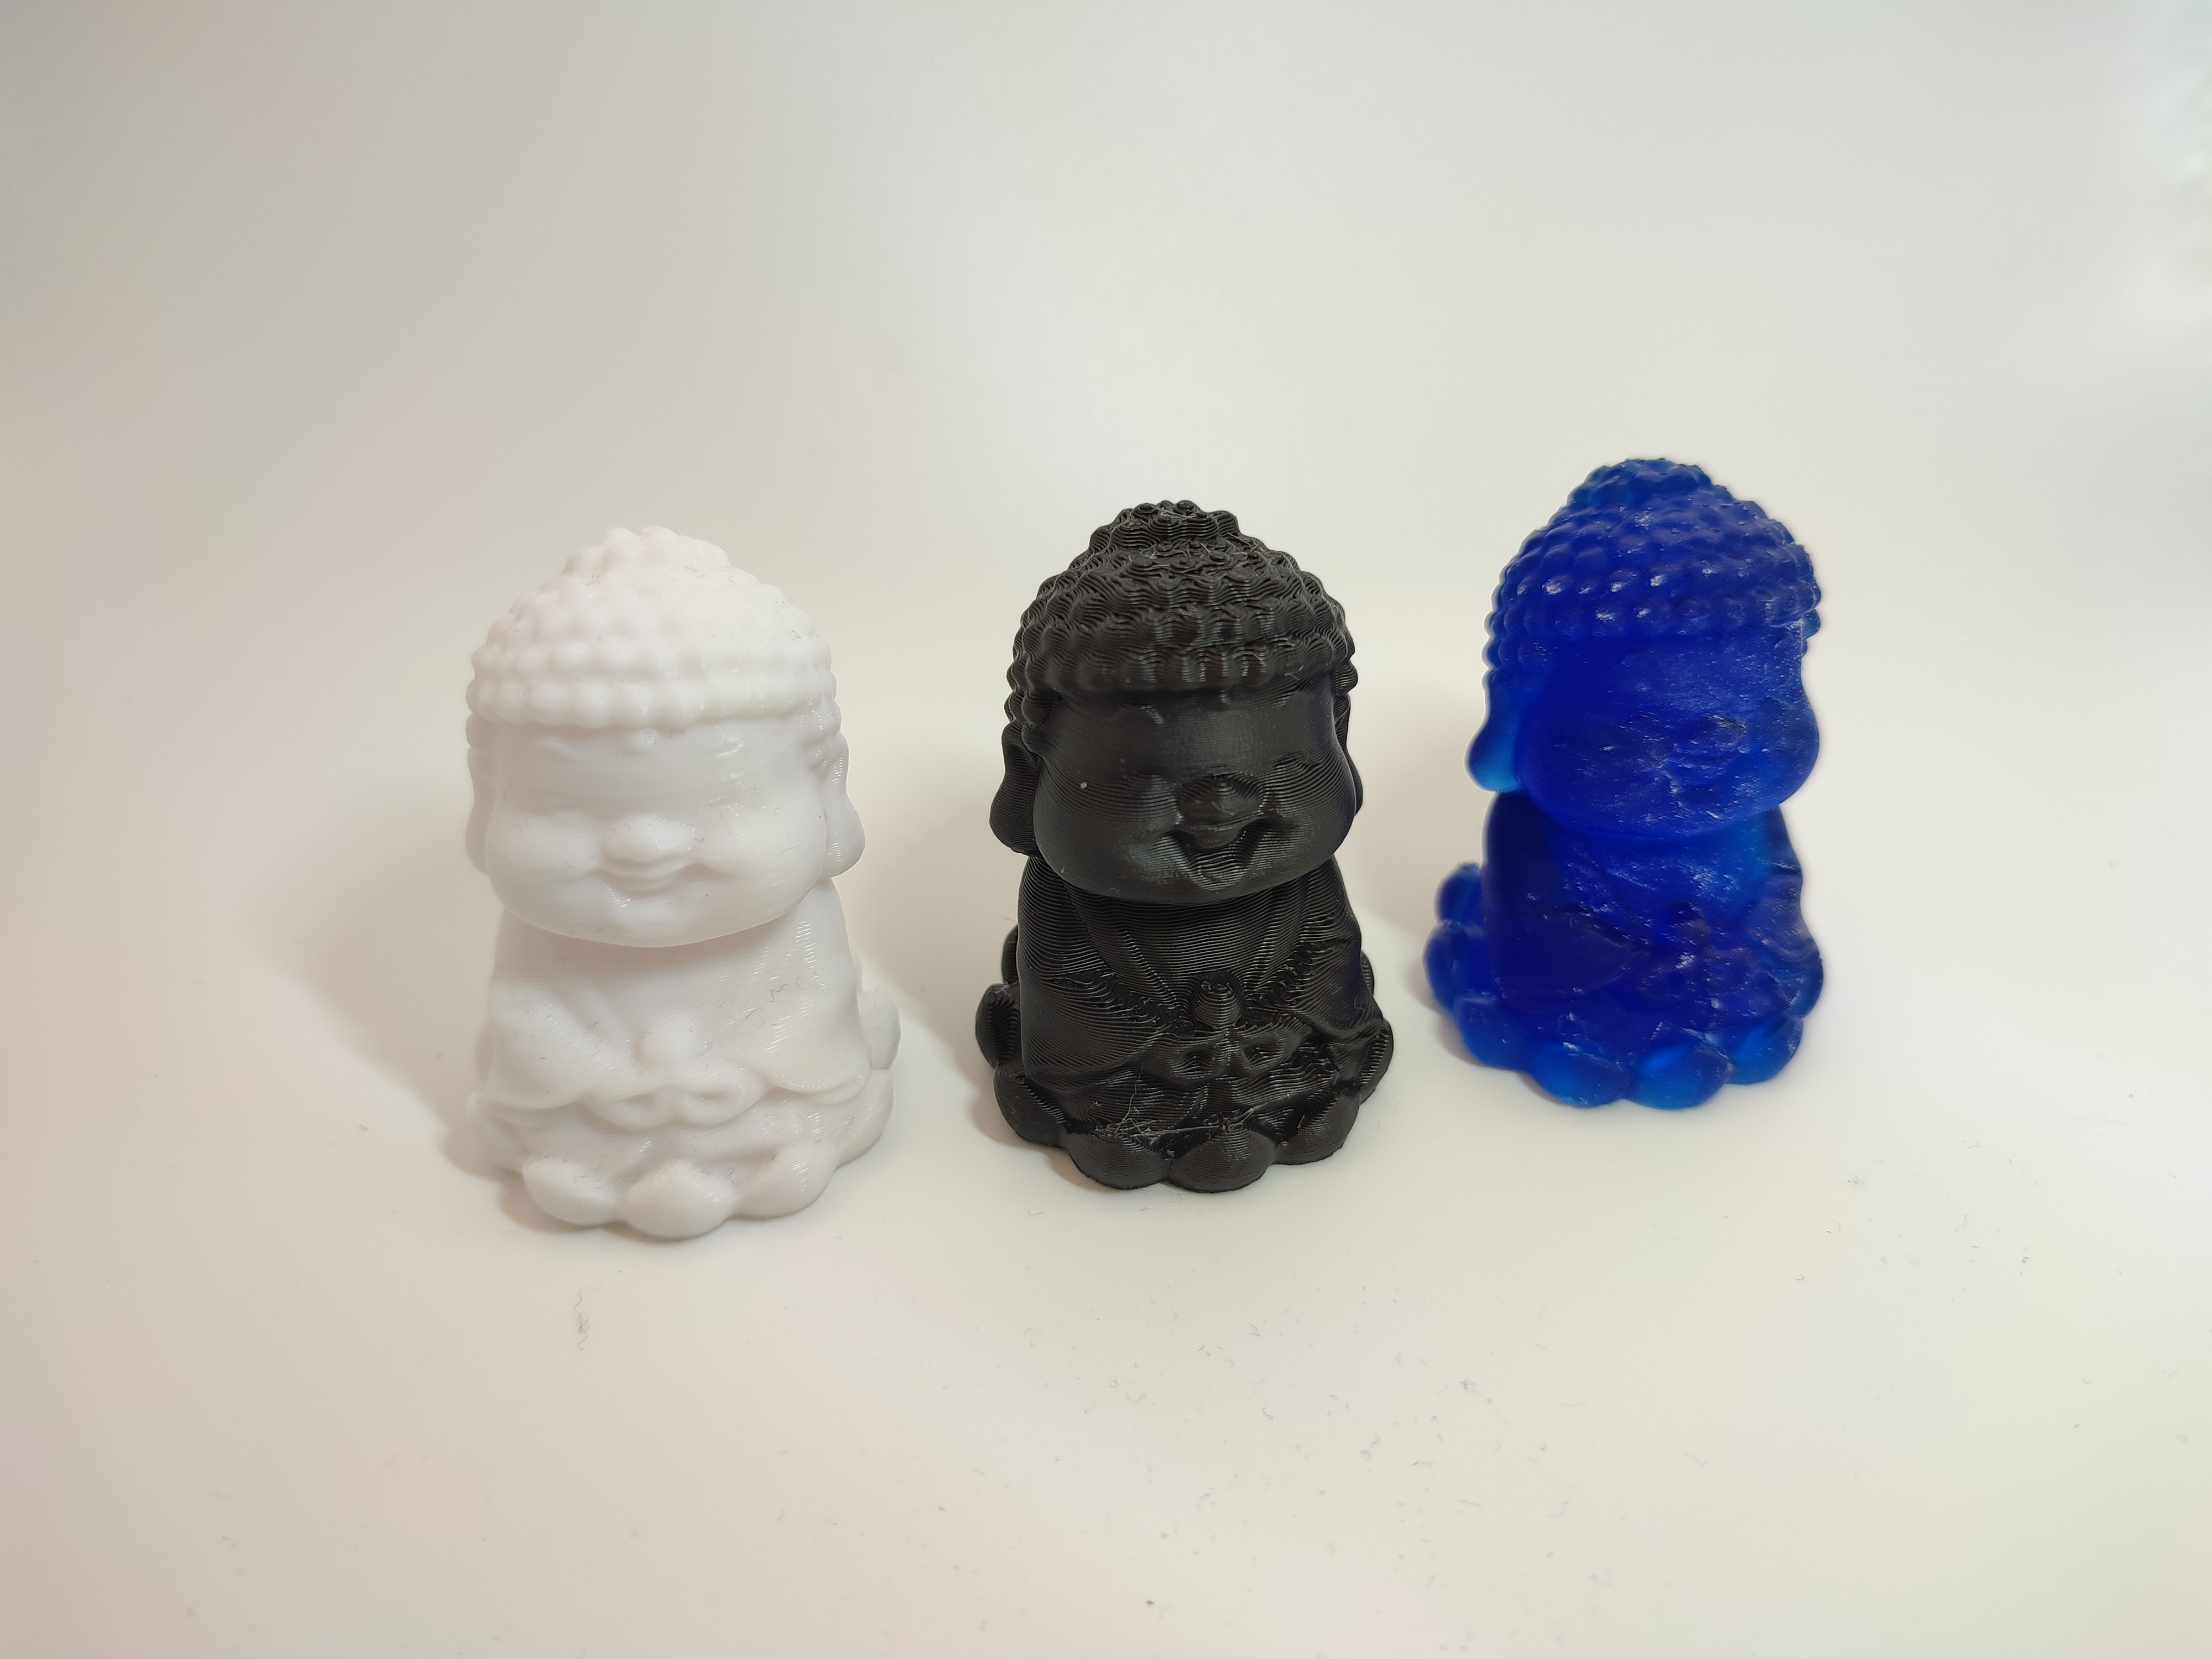
Since both Elegoo FDM printers come with an example model in the form of this happy Buddha figurine, I figured that I’d also print it with the GK3 Ultra. Here you can see how these compare in a sloppy smartphone photo for which I apologize:
Advertisement
Three happy Buddhas. (Credit: Maya Posch)
The model was clearly intended to be printed on FDM printers, so the SLA version doesn’t really add a lot, other than a lot of weight. Unlike FDM prints where you have aspects like ‘infill’, an SLA printer can print everything 100% solid with zero time penalty. In fact you want to do this so that you don’t need to drill a hole in it for liquid resin to leak out.
Of course, you can totally hollow out models to save resin and weight, but in that case you do need to add those drain holes lest you end up with liquid resin sloshing inside forever.
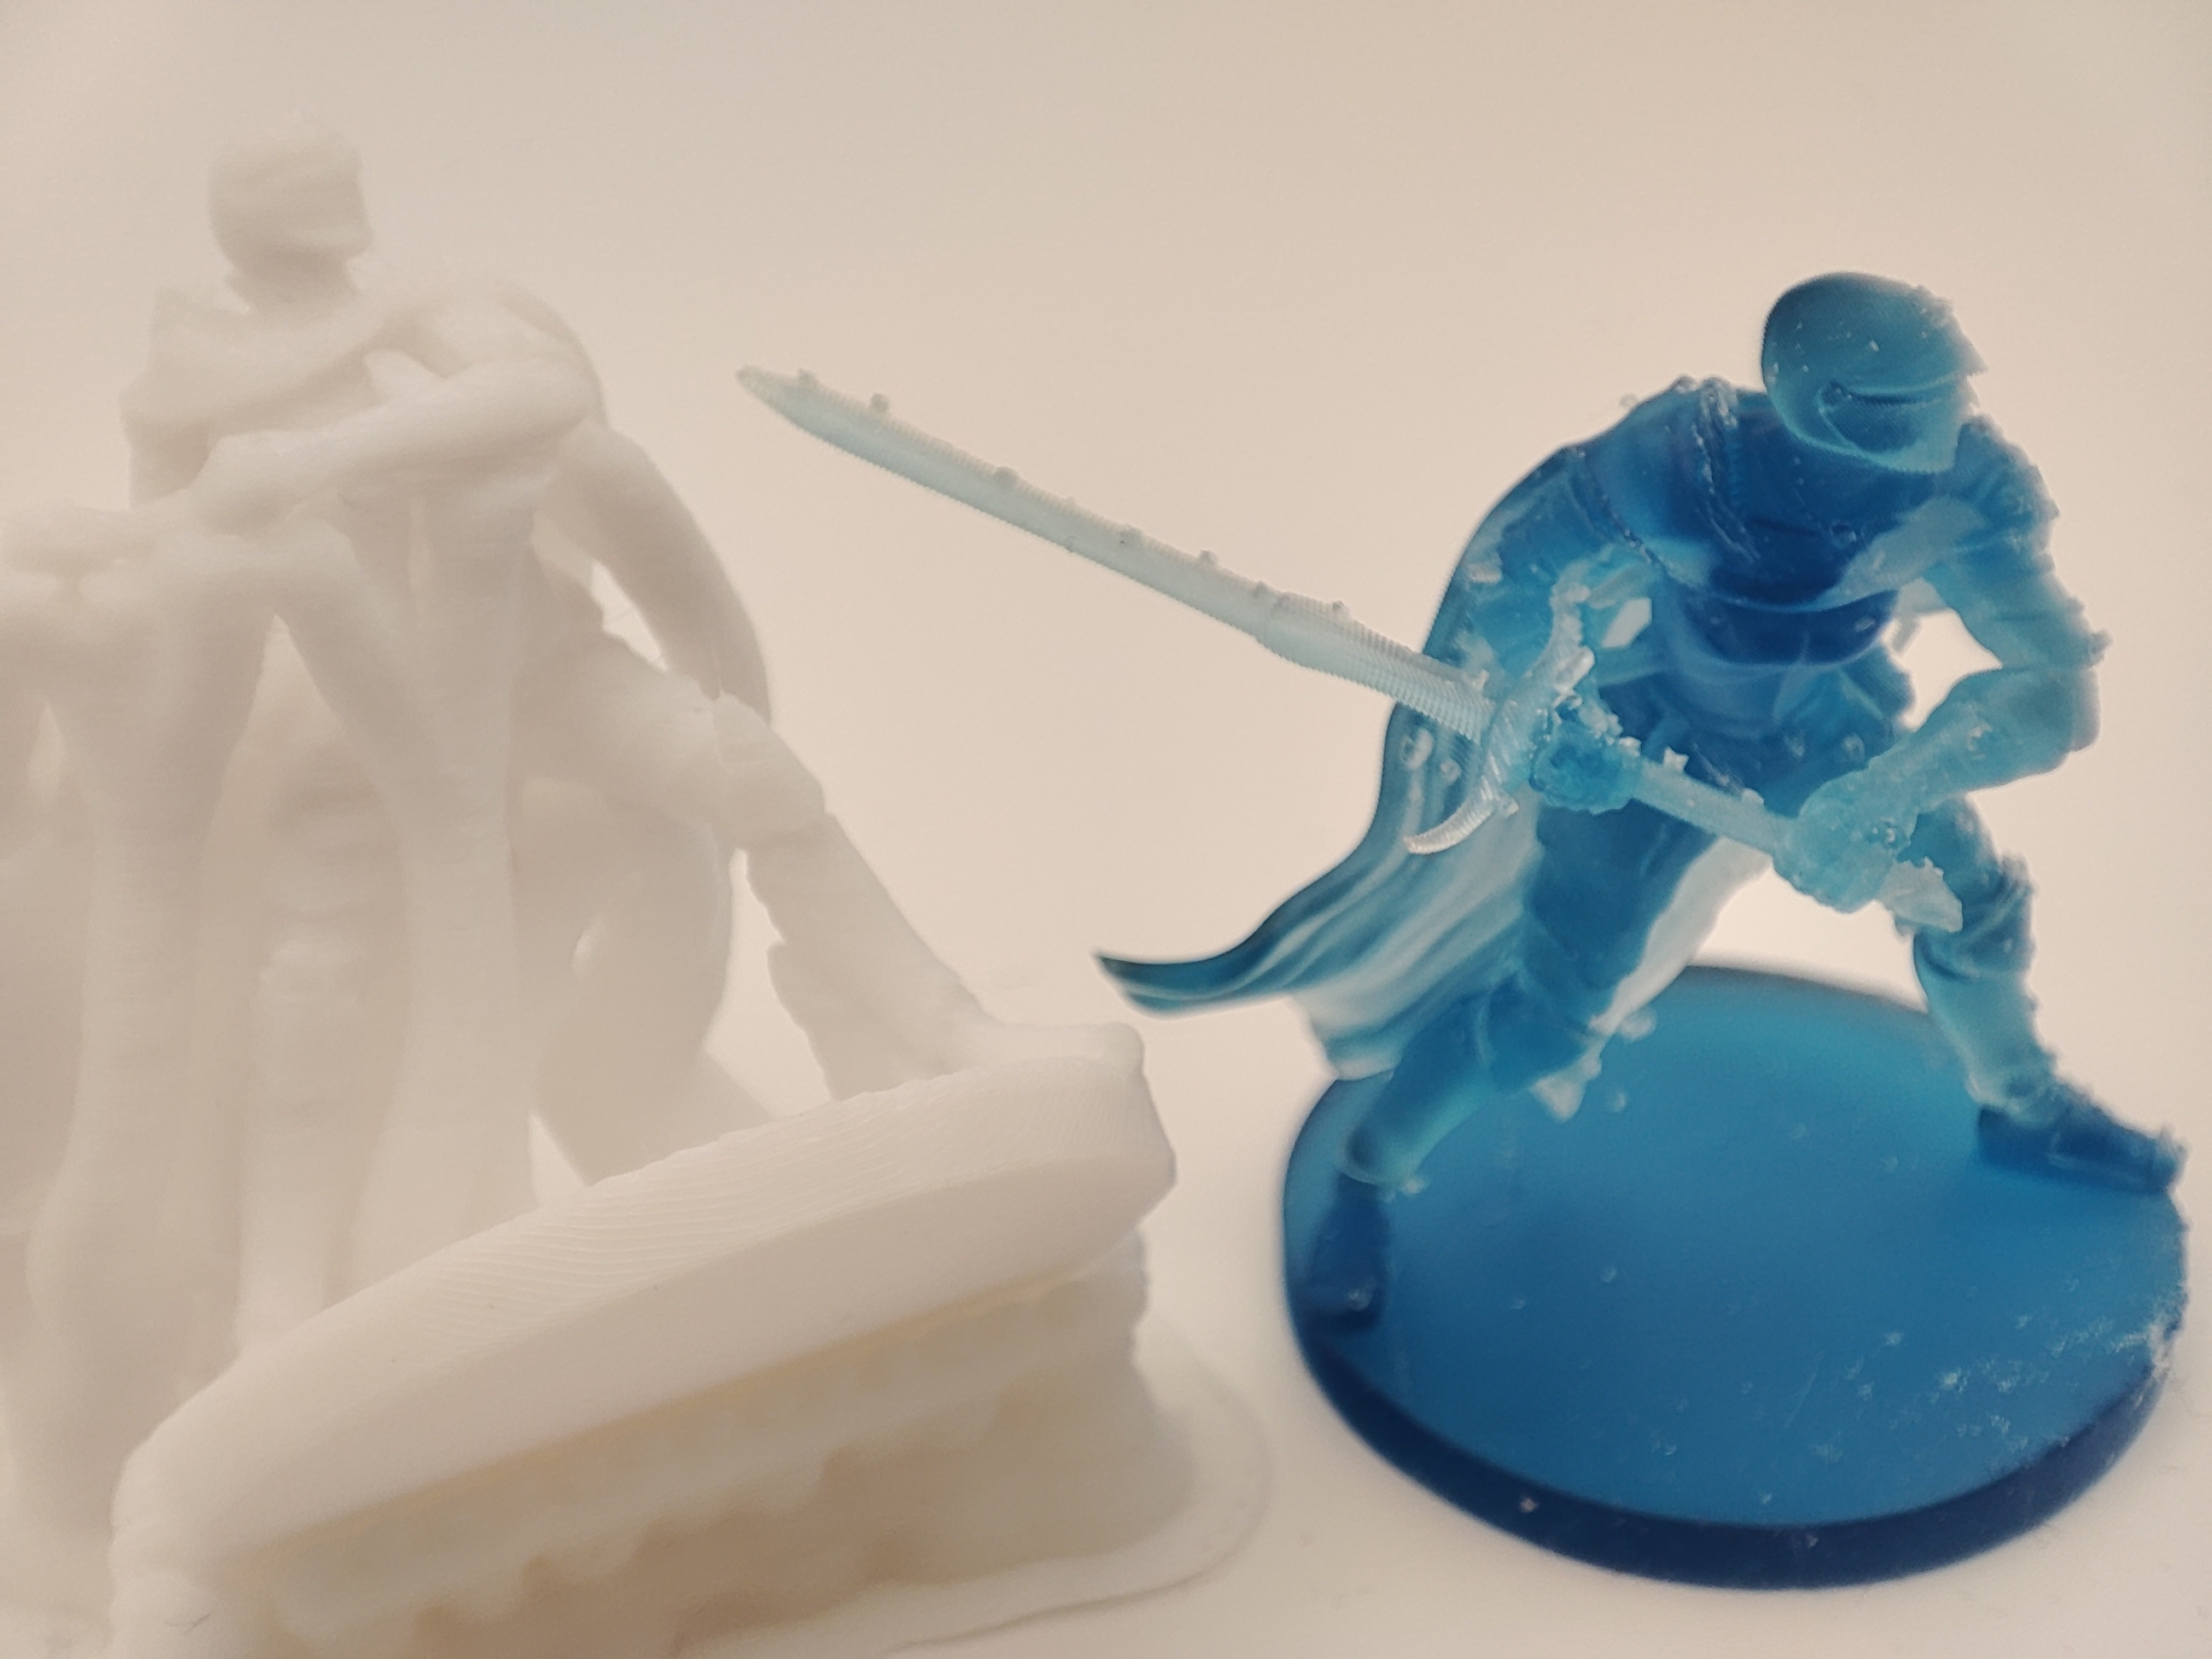
Moving on, I also printed a miniature knight figurine on the N4 and GK3 Ultra, which was a bold decision for the former:
FDM figurine vs SLA figurine. (Credit: Maya Posch)
Removing supports on this approximately 32 mm tall model was a bit of a nightmare with the SLA version, and I still need to clean it up better, while also rethinking ChitBox’s insistence on angling it upside-down for some reason.
I didn’t even bother with removing supports on the FDM version, although I was somewhat surprised at how much detail it still had when pushing layer height to its ‘super fine’ 0.12 mm setting, though the SLA printer with the ‘sloppy’ 0.1 mm layer height preset is simply in another universe when it comes to preserving fine details.
Clearly layer heights between SLA and FDM are at best the fuzziest of all overlaps, with even the knight’s cape in the SLA version capturing the flow of the fabric and details in the helmet that the FDM version had obliterated.
Advertisement
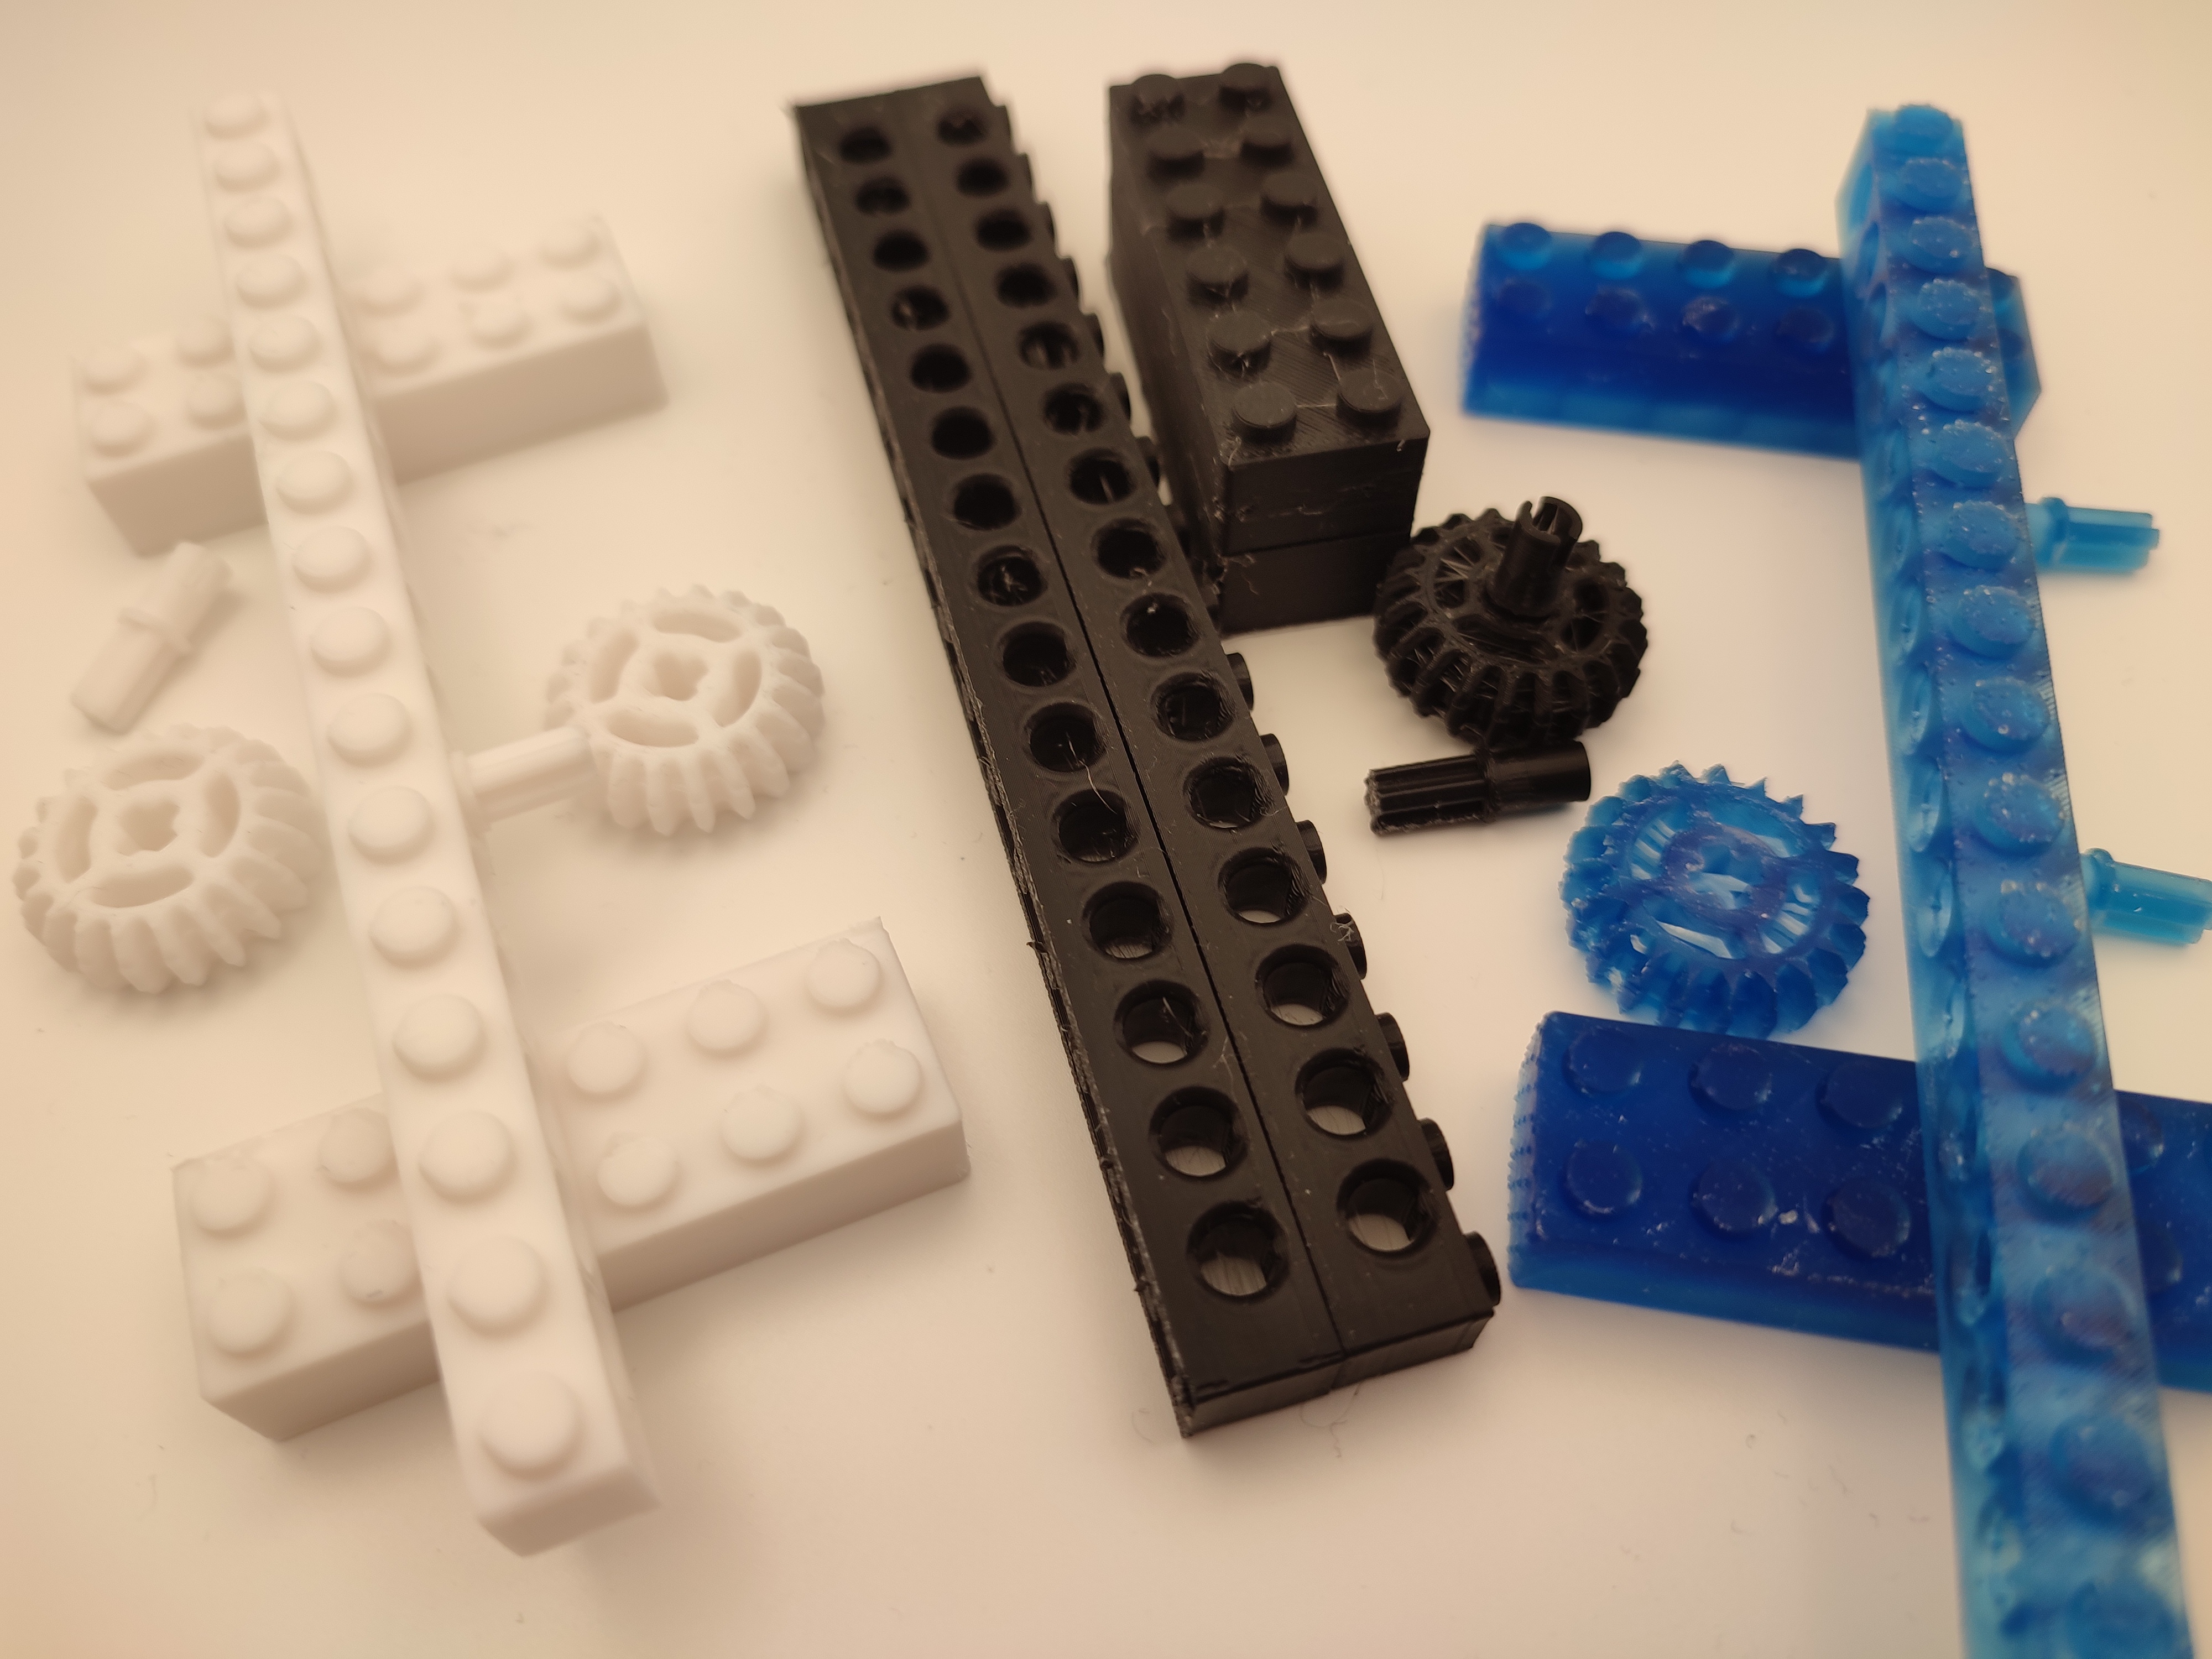
Finally there are the LEGO Technic-compatible shenanigans:
Merely LEGO Technic-compatible, please don’t sue. (Credit: Maya Posch)
There is obviously a lot of variability and improvement possible simply by the orientation you print things in, the type and placement of supports. SLA has the massive advantage here that support points on models can be made absolutely tiny and correspondingly leave almost no mark. This made e.g. printing LEGO-compatible parts a snap on SLA, but a nightmare on FDM where I struggled to find an orientation and support/brim configuration that didn’t lead to misprints and/or interfered with the part’s functionality.
The thing where ChituBox really did me dirty, however, was that it went crazy on supports, even adding lots of supports inside these latter parts that still have to be painstakingly poked out if I want to actually properly use them. This is however a slicer issue and potentially a skill issue on the side of yours truly.
Flipping Of Tables
Even after just this first round of printing there’s quite a bit to unpack. On the FDM side of things the workflow is definitely the easiest, especially in terms of post-processing. I did have some bed-adhesion issues, however, which is where SLA tends to be significantly less fussy with just the long-exposure first layer. For the FDM side of things I had a few misprints as a result, which was annoying.
Advertisement
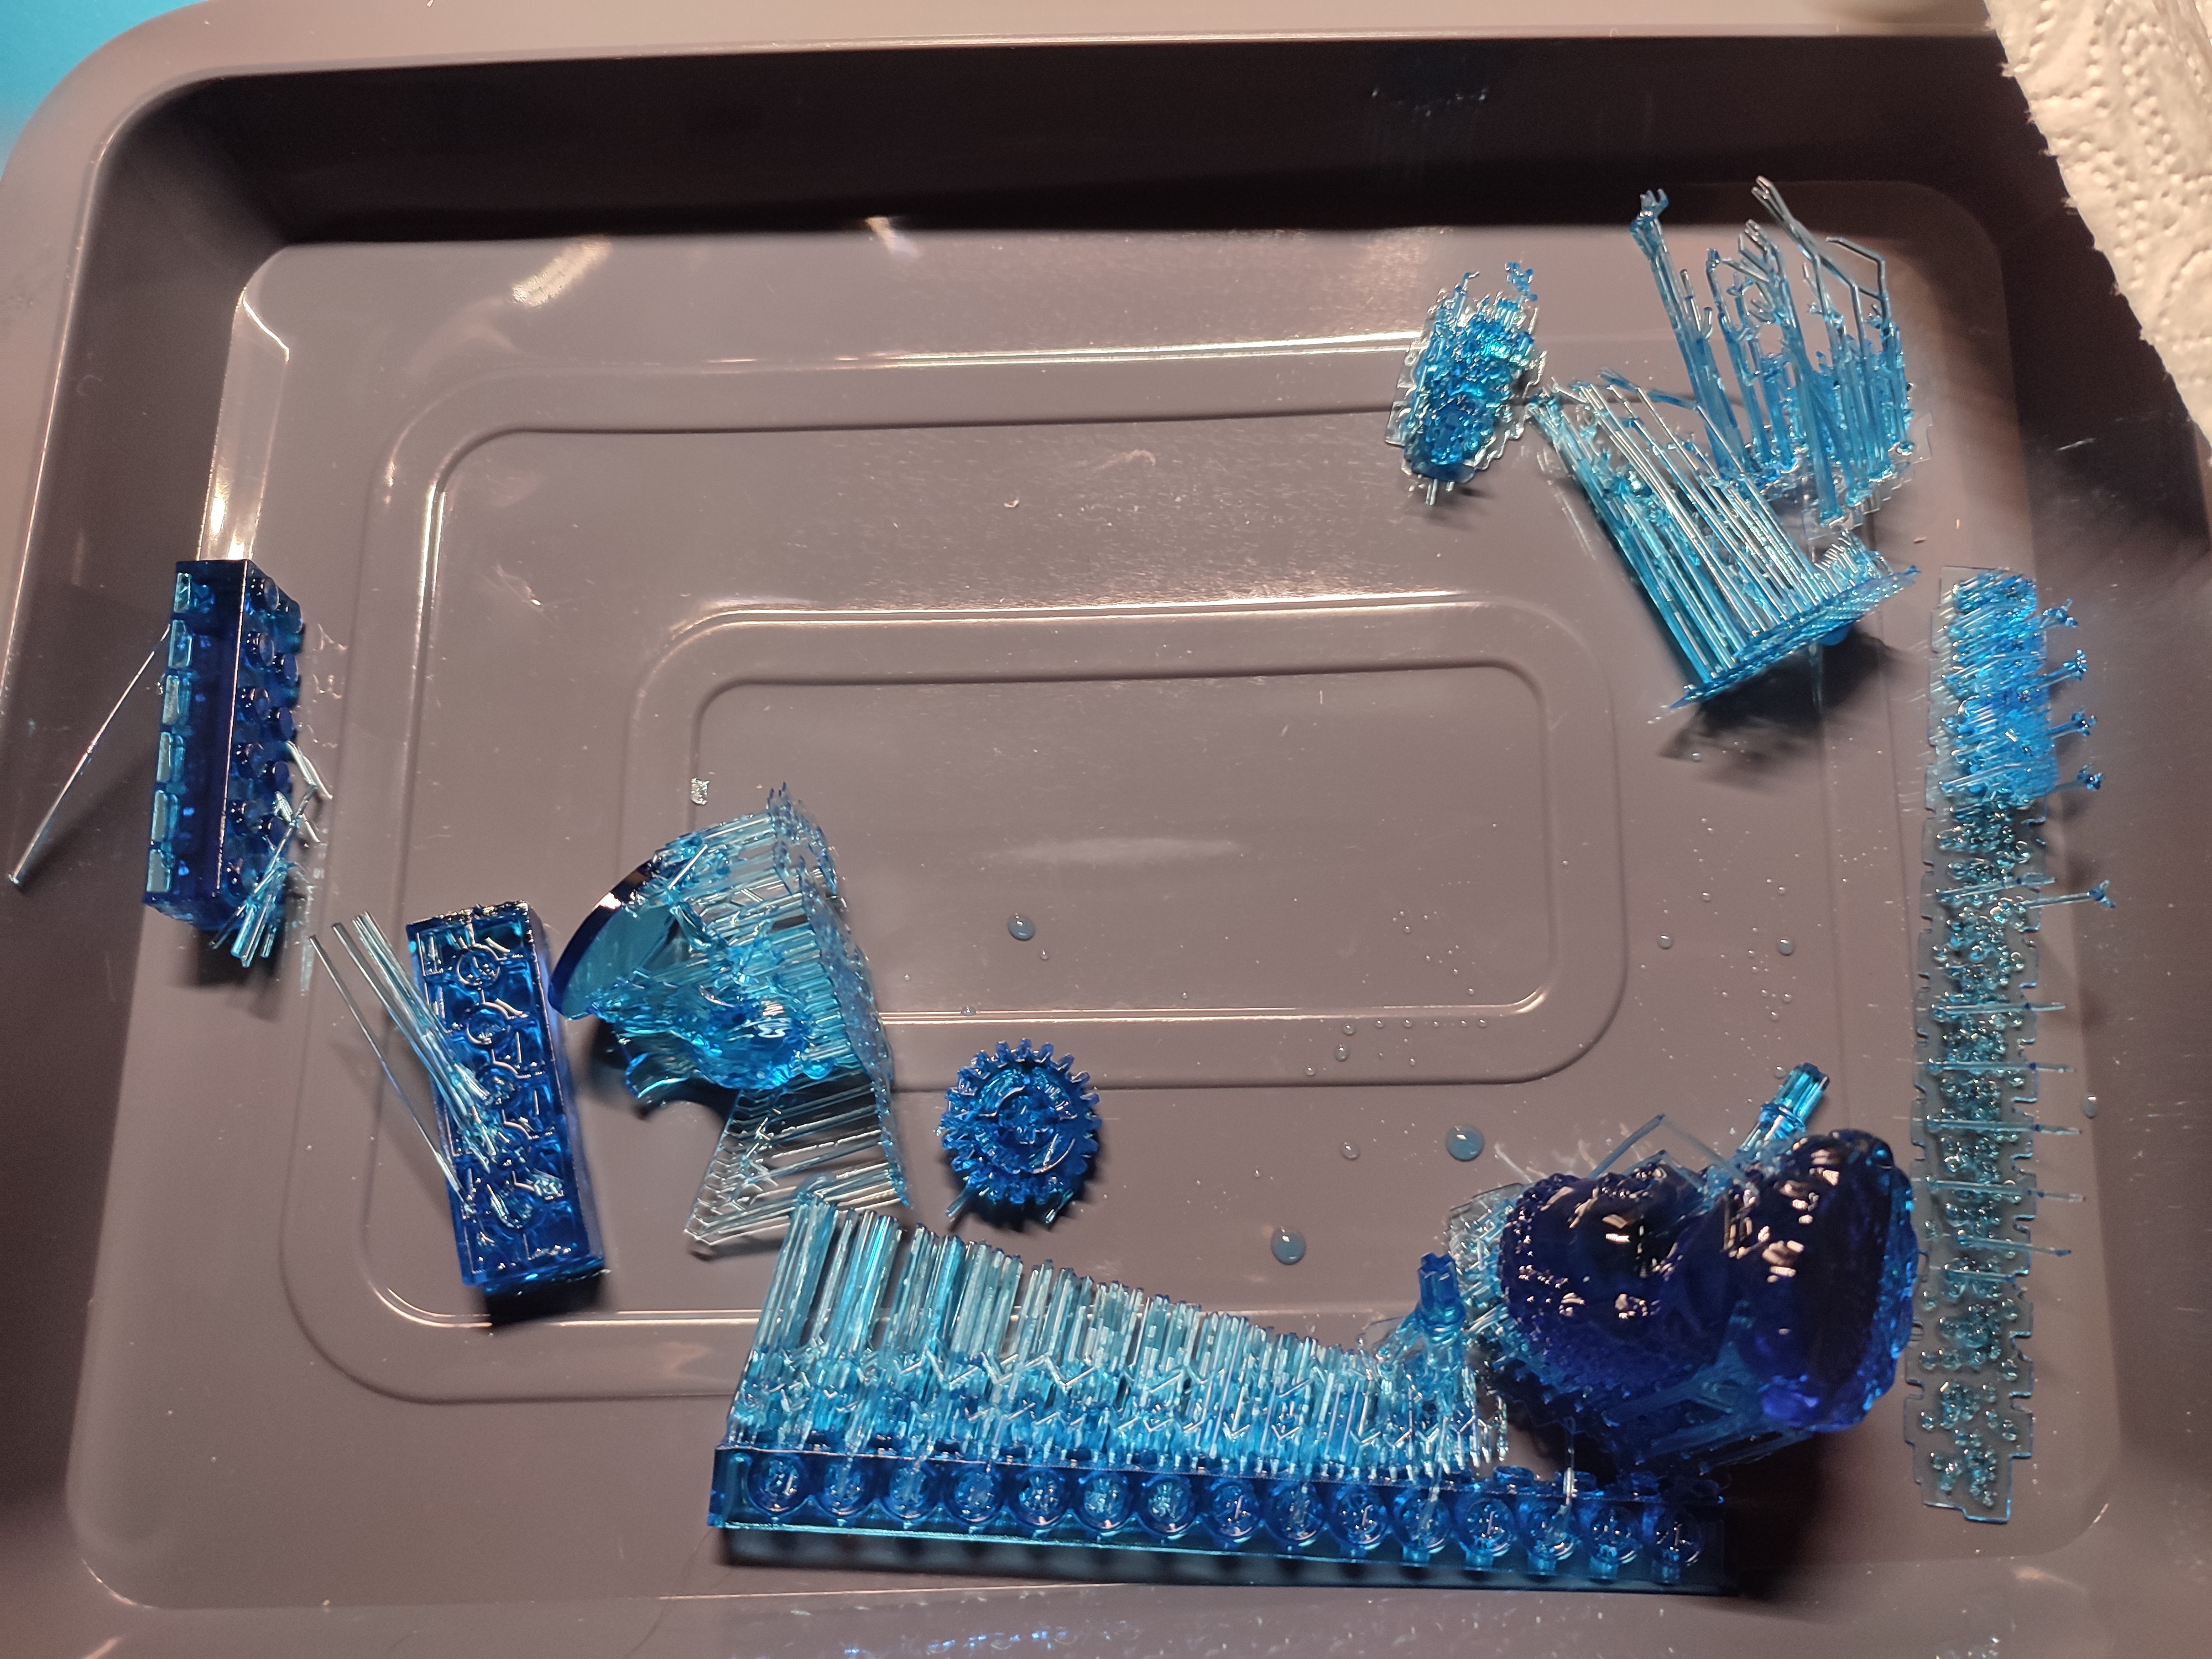
Happy gooey resin parts. (Credit: Maya Posch)
On the SLA side of things there wasn’t too much to upset me, other than some table-flipping at the automatic resin feeding system which I mentioned in the first article. After starting the print, the system seemed to work and began filling the vat with resin, albeit very slowly. At some point I got a ‘material in/out time-out’ error, following which I retried printing, with the resin system again trying to fill the vat for a long period of time.
Ultimately I decided that since I only needed just over 60 mL for the print, and it had already poured in about half the resin bottle, I’d just cancel it. It’s likely that I missed a step here, such as I’m not sure whether you need to pop open the bottle for this to work, but the manual did not mention such details.
Popping over into settings I disabled this auto-feed system and tried to printing again, which worked without issues, other than the backstabbing by ChituBox and a persistent resin smell. This latter issue I tracked down to the slot for the resin bottle, which may or may not be related to the auto-feed issues. After sealing up the gaps the resin smell faded quickly, making it seem at least plausible that the active-carbon system of the machine does something.
After printing I did the usual post-processing, just with a scraper to knock the supports loose instead of something more gentle with a flex plate. The parts were tossed into IPA for a quick clean, including a trip through the ultrasonic cleaner. This was followed by another quick IPA rinse and finally some tanning with a UV lamp in a water bath. This latter step is to keep oxygen away from the curing process and thus speed up the curing, which is one of those details that have worked well for me in the past.
First Conclusions
Despite some flipping of tables, it’s been a fairly positive experience that at least has allowed me to set a bit of a baseline. My overarching feeling at this point in time is that FDM is rather okay for large parts with little detail, such as a CD rack that I already printed in PLA. Not having to deal with smelly resin and involved post-processing is also generally nice.
Advertisement
That said, the sheer quality and level of detail you get with SLA is just a whole other ballgame than FDM. Although it’s been a few years since I previously printed with resin, I still have quite a few prints from that time, including an absolutely miniscule fox figurine that I scaled down on the LD-002R for fun and which still is very much recognizable. The SBC cases and such printed in resin from back then have this level of smoothness and solid feeling to them that you just don’t get with FDM.
An elephant in the room remains that of ABS and ABS-like printing. Such engineering-grade materials are essential for anything in production, and I definitely have to give this Uniformation ABS-like material a good workout. That said, I’m still very hesitant about printing ABS and ASA filaments with FDM, due to the health hazards this poses, mostly caused by the release of styrene.
Although I already wear a respirator with A1 filters backed up by P2 prefilters against VOCs and kin while processing SLA prints, styrene pushes the hazard levels a few notches higher, since unlike most organic vapors it’s not just an irritant, but a known mutagenic toxin. Here an active carbon filter in a closed-chamber FDM printer would seem to be at best optimistic.
To me this aspect alone makes the idea very appealing to use SLA to print high detail models and production parts, while using FDM for sloppy prototyping in PLA, PETG and of course TPU, but this is something that I’ll have to poke some more at. Any input here would be most welcome so that I can do even better with the next article.
In brief: The Steam Machine’s software is fully customizable, allowing users to install non-Steam apps and even different operating systems. However, the living-room PC’s locked-down hardware is far from high-end, an issue some users have addressed with ambitious modifications.
Two recent modding projects aim to substantially boost the Steam Machine’s performance. One modder discovered a roundabout method of adding external graphics, while another built a water block from scratch to achieve dramatically lower temperatures.
Valve’s Linux PC offers a comfortable living-room experience with a controller-friendly interface and a tiny form factor, but its 8GB RDNA 3-based graphics card struggles with high-end games, especially on 4K TVs. Most other desktop PCs would allow users to resolve the issue via upgrades, but the Steam Machine’s unique chassis makes this significantly more complicated.
For example, many likely wish that Valve had included external graphics support out of the box. Handheld PCs from other manufacturers can be docked into high-end desktop graphics cards via USB4, OCuLink, or Thunderbolt 5 ports, none of which the Steam Machine includes.
Advertisement
However, Redditor “Large_Customer_3840” successfully connected an AMD Radeon RX 9070 XT to the device by running its M.2 drive through an OCuLink adapter. Since the Steam Machine’s sole M.2 drive manages the system’s boot storage, he had to reroute the NVMe SSD through a USB-C adapter.
While the process introduces some quirks, Large_Customer claims that the PC booted up immediately. The new GPU ran Crimson Desert at between 40 and 100fps on high settings at 1440p, though there were audio glitches, likely related to SSD bandwidth. The modder recommends that anyone else interested in repeating the process seek an NVMe enclosure with active cooling and at least 40Gbps of bandwidth.
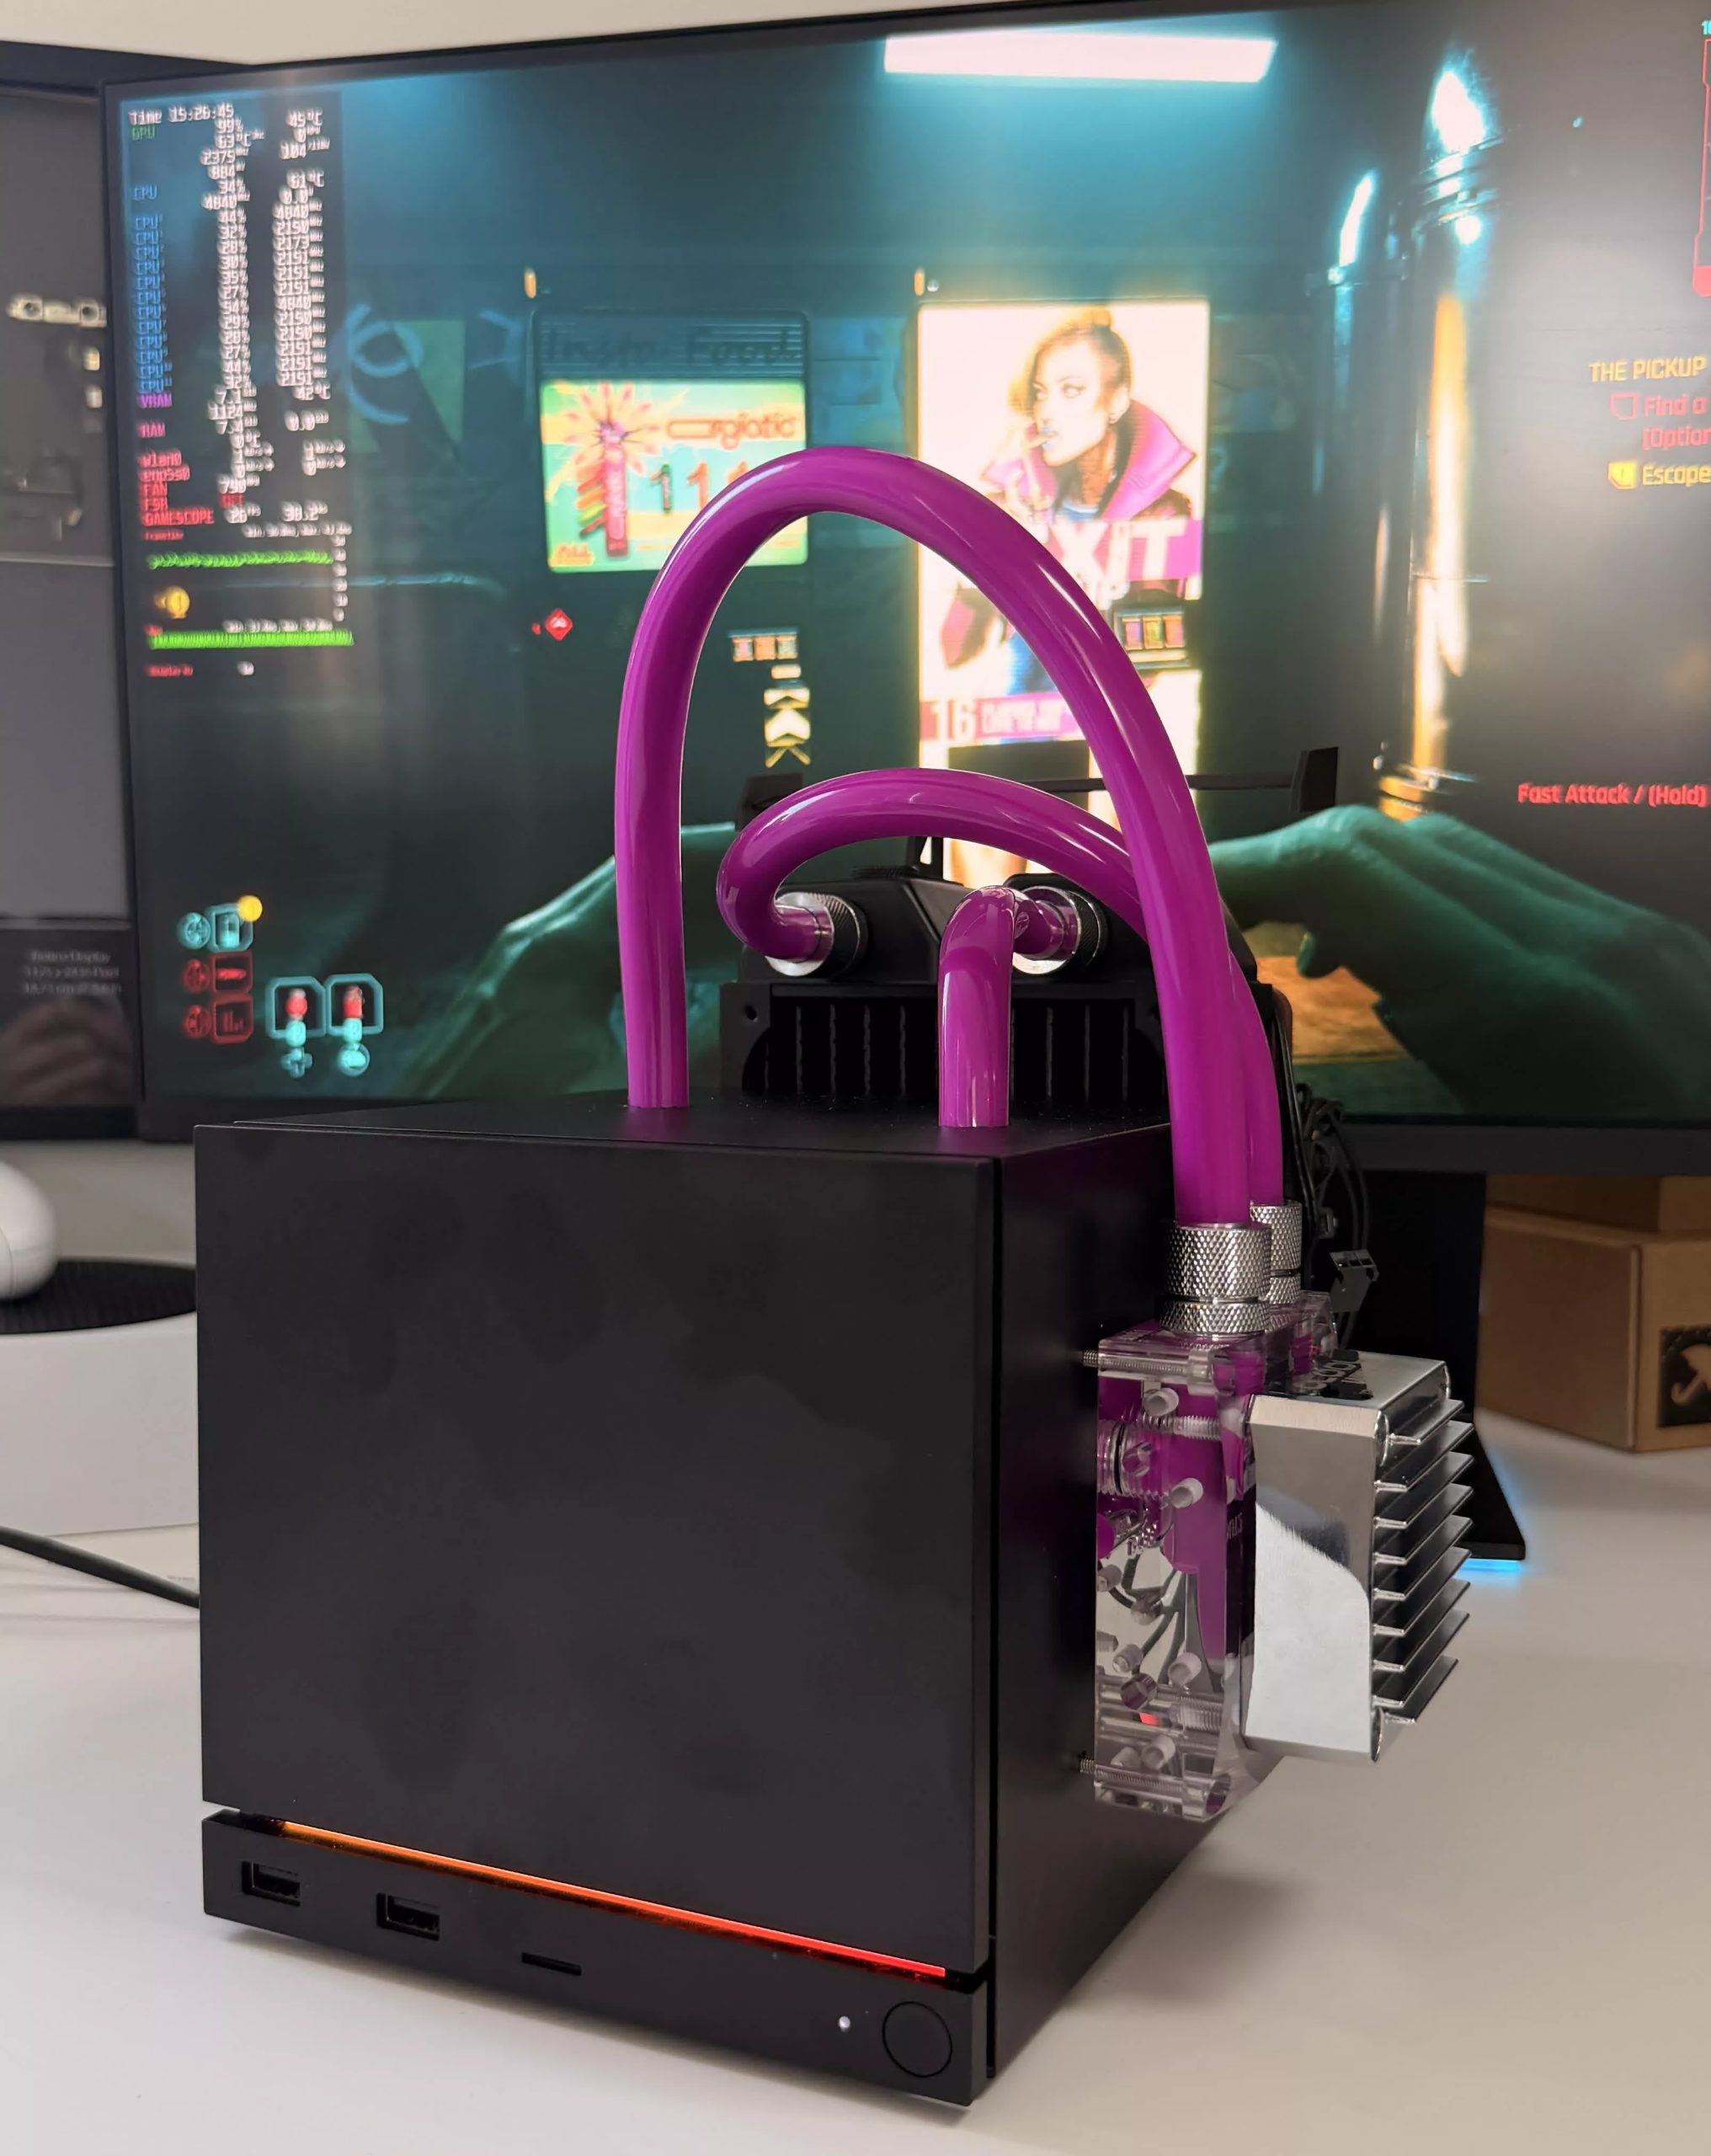
Meanwhile, a recent video (above) from German YouTuber Techmagnet outlines how to completely disassemble the Steam Machine and insert a custom-built water block. A subsequent video on Reddit shows the construction of the water block using 3D-printed components.
Advertisement
While the process leaves large tubes protruding from the Steam Machine, Techmagnet claims it lowers temperatures by 20 to 30 degrees Celsius. However, using the extra headroom for overclocking would require a custom BIOS. With additional work, water cooling the SSD might also be possible.
Ultimately, the Steam Machine’s biggest weakness is its price, which starts at $1,049 due to soaring memory costs. While the RAM crisis has affected virtually every hardware manufacturer, Valve was particularly vulnerable due to its relatively small presence in the hardware market. Still, the company is selling as many Steam Machines as it can build, and new orders are currently waitlisted.
For many security teams, the expected route into the corporate network begins with a phishing email or exploited vulnerability. Certain techniques differ, exploiting the hiring process to gain legitimate access.
In July, the US Department of State released an alert warning of North Korean IT workers impersonating nationals of other countries for the purpose of obtaining work. Once employed, those workers then send their salaries back to parent agencies in North Korea.
The FBI has also warned that fraudulent workers may use their access to copy source-code repositories, exfiltrate proprietary information and support other cybercriminal activity. After being discovered or dismissed, some have attempted to extort their employers by threatening to publish stolen code and data.
These operations expose a gap between checking an identity and proving who is using an account. For instance, a résumé may appear credible, and a laptop may arrive at a domestic address. But, neither of those controls, on its own, proves that the person interviewed is the person who receives the device, or the person who ultimately signs in.
Advertisement
The challenge for service desk agents is how they can confirm the person requesting access is both real and a legitimate new hire.
How Fake Remote Workers Defeat Recruiting Controls
Changing their nationality or identity: This is a key tactic of North Korean IT workers, who will falsify information when registering for online platforms. This might include forging identification documents, impersonating another person, or using a proxy to register an account.
Create fake profiles using AI: To add legitimacy to their identities, fake workers may also create professional profiles and social media accounts. They use AI to support these efforts, matching tone and language to real IT professionals.
Unorthodox payment methods: Fake workers may attempt to avoid being paid by direct deposit, instead favoring money transfers or cryptocurrency. North Korean workers have been observed using a third party for salary deposits, paying the third party for use of the account.
Advertisement
Disguising their location: Tools such as VPNs and remote desktop software may be used to hide the fact that a person is working from abroad.
Using overseas facilitators: Some fake workers will use proxies for device delivery and use. Employer-issued computers are delivered to an address in the country where the worker claims to live. The facilitator keeps the devices powered on and connected, allowing workers overseas to control them remotely.
Verizon’s Data Breach Investigation Report found stolen credentials are involved in 44.7% of breaches.
Effortlessly secure Active Directory with compliant password policies, blocking 6+ billion compromised passwords, boosting security, and slashing support hassles!
Why Employment Checks do not Prove Who is Using the Laptop
Background checks, right-to-work checks and identity screening are built to confirm that the details supplied by a candidate are credible. However, fake remote-worker operations exploit the gaps between several different forms of verification.
An organization may confirm that an identity exists, that the named person is eligible to work and that a laptop was delivered to an approved address. It can still issue credentials to an account that is ultimately controlled by someone else.
The tactics employed in operations like the North Korean IT workers are designed to satisfy specific controls:
The stolen or proxy-supplied document satisfies the identity request.
The fabricated résumé satisfies the recruiter’s initial review.
The proxy or skilled worker satisfies the interview panel.
The facilitator’s address satisfies the equipment-delivery process.
The laptop farm satisfies location and device expectations.
The third-party account satisfies the payroll process.
Warning Signs of a Fake Remote Worker
No single indicator proves that an applicant is part of a fake worker operation. However, there are several warning signs to watch out for, as outlined by the US Department of State:
Frequent changes to registered information.
A mismatch between the account holder’s name and the name on the registered payment account.
Multiple accounts created using the same ID.
Multiple accounts accessed from the same IP address, or a single account accessed from multiple IP addresses in a short period.
Unusually high hours logged in.
Securing the Onboarding Process Against Fake Hires
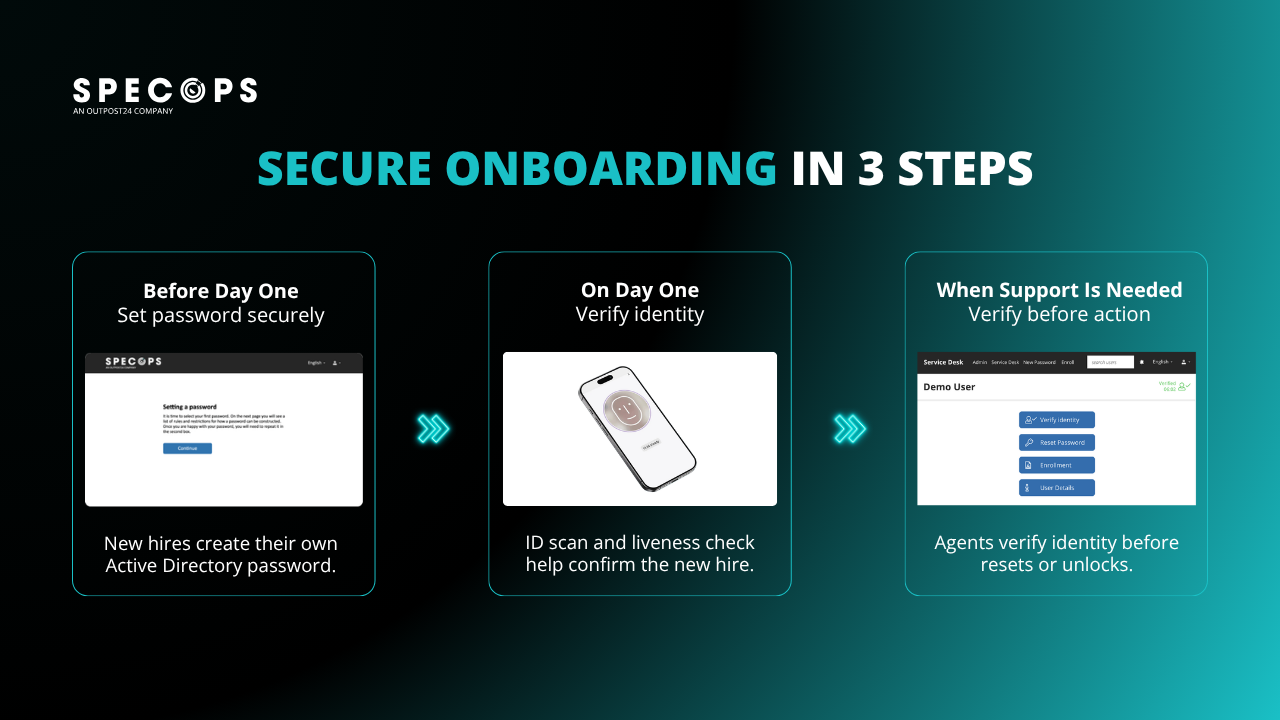
Organizations need robust vetting processes for freelance and remote hire to mitigate the risk of fake workers. Solutions like Specops Secure Onboarding allow organizations to confirm identity at a crucial point, by adding government-issued identity-document scanning and biometric liveness detection to the onboarding process.
The document check helps confirm that the identity document is genuine, while the biometric check compares the person completing onboarding with the photograph on that document.
Advertisement
Liveness detection then establishes that a real person is physically present, rather than a photograph, recording or manipulated video being presented to the camera.
A valid identity document may still have been stolen or supplied by a third party. Similarly, a face that appears to match an uploaded image may be presented through a replay or deepfake. Document validation and biometric liveness work together to provide stronger evidence than either control can offer alone.
With support for more than 16,000 document types, Specops Secure Onboarding can apply this process across a wide range of remote and international hiring scenarios.
Specops Secure Onboarding
Turn Identity Proofing into an Access Control
The central lesson from fake remote worker operations is that identity should not be treated as a one-off hiring record.
Organizations need to confirm that the approved identity belongs to the live person receiving access, and they need a reliable way to repeat that check when access is recovered or changed.
Advertisement
By combining government-issued document validation with biometric liveness on day one, then requiring identity confirmation before service-desk agents act, Specops Secure Onboarding provides trusted identity-proofing checkpoints at the moments most likely to be targeted.
Contact us today to see how Specops solutions can secure your service desk against increasingly sophisticated identity attacks.
A proof-of-concept (PoC) exploit for a critical Microsoft SharePoint vulnerability, published by cybersecurity company Rapid7 on Tuesday, is already being used in attacks.
Tracked as CVE-2026-55040, this authentication bypass security flaw in the JWT token validation pipeline can be exploited by attackers without privileges to perform operations as a SharePoint site user or administrator.
Microsoft patched the vulnerability as part of the July 2026 Patch Tuesday updates, when it warned customers to patch systems running SharePoint Enterprise Server 2016 and SharePoint Server 2019.
“The authentication feature could be bypassed as this vulnerability allows impersonation,” it said. “Exploiting this vulnerability could allow an attacker to disclose files and modify data, but the attacker cannot impact the availability of the system.”
“Attackers are now using the @rapid7 POC for CVE-2026-55040 against our SharePoint honeypots,” Defused warned. “The vulnerability is a Microsoft SharePoint JWT auth bypass for which Rapid7 published a technical writeup and proof-of-concept code yesterday.”
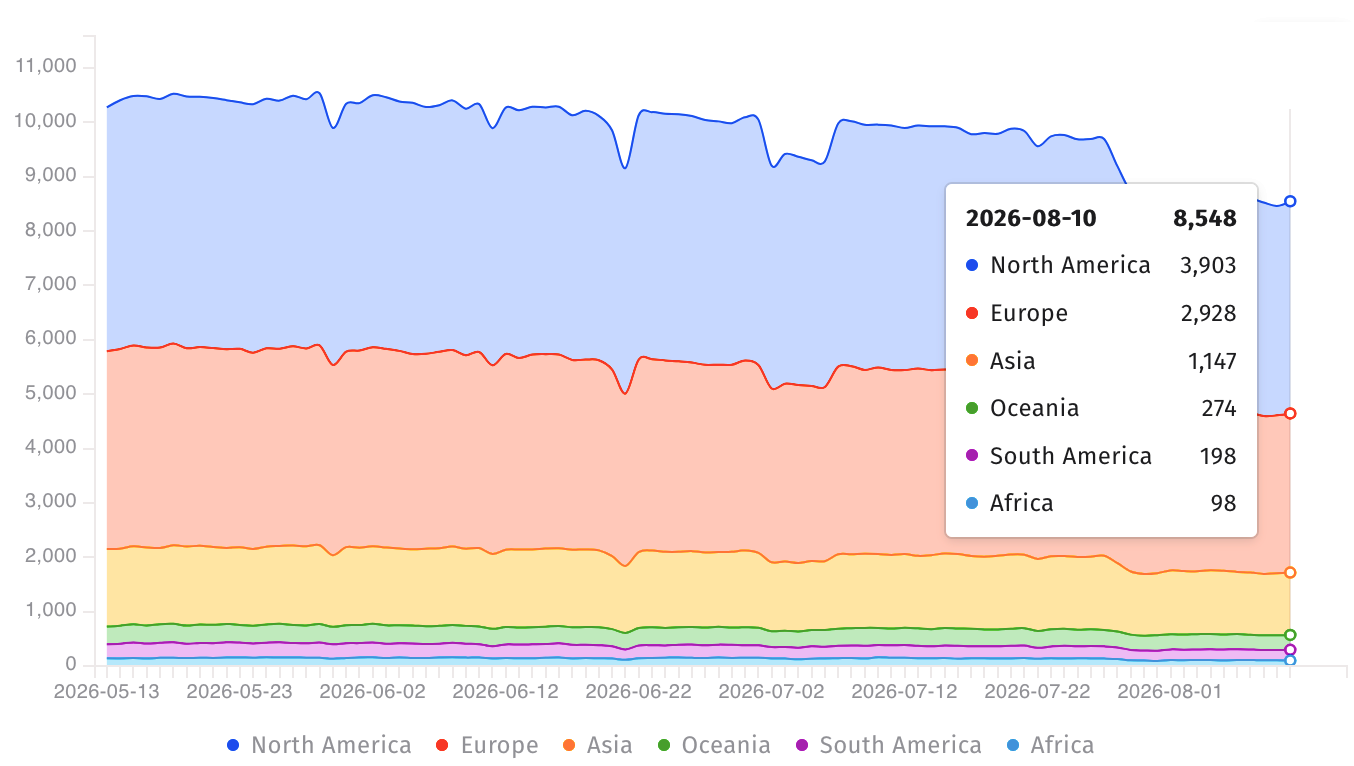
Internet threat watchdog Shadowserver currently tracks over 8,500 Microsoft SharePoint servers exposed online. However, there is no information on how many of them are honeypots or have already been patched against this security flaw.
SharePoint servers exposed online (Shadowserver)
While Microsoft has labeled this security flaw as an attractive target for attackers, it has yet flag it as successfully exploited in the wild.
Likely based on Microsoft’s exploitability assessment, the U.S. Cybersecurity and Infrastructure Security Agency (CISA) warned network defenders on July 15 to secure their SharePoint servers against potential CVE-2026-55040 attacks.
Advertisement
CISA urged security teams to avoid directly exposing SharePoint servers on the Internet unless necessary and to review Microsoft’s official SharePoint Server security-hardening guidance.
It also recommended blocking external access to SharePoint Central Administration and restricting farm and database communication to the required systems. Where Internet exposure is required, CISA recommends placing servers behind a Layer 7 reverse proxy or similar application-layer security control.
On Tuesday, CISA also confirmed that a high-severity Microsoft SharePoint remote code execution vulnerability (CVE-2026-45659), flagged as actively exploited since early July, is now also being exploited by ransomware gangs.
Advertisement
Overall prevention scores can hide what happens after initial access. Once attackers are using valid credentials, prevention drops sharply.
The Blue Report 2026 measures defenses technique by technique across 338 million simulations run in customer production environments.
Photo printers can be an essential addition to any workflow, with a lot more versatility than the average printer. However, there’s a lot to know about these photo-first devices, but when you shop with our tried and tested buying advice, you can’t go wrong. Here are the best photo printers to buy right now.
Although we’re big fans of all that photo printers can do, it should be said from the outset that if you’re only interested in printing out occasional documents to be signed or posted, then you’re better off with one of the best printers available. Standard printers tend to be cheaper at the point of purchase, and even cost less in the long run as you won’t need to use quite as much ink.
Where photo printers really come into their own is for anyone who works in a creative industry and would prefer the convenience of being able to print things out at any time of day, rather than having to be reliant on a nearby printing service. Because of their ability to recreate colours more accurately than standard printers, photo printers are perfect for professional photographers and graphic designers.
Photo printers also have the capacity to print things out in sizes beyond the standard A4 template. This is ideal if you have an A3 poster that you need to print out in time for a show, or you want to have a compact A5 photo that can then be framed afterwards. There’s no shortage of reasons as to why photo printers are a worthy investment, but we take the time to test each one that appears at our offices so that you get paired up with the right one.
Advertisement
In order to make the buying process as simple as possible, all the photo printers on this list have been highlighted for their best feature, whether it be pure value for money or smartphone connectivity, so you can start whittling down your options quickly. For those who might be tempted by a camera upgrade alongside their new photo printer, our guides to the best cameras and the best camera phones have you covered.
Best Photo Printer at a glance
Advertisement
SQUIRREL_ANCHOR_LIST
Learn more about how we test printers
Every printer we review goes through a series of uniform checks designed to gauge key things including print quality, speed and cost. These include first-time setup, changing respective cartridges, and measuring key things such as print speed and quality with a range of different paper types, including plain and photo.
Advertisement
We’ll also compare the features with other printers at the same price point to see if you’re getting good value for your money. We’ve also calculated how much it would cost to replace the cartridge or refill the ink in order to see how much the printer will cost you in the long term.
Very good photo print quality
Less cost and hassle thanks to bottled ink
Surprisingly compact
Underwhelming plain paper printing
Expensive to buy
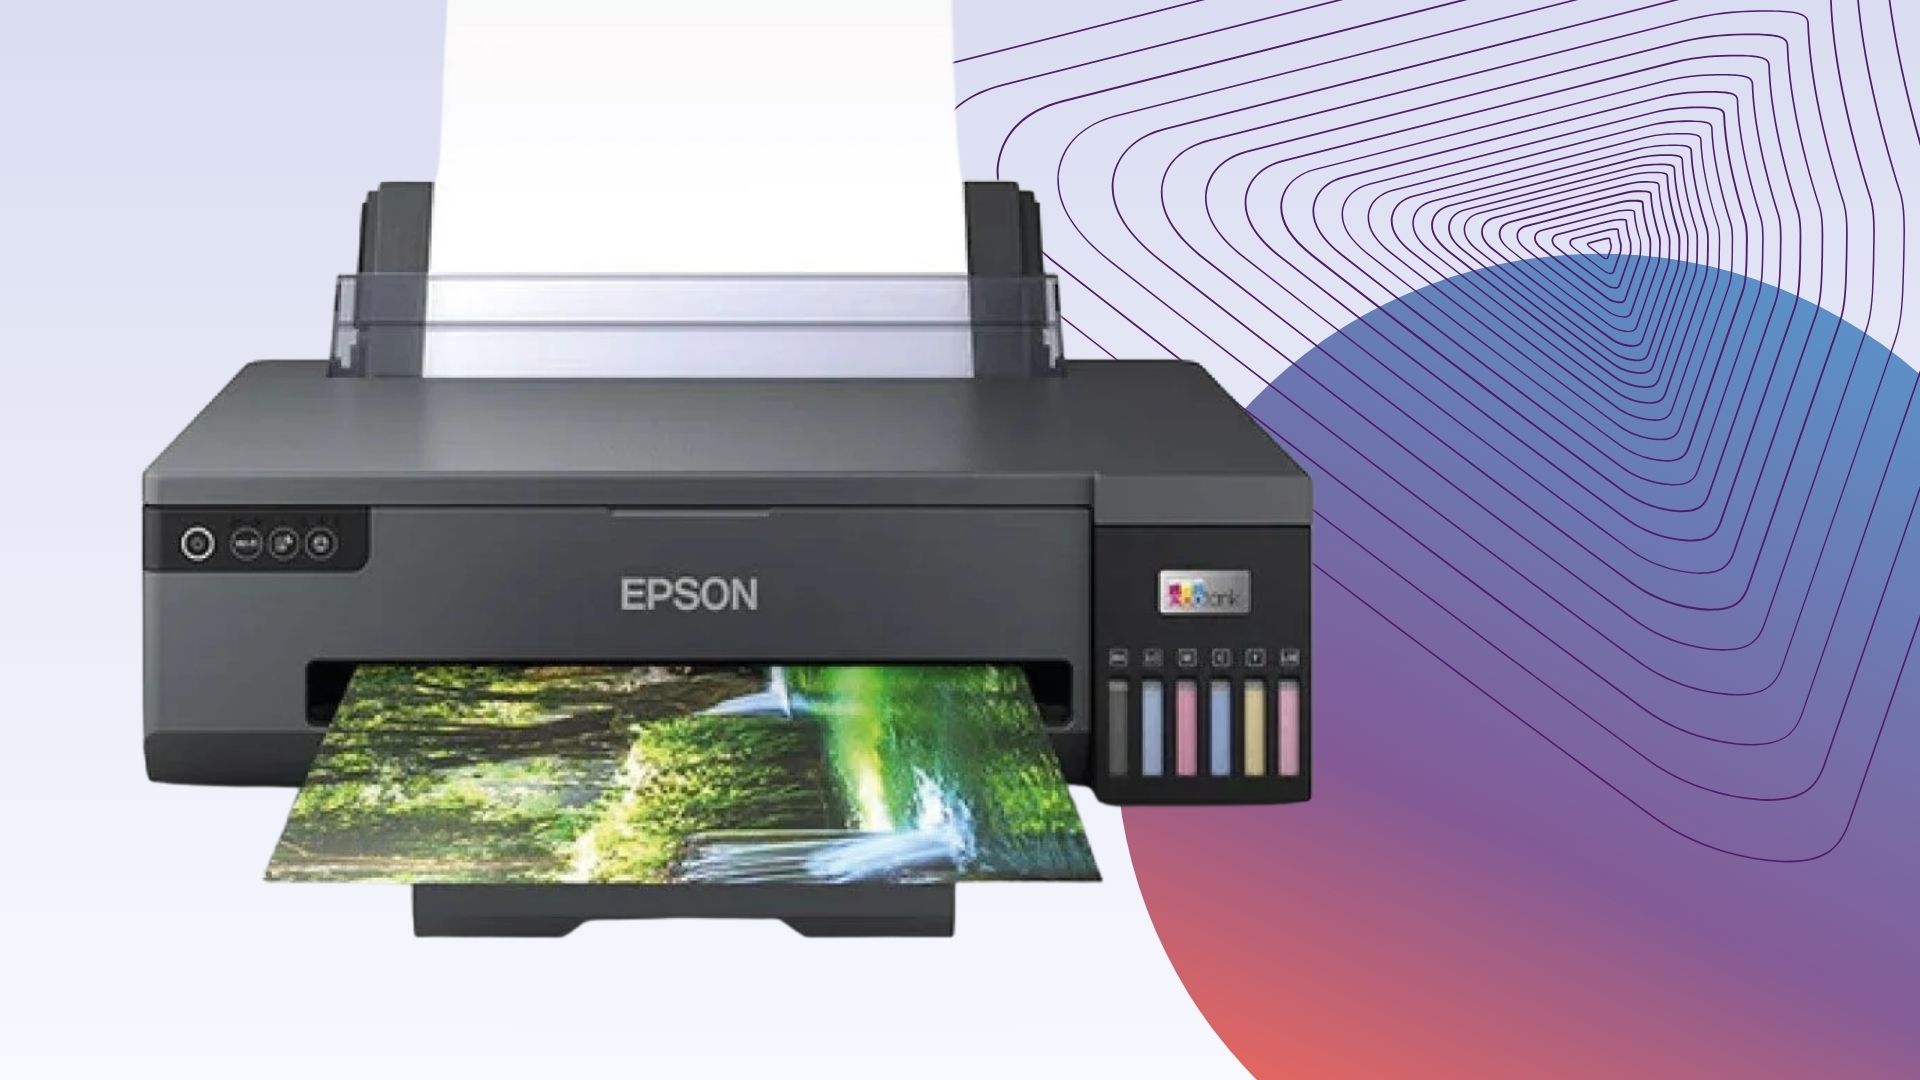
The Epson EcoTank ET-18100 is the ultimate option for those looking for great photo prints, particularly those amateur photographers who want to print photos to their heart’s content.
Advertisement
With the EcoTank ET-18100, you’ll be getting an A3+ capable, six-ink photo printer that opens up the world of photo printing to you through low running costs and super convenient refillable tanks. It’s the big bottles the ink comes in and the refillable tanks that make this such an easy and cost-effective purchase. As such, you can make up for the slightly expensive starting price if you’re going to use this printer a ton.
The results speak for themselves too, producing top-notch photo print quality. Admittedly, the prints aren’t professional tier – look to our next recommendation for that – but for those after great home photo printing, it’s more than good enough. Overally, we found the printer quality to be delightful and it dishes out the prints in speedy fashion too. What’s more, despite its strong capabilities, it is still a surprisingly compact printer too.
Advertisement
Compact and businesslike
Fast mono printing
Good value to own
Slow colour printing
Sub-par plain paper print quality
Although it might be noticeably late to the party, Brother’s first ink tank printer doesn’t suffer from any major first-generation woes, instead being a great photo printer in its own right and one that’s well worth considering if you’re someone who works from home. While there are more powerful options on this list, it’s the Brother DCP-T580DW we recommend for professionals who work exclusively from home.
One of the reasons why the Brother DCP-T580DW is so well-suited to home office working is because of how compact it is. Unlike a lot of photo printers which, by their very nature, can end up taking over an entire desk or table, the DCP-T580DW can easily sit alongside your monitor so you won’t feel as if you’re sacrificing essential space just to have it.
Advertisement
Of course, because this is an ink tank printer, the real allure is in having much cheaper running costs which, on top of the reasonable asking price of £250/$299, can save you a ton of money in the long run. Unlike the ink cartridge system of old which relies on proprietary containers that are expensive to buy and to build, ink tanks can be easily topped up via much cheaper ink bottles.
When it comes to the actual printing process, the DCP-T580DW can get the job done incredibly well. Photos have a warm and inviting quality to them, which is perfect for any memories you might want to frame and hang about your home, and there’s impressive speed at play when printing plain documents. We were able to print 10 double-sided pages in just three minutes.
Because this is a smaller printer, we don’t recommend buying the Brother DCP-T580DW for large-scale projects, and there’s definitely a case to be made that other printers can put out better quality documents, but for a compact printer that more or less does it all, the DCP-T580DW is a great pick for home workers.
Advertisement
Exceptional photo prints up to A3+
Eight-ink print engine for less grain in colour photos
Grey inks for neutral black and white prints
Expensive to run
Not great for plain paper
Are you looking for professional grade photo printing at home? The Canon PIXMA Pro-200 is the choice for you.
Advertisement
Very few printers live up to the quality on offer from the PIXMA Pro-200, the secret? The Canon PIXMA Pro-200 is powered by an eight-ink print engine rather than your more traditional four or six options. The results are stunning, banishing grain from your photo printers up to A3+. The grey ink options make for impressive black and white photo prints too, if monochrome is your vibe.
This photo printer is laser-focused on being for professionals, and that’s why professionals will love it. As such, you’ll need plenty of desk space but, nevertheless, it’s a subtle and straightforwardly designed printer. Printing can be quite expensive if you aren’t printing those larger A3 prints so, again, this is professionals who need its remarkable photo print quality. You’ll have no shame selling your best snaps when using Canon’s high quality photo paper and this printer together.
Again, it’s the quality that sings here, it’s better than what you’d get from your typical lab and it comes back to you in a far speedier manner too – allowing you to hone what you like from your own printer in an efficient way.
Advertisement
Low running costs
Strong photo quality
Decent plain paper prints
Expensive to buy
Slow, especially on plain paper
No auto double-sided printing
The Canon PIXMA G550 isn’t the best value photo printer available, but we decided to include it on this list since it still offers affordable long-term running costs if you plan on printing out photos on a frequent basis.
Advertisement
This model utilises refillable bottles as opposed to cartridges, which immediately makes refills more cost effective. To boot, the G550’s bottles will last for either 3700 black pages or 8000 colour pages. It’s capable of 3800 10x15cm colour photos, giving you a cost per page of just 1.7p, which is some of the lowest we’ve ever seen. This is especially thanks to replacement bottles costing just £11.
As well as offering great value for money, the G550 delivers great quality printouts. This printer offers a six-ink setup, with an extra red and grey ink option, which helped to provide smooth shade transition in coloured printouts, as well as a neutral and exceptionally detailed greyscale print. While some of our colour samples may not be up to standard against other six-inkers, there’s a noticeable difference compared to more standard four-ink printers. Admittedly, it may not be the fastest printer in the world, with a print time of nearly seven minutes to print a single borderless A4 photo, but at least the results are good.
This is a remarkably simple printer, especially given it’s a single function device so you can’t copy or scan images. That being said, it does have a display alongside offering convenient control over key features with some actual buttons. The fact it’s a six-ink printer is also handy given the extra oomph it gives to photos, as well as the fact the ink is refillable, saving waste and also saving you money with much lower printing costs than more standard cartridge-based inkjets.
Advertisement
Squat and smart design
Excellent photo and scan quality
Huge touchscreen controls
Quite expensive to buy and run
Some minor usability issues
As you can see in this list, the best photo printer options aren’t exactly cheap. If your budget can’t stretch that far, then it’s worth considering the Canon PIXMA TS8750 instead.
Advertisement
Available for as little as £150, this cartridge-based, multi-function printer really impressed us when it came to the quality of its photo prints. This is largely thanks to the six-ink setup, which ensures accurate and bold colours, as well as realistic skin tones. Its use of both black and grey ink also allows this printer to excel with dark imagery, adding plenty of detail to the deepest of shadows.
What’s more the Canon PIXMA TS8750 features an SD card slot which allows you to print your photos directly rather than using a PC as a go-between. You can even use the printer’s screen to display thumbnails, making it easier to locate the photos you want to print.
There is a big caveat with the cheap upfront cost of this printer though, as its running costs are expensive due to its use of cartridges instead of ink bottles. If you plan on printing a lot of photos, it may end up being a costly printer over its lifespan, but the Canon PIXMA TS8750 remains a great option for those who want a low upfront cost and don’t plan on printing photos too often.
Advertisement
In-app editing tools give saturation and contrast a boost
Only Instax Link printer to use square film
AR Print and Instax Connect aren’t available on other printers
Limited editing tools
QR codes are too big
Film development takes slightly longer than advertised
The vast majority of the photo printers in this list are designed to live in your home/office and print a variety of image sizes. However, if you’re looking for a more portable printer that uses an instant printing technique, the Instax Square Link is a brilliant option.
Advertisement
The Instax Square Link is a lightweight, pocket-sized printer that prints instant photos like those you’d get from a Polaroid or Instax instant camera. However, unlike these cameras, there’s no lens or sensor involved. Instead, the Square Link allows you to choose specific photos from your phone’s camera roll to send to the printer via Bluetooth.
Not only does this allow you to pick and choose which images are sent to print to avoid wasting ink on duds, but it also makes it possible to print multiple copies of each shot to hand out to others as gifts. It also means you can print your photos the moment you shoot them or wait until later if you leave the printer at home that day.
Images measure 6.2 x 6.2cm and require you to stay stocked up on Instax Square film, which can get quite pricey. However, the printing process itself is relatively quick, with a claimed 90-second developing time (though we found that it took a little longer for the image to develop fully).
There are options to edit your photos in the mobile app and even add AR elements that can be viewed by scanning a QR code in the bottom corner of your print.
Advertisement
Photos printed with the Square Link match our expectations for a decent instant camera. Shots are bright and detailed, though skin tones tend to appear somewhat washed out. You can, however, tweak the saturation or apply a filter in the app to counteract this.
Instax sells two similar printers designed to be compatible with its Mini and Wide film sizes, but if you prefer the in-between Square format, the Instax Square Link is the instant printer for you.
Advertisement
FAQs
Which printer is best for printing photos?
For our money, the Canon Pixma G650 is the best overall photo printer you can buy, with high quality printouts, especially on glossy paper, as well as a convenient featureset and low running costs.
Is Epson EcoTank good for photos?
Advertisement
For what it’s worth, we’d say yes, especially given we’ve listed an Epson EcoTank (the ET-2750) above as a potential option for those wanting a versatile photo printer. Although it really does depend on the specific model.
Is laser or inkjet better for photos?
Inkjet printers are arguably better for printing photos, given that laser printers are traditionally more associated with large-scale text work, and for commercial image printing operations such as brochures and flyers.
As AI makes coding dramatically faster, the next big challenge in software development is testing and validating all that code. Blacksmith has raised a new $45 million round to capitalize on that shift.
The Series B, led by Peak XV Partners, values Blacksmith at $550 million, up from the $60 million valuation it was assigned when it raised a $10 million Series A less than a year ago. Existing investors GV and Y Combinator also participated, bringing the startup’s total funding to $58.5 million.
Founded in 2024, Blacksmith helps companies build, test, and verify software before it reaches production. The startup now serves more than 5,000 customers, including Mercury, Supabase, Clerk, Ashby, and Expensify, up from more than 700 customers less than a year ago, co-founder and CEO Aditya Jayaprakash said in an exclusive interview.
The rise of AI coding tools such as Cursor, OpenAI’s Codex, and Anthropic’s Claude Code has made it significantly easier for software teams to generate code, but the quality of AI-generated code is not a given.
Advertisement
“Validating code is still a bottleneck, and it’s an even bigger bottleneck because people are writing even more,” Jayaprakash said.
Blacksmith started as a cloud provider for continuous integration (CI) workloads, helping companies run the software builds and tests needed to validate code before it reaches production. The startup has since broadened its platform with Codesmith, an AI coding agent that can automatically fix failed code checks.
Jayaprakash said Blacksmith reached a $10 million annualized revenue run rate with just 10 employees and has since grown its workforce to about 30 and grown revenue to “tens of millions of dollars.” He declined to provide a specific updated ARR figure, though did say some of its largest customers now spend more than $1 million a year on the platform.
While that appears to be solid and fast progress, Blacksmith is operating in a crowded market. Its key competitors include GitHub Actions, Cursor Automations, validation capabilities baked into Codex and Claude Code, numerous other startups, and AI code-testing services offered by Amazon Web Services, Microsoft Azure, and Google Cloud.
Advertisement
Jayaprakash said his startup is competing on the speed of testing code as well as affordability.
Looking ahead, Jayaprakash said that Blacksmith plans to expand into a broader suite of coding tools, aiming to help developers write, validate, and merge software faster.
When you purchase through links in our articles, we may earn a small commission. This doesn’t affect our editorial independence.
Lovable now aims to expand on its product and infrastructure, and wants to hire across offices globally.
AI vibe-coding start-up Lovable has tapped fresh funding from Scaleup Europe Fund and China’s Tencent in a round that values the Swedish company at $13.3bn.
The $400m Series C round was led by Menlo Ventures and co-led by the $5bn EQT-run EU fund. The raise doubles Lovable’s $6.6bn valuation from last December after a $330m Series B raise, also led by Menlo.
With big backers from across the world, including Balderton Capital, Europe’s Carmignac, World Innovation Lab, Accel, HubSpot and Salesforce, Lovable now aims to expand on its product, infrastructure and team as it looks to challenge the likes of ChatGPT and Claude.
Advertisement
Lovable enables users to build apps and websites using AI. Since its launch in late 2024, users have created more than 60m projects using its tools, the company said. In recent months, it has integrated payment functionalities and other features into its tools to help users monetise building using Lovable.
“As millions of people build with Lovable, the system gets better at understanding which choices lead to stronger outcomes,” it said.
The AI start-up said it will grow its global team – spread across Stockholm, London, Boston, San Francisco and New York – to roughly 450 people. Hiring will be focused around machine learning, product, infrastructure, and security roles.
EU’s Scaleup Europe Fund – the largest of its kind in Europe – is helping EU-based companies across a range of strategic sectors, including AI, quantum, clean energy, space-tech, biotech and medical innovation tap high growth capital and support in a bid to better compete with US and China in emerging technologies.
The multi-year partnership will explore how hybrid quantum-AI infrastructure could address some of the globe’s most pressing challenges.
Quantum computing company Quantinuum and Technology platform Oracle have announced a multi-year partnership that aims to blend quantum computing and cloud infrastructure.
Under the partnership, Quantinuum and Oracle plan to support enterprise, the AI lab, academic and research applications spanning drug discovery, materials science, financial modelling and large-scale optimisation.
Quantinuum’s advanced quantum computer Helios will be deployed in a US-based OCI AI data centre to enable hybrid quantum-AI workloads as an OCI service. Oracle consumers will have access enabling them to combine quantum computing with Oracle’s graphics-processing and high-performance computing services.
Advertisement
“We believe the next phase of enterprise computing will be shaped by bringing quantum, AI and high-performance computing together,” said Dr. Rajeeb Hazra, the president and CEO of Quantinuum.
Hazra added, “Deploying Helios inside OCI gives Quantinuum and Oracle an opportunity to create a unique deeply integrated environment for hybrid workloads, explore enterprise use cases with customers, and accelerate commercial adoption.”
The partnership intends to explore how hybrid quantum-AI infrastructure might impact some of the most computationally intensive challenges facing enterprises, while also broadening access for universities and research institutions looking to advance scientific discovery and education.
According to Quantinuum, the deal is a shared vision that the future of enterprise-based computing will be developed at the intersection of AI, classical supercomputing and quantum computing.
Advertisement
Commenting on the announcement, Mahesh Thiagarajan, the executive vice-president of Oracle Cloud Infrastructure said, “AI has changed what organisations can imagine and we believe quantum computing can expand what they’re able to solve.
“By bringing Quantinuum’s Helios to Oracle Cloud Infrastructure, we want to give developers a practical and secure way to explore how quantum computing could complement their existing AI and HPC workloads on Oracle Cloud Infrastructure while improving compute efficiency and energy use.”
In late July, Zuriq, a quantum computing company based out of Switzerland, announced a seed funding round of $25.5m. The round, which was led by Quantonation, with participation from Forward.one, Extantia, Firgun Ventures and additional previous round investors, also raised a $4.2m pre-seed round in 2025.
Don’t miss out on the knowledge you need to succeed. Sign up for the Daily Brief, Silicon Republic’s digest of need-to-know sci-tech news.
Spotify will begin labeling AI-generated artist identities with “AI Persona” badges and exclude their music from editorial, algorithmic, and personalized recommendations unless users explicitly follow them. The company says the designation applies to whether an artist profile represents a real person, not whether AI was used to make the music, and will allow appeals for mislabeling. TechCrunch reports: While Spotify will allow artists to identify themselves as AI Personas, the company says it won’t rely on self-disclosure alone. It will also review artist profiles and identify those where the artist’s name and imagery appear to represent photorealistic AI-generated identities. Spotify said it will begin its review with profiles that have met pre-defined audience thresholds to ensure the more listened-to artists are covered first.
Once labeled, the AI Persona badges will appear on the artist’s profile in the banner and the About section, in Search, and on track rows across playlists. By default, Spotify won’t include AI Personas in its editorial or algorithmic recommendations, nor will it add AI Personas’ music to users’ personalized recommendations — unless they happen to follow an AI Persona. Only users can choose to follow an artist, so it’s an explicit signal that the user wants to hear more music from that person or group. Spotify wrote in its announcement that, “while we believe all artists have creative choice in determining how they present themselves, Spotify’s programming is focused on elevating music from authentic artists building careers in music.”
“Although there’s a broad spectrum in how artists use AI as a creative tool, the question of whether a profile represents an actual human is one where Spotify can help make a clear determination. This badge is about the artist’s public identity, not about how the music was made,” the company said.
The partnership will work to train researchers across quantum error correction, filling a gap in the current workforce
Quantum computing company Alice & Bob has today (12 August) announced a partnership with QuBriC, Europe’s first Marie Skłodowska-Curie Actions Doctoral Network dedicated to quantum error correction.
QuBriC brings together 16 universities and seven quantum companies across Europe, including ETH Zürich, TU Delft, UCL, INRIA, Riverlane and IQM, to recruit and train 15 doctoral researchers.
Backed by €4.6m in funding, to be delivered over four years through Horizon Europe’s MSCA programme, the network aims to develop researchers capable of tackling one of quantum computing’s biggest technical challenges, quantum error correction.
Advertisement
For 30 years, the MSCA programme has advanced research and innovation, supporting more than 150,000 researchers, 23 of whom are Nobel Prize winners.
As an industry partner Alice & Bob will further develop the network’s research and training endeavours, while QuBriC will provide access to a pipeline of highly specialised talent and an academic network closely aligned on fault-tolerant quantum computing.
Commenting on the announcement, Christophe Vuillot, a principal research scientist at Alice & Bob, said, “QuBriC brings together leading universities, research institutes and quantum companies to train researchers and bridge these gaps, combining expertise from quantum information, coding theory and hardware engineering.
“This next generation of researchers will be essential to accelerating the path to useful, fault-tolerant quantum computers.”
Advertisement
Globally there has been a significant push to invest in quantum capabilities and technologies. Recently, quantum computing company Quantinuum and Technology platform Oracle announced a multi-year partnership that aims to blend quantum computing and cloud infrastructure.
In July, Zuriq, a quantum computing company based out of Switzerland, announced a seed funding round of $25.5m and Multiverse Computing, based in San Sebastián, Spain, announced a $570m Series C funding round.
Also in July, the Irish Government published the Quantum 2030 Implementation Plan, which explores how the country intends to deliver on the targets and ambitions set out in the Quantum 2030 Strategy.
Don’t miss out on the knowledge you need to succeed. Sign up for the Daily Brief, Silicon Republic’s digest of need-to-know sci-tech news.























































You must be logged in to post a comment Login