
Tech
Nuki Smart Lock & Keypad 2 NFC review: Features, specs, price


If you’re looking for a simple way to access your home, the Nuki Smart Lock and Keypad 2 NFC combo is perfect for renters while supporting in-demand features like Apple Home Key.
I never want to own another smart lock without Apple Home Key support. Retrofit smart door locks have a problem though, as they don’t have an external-facing component for NFC usage.
That’s where the Nuki Smart Lock and Keypad 2 NFC comes in. The lock attaches to the indoor-side of your deadbolt while the Keypad 2 NFC attaches to the wall outside.
I’ve reviewed a lot of smart home gear and have started a semi-regular column called “Owning an Apple Home.” It isn’t always easy talking at length about something like a smart shade, door lock, or smart light, but I’ve found that focusing on how they’re actually used versus specs helps.
Here’s what you need to know about the Nuki Smart Lock and Keypad 2 NFC. It’s a good system, so let’s get into it.
Nuki Smart Lock & Keypad 2 NFC review: Design and features
There are a couple of ways to introduce a smart lock to your home. You can completely replace the deadbolt with a new lock that changes the internal mechanism and outward-facing keyhole, or you can retrofit a system on the indoor side of the door.

Nuki Smart Lock & Keypad 2 NFC review: retrofit your door lock
Since the Nuki Smart Lock is a retrofit that exists only within the closed door, it can’t benefit from features like Home Key. Apple’s Home Key feature uses NFC to unlock a door with the tap of your iPhone or Apple Watch, which can’t happen if the lock is on the other side of the door.
That’s where the Keypad 2 NFC comes in. You mount it outside of the door and it acts as an NFC surface for Apple Home Key.
It also accepts passcodes and fingerprints as access methods, so use whatever is most convenient in the moment. Sometimes, like if I’m carrying groceries, it’s easier to use my fingerprint than Home Key.

Nuki Smart Lock & Keypad 2 NFC review: Home Key support is a must
I’ve decided that having Home Key is a must for any smart lock. You get one Home Key card for your household and it unlocks all of your compatible locks seamlessly.
My Level Lock resembles a standard deadbolt from the inside and out, but that comes at a premium. The Nuki Smart Lock & Keypad 2 NFC combo isn’t that much less expensive, but sales cut the cost to be almost half of Level lock.
Using the system has been mostly flawless. I had some setup difficulties getting the features live and the lock paired to Matter, but that’s more of a Matter issue than a Nuki one.
Unlike the Level Lock, Nuki’s battery is internal and rechargeable. The Keypad 2 NFC takes two AAA batteries, but they last about a year.

Nuki Smart Lock & Keypad 2 NFC review: recharging is simple
Charging the Nuki Smart Lock is simple. It comes with a USB-C cable that has a proprietary magnetic connector on one end, so you can use a wall charger or portable battery to recharge.
I keep the Nuki app installed for access to low-battery notifications, but otherwise I ignore the app. Nuki’s Matter and Home Key integration are good enough that I can interface fully from Apple’s app or via NFC and fingerprints.
It feels unnecessary to state these days because it’s basically standard, but the Nuki lock utilizes end-to-end encryption with bank-level security.
Using the Nuki Smart Lock & Keypad 2 NFC
The Nuki Smart Lock is a retrofit solution that attaches to the existing deadbolt mechanism with very little installation overhead. The result is a door lock that sticks out further than your standard locking mechanism, which is a unit that houses a motor that turns the lock.

Nuki Smart Lock & Keypad 2 NFC review: unlock via app, NFC, passcode, fingerprint, or Apple Home
August was one of the pioneers of this type of smart lock, and while the company shrunk the design over time, it always took on a rather industrialized style. The Nuki lock blends in well with modern doorknobs, but perhaps a little too well.
Now, you’d expect any human that has spent most of their life turning doorknobs to not get confused by this definitely-not-a-doorknob, but you’d be surprised. Whether faced with the more industrially-designed August lock or the Nuki Smart Lock, people freeze as if encountering a new unknown predator.
“So what do I do here?” You open the door. It isn’t even locked. Grab the doorknob and turn it like normal.
This interaction happened with most people that saw these retrofitted smart door locks for the first time. Of course, it’s a one-time failure, but one that shouldn’t have to happen.

Nuki Smart Lock & Keypad 2 NFC review: a door lock that looks closer to a door knob
Nuki’s design is sleek, silver, and has a light on the end. It looks nothing like a doorknob, especially when placed directly next to the actual doorknob, but people struggle with this.
It’s not a Nuki problem, but one I wanted to point out.
Overall, I’ve enjoyed the Nuki Smart Lock. It is low-to-no maintenance as a smart home device, integrates with my Apple Home, and is unobtrusive as a device with its design and execution.

Nuki Smart Lock & Keypad 2 NFC review: a fingerprint works too
When I need to unlock the door, I use my fingerprint or Apple Watch — I’ve never used the code. If anything, I wish I could have a system that offered only an NFC touch point and no other mechanism at all.
Having the backup of your home’s physical key is nice, but I’ve never been in danger of losing access to my home because of a dead battery. I do have a smart lock on my front and back door, so the likelihood of a dead battery preventing entry into my home is basically zero.
Home Key is, well, key
I’m an Apple Home user and want to minimized the amount of technology I own that isn’t accessible within the Home app. Matter has been an excellent boon to Apple Home users, and Nuki is Matter compatible.

Nuki Smart Lock & Keypad 2 NFC review: a smart lock that looks good
However, in the case of smart locks, simple Matter or Apple Home integration isn’t enough. I’m demanding Home Key support going forward.
The ability to have a single digital key for my smart home in Apple Wallet that can unlock all of my doors is amazingly convenient. Sure, alternative unlocking options are available, even from the Home app itself, but you can’t beat the convenience of simply tapping your iPhone or Apple Watch to unlock.
The only thing that might prove more accessible and simple is UWB smart locks. That’s an emerging technology that isn’t widespread just yet, but I’d argue that plus Home Key would still be preferable.
For those looking for a retrofit solution that’s not too expensive, the Nuki Smart Lock & Keypad 2 NFC combo is a good option. It’s especially a great buy for those renting or living in an apartment.
Nuki Smart Lock & Keypad 2 NFC – Pros
- Home Key and Matter support
- Easy installation
- Keypad with fingerprint & NFC
Nuki Smart Lock & Keypad 2 NFC – Cons
- Might confuse some with doorknob-like design
- A bit pricey, but competitive
Rating: 4.5 out of 5
The Nuki Smart Lock and Keypad 2 NFC combo is a great setup for your Apple Home, if a tad expensive. The design is necessary given the nature of a retrofit lock, but it’ll be confusing for some.
Where to buy the Nuki Smart Lock & Keypad 2 NFC
The Nuki Smart Lock bundled with the Keypad 2 NFC can be ordered at Amazon, with the price discounted to $289 (down from $378) at press time. Alternatively, you can order the set from Nuki directly.



Flashlights used to be relatively simple devices that featured simple on and off switches, a fixed brightness setting, and few other features. Like virtually everything else in the world, technological advances have made flashlights smarter and more effective than ever before. USB rechargeable batteries and upgrades in brightness capabilities have helped brands like our favorite, Fenix, bring new levels of versatility to the flashlight market. Meanwhile, the ability to focus light more directly remains an important feature for many users.
That last advancement isn’t entirely new when it comes to flashlights, of course, as manufacturers have long built that feature into different styles of torches. As the name implies, focusing flashlights do indeed feature the ability to adjust the width and focus of the device’s beam. In essence, it allows users to cast light on specific items and areas in the dark when the need is there. The beam can also easily be adjusted to cast a wider light when you want to illuminate a larger area.
As you can imagine, a focusing feature can be as important as brightness in emergency scenarios, as it allows you to highlight a specific point in the dark. This can help you know exactly what lies ahead if you need to be out and about. The same may be true in a dimly lit basement or crawlspace, or if you’re camping off-grid and need to venture away from the tent in the middle of the night to, well, you know.
How to focus the light on your flashlight
As noted, the addition of a focusing feature is hardly the result of a recent technological breakthrough. In fact, the design behind the feature is pretty simple in principle and requires little more than the addition of an internal lens or reflector in the flashlight’s headlamp. That feature can then change the focus of the torch based on how far or how close it is to the light source itself.
The question then becomes how users can move the lens or reflector when the need to focus or unfocus the beam of the flashlight arises. Lights from the market’s top manufactures tend to feature two different styles of flashlights with focusing abilities. The first style allows users to change focus by simply sliding the headlamp of the flashlight forward or backwards on the shaft. The further away from the light the head is, the narrower the beam will be. The principle is the same with the second style of focusing flashlight, though these move the head forward and backward by way of a twisting motion.
There are no major advantages to one style or the other for focusing flashlights, though a push and pull model may be easier for some to adjust with one hand. Versatility aside, there may be a couple of drawbacks to consider with either model, in that the o-rings used in many focusing flashlights can wear out over time, making them less effective at protecting them from dust and moisture. Likewise, the need for moving parts may make focusing flashlights less durable than their fixed head counterparts.
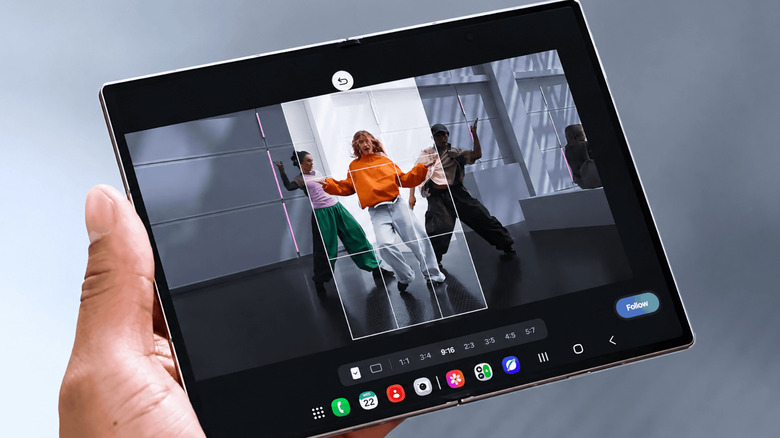
My FanCam works after you record, turning a wider group video into a tighter tracking shot around one person.
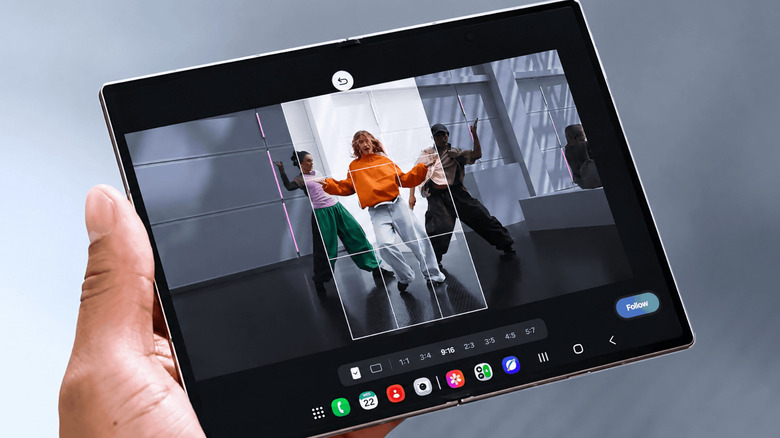
Samsung’s My FanCam is built for videos where several people are moving through the frame. Instead of trying to keep one person centered while you’re recording, you can capture the wider scene and choose your subject afterward. Galaxy AI then reframes the existing footage around that person in an aspect ratio you select.
Samsung introduced the feature on the Galaxy Z Fold8 lineup. Because My FanCam works on a video you’ve already recorded, there’s nothing special you need to turn on before shooting.
How to use My FanCam in Samsung Gallery
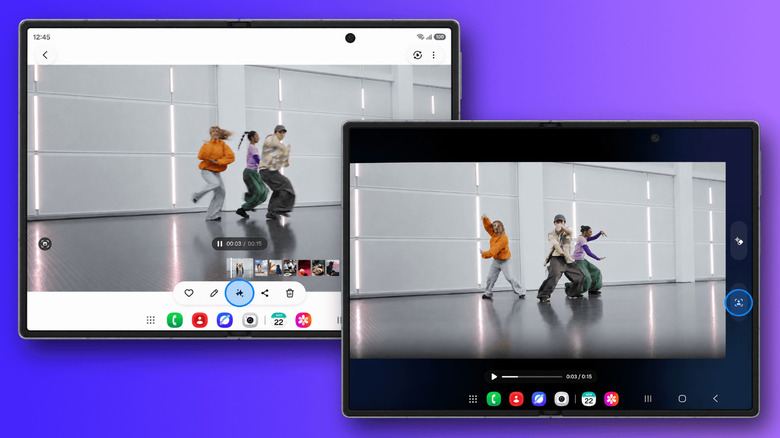
My FanCam lives in Samsung’s Gallery editing tools. On a supported device, start with a video that contains the person you want Galaxy AI to follow.
Open Gallery and select the video you want to edit. Then, tap the Galaxy AI icon and select My FanCam. Wait for Galaxy AI to identify the people in the video and select the person you want to follow. Next, choose an aspect ratio for the new clip. Finally, tap Follow to create the reframed video.
The aspect-ratio choice is useful if you already know where the finished clip is going. A vertical crop makes more sense for platforms built around portrait video, while a wider frame may work better if you want to keep more of the original scene visible. My FanCam handles the tracking either way, so you can make that decision after you’ve recorded the footage.
Shoot a wider frame if you plan to use My FanCam
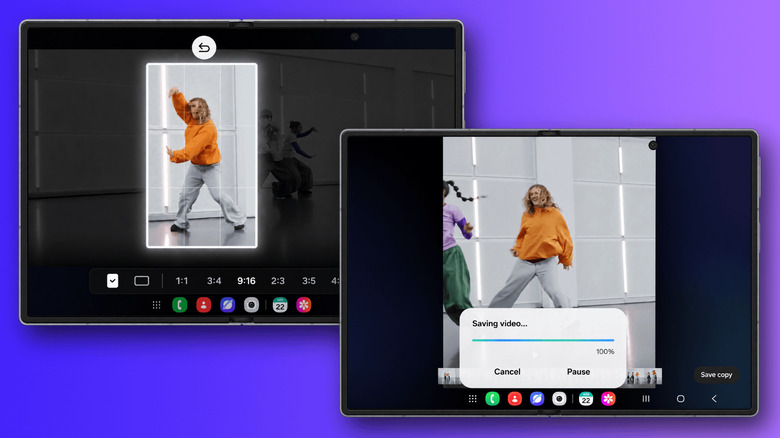
My FanCam differs from Samsung’s Auto framing feature in one important way. Auto framing adjusts the composition while you’re recording, while My FanCam does its work afterward. That gives you more freedom to capture the whole scene first, but it also means the feature can only reframe footage that made it into the original recording.
Imagine recording a school performance, a soccer game or a group dance. Rather than constantly moving the phone to keep one person centered, you can keep more of the scene visible and decide who you want to focus on when you edit the clip later.
It helps to think of My FanCam as moving a smaller frame around inside the video you already recorded. If you’re filming several people, keeping the shot reasonably wide gives Galaxy AI more room to reposition that crop as your chosen person moves from one side of the scene to the other. If you start with a very tight shot, there’s simply less surrounding image available for My FanCam to use.
The same limitation applies when your subject moves outside the original frame. My FanCam reframes what the camera captured, but it can’t recover parts of a scene that were never recorded. Samsung also says the feature won’t work when it can’t find a subject to track, and it doesn’t guarantee tracking accuracy. So for something unpredictable, such as a sports game or a group performance, keeping the person you care about comfortably within the wider shot gives the feature a better starting point.
Which Samsung phones support My FanCam?
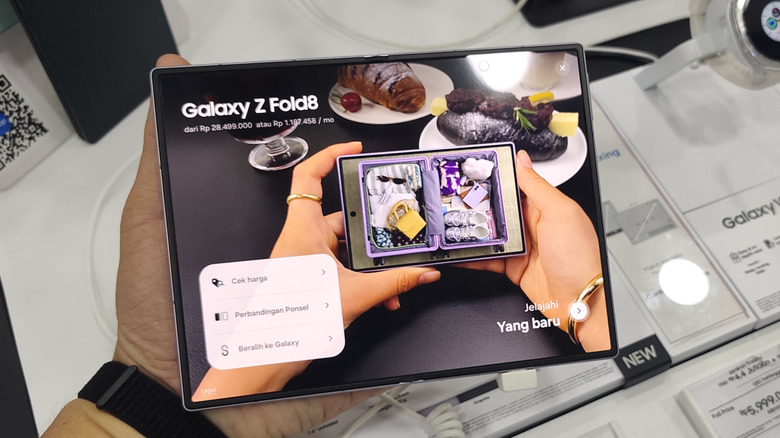
Samsung currently demonstrates My FanCam on the Galaxy Z Fold8 and Galaxy Z Fold8 Ultra. Both phones launched with One UI 9, which is where Samsung lists My FanCam among its new Galaxy AI features.
One UI 9 isn’t limited to those two phones. Samsung first rolled it out to the Galaxy Z Fold8 Ultra, Galaxy Z Fold8 and Galaxy Z Flip8, with more Galaxy devices set to follow. My FanCam is a little less straightforward, though, since Samsung says individual AI features can vary by device, language and region. So even if your phone gets One UI 9, My FanCam may not come along with it.
Upscaling software is getting better all the time, but there are still some caveats to be aware of.
The shift from analogue film to digital video happened quickly. Before you knew it, tape-based video recorders had been replaced with digital video cameras and, later still, smartphones. 4K is now the gold standard for video creation, with 1080p left as its lower-quality sibling.
Despite widespread 4K adoption, there’s still plenty of video being created in 1080p. And that’s not to mention content made in the past, from home videos to old movies, available in standard definition or even lower. That can lead you to thinking about converting video to 4K, giving it a boost to make it look as sharp on a modern 4K OLED display as something you’d shoot today. Converting a video to 4K is possible, but it’s a process with a lot of steps and points to consider first.
Converting a video to 4K means creating millions of new pixels
When we talk about 4K and 1080p, or ultra-high and high definition, we’re talking about the amount of pixels contained within each video frame. For ultra-high definition video content, which is what most people usually mean by 4K, that means a resolution of 3,840 x 2,160 pixels, versus 1,920 x 1,080 pixels for 1080p high definition video. Standard definition video, meanwhile, sits at either 480 or 576 vertical lines depending on your region; width can vary depending on how the content was originally filmed. You can also find cinematic 4K resolutions, so-called ‘true 4K’ or DCI 4K, with a resolution of 4,096 x 2,160.
You can upscale any output file to 4K — 4K is just the frame size. To move from 1080p to 4K, you’re going to need three additional pixels on-screen for every original pixel that was recorded, so four times overall. Managing that without losing any quality is the issue. That is almost impossible and simply changing the resolution won’t reveal a hidden version with extra clarity or sharpness, either.
Traditional upscaling software uses interpolation to manage this, scaling up each frame and figuring out what it should look like. How accurate upscaling software can be is the main question. It has to estimate what the pixels should look like, but it can’t recover the real detail if it wasn’t recorded in the first place.
Often, this means that sizing up will make the footage look softer. The “guess-timation” used to add extra pixels often makes it look smooth as a result. Sharpening can help around the edges, but it’s a Goldilocks dilemma: too much, or not enough, can ruin it. The same is true for noise reduction, which can make the final footage look unnatural.
Professional 4K restorations often return to high-quality original source files
If you’re a professional looking to convert a video to 4K, you’re going to want to work from the best source data available to you: the original source files. The better that source data is, the better quality a job you’ll be able to achieve.
The HD restoration of Star Trek: The Next Generation proves how tricky this can be if you want to get the process right. That upgrade, commissioned by CBS in 2011, used the show’s original 35mm film negatives, which were described as having a quality equivalent to a 20 megapixel resolution, to remaster all seven seasons of the show from their original broadcast quality to 1080p for Blu-ray release. 25,000 reels of original film stock were used, with visual effects and CGI upgrades to help the process. It took over three years to complete and reportedly cost the studio over $12 million, according to one of its producers.
Ironically enough, the analog film to digital video conversion here makes this type of job easier. If you’re working with an older digital master file with a set resolution, you’re stuck with a fixed number of pixels to work from. The original negatives used in the Star Trek upgrade capture far more detail that wouldn’t have made it into the original television broadcasts.
Unfortunately, when the best source files are already low resolution, you’re not able to work from the real data. All of the missing pixels that are created are guesses. The best result is that this will look pretty convincing, but it won’t be 100 percent true to form.
Home upscaling uses interpolation or AI to fill in the gaps
Unlike CBS, you’re unlikely to have $12 million to convert your videos to 4K. Home users converting video to 4K will instead have to choose between traditional interpolation or newer AI-based tools. Both methods will create the additional pixels needed to fill out an enlarged 4K frame, but not in the same way.
4K upscalers using interpolation rely on good, old-fashioned math. It takes a pixel from a single frame and looks at the color and brightness of the pixels around it. From there, it’ll try to calculate how the pixels surrounding it will look. At a basic level, it might achieve this by sheer duplication, but more advanced algorithms will focus on trying to preserve edges and avoid jagged lines. The end result is pretty predictable, but one problem is softness. Interpolation can’t magically recreate genuine detail or textures, making it seem slightly fake. Your TV might be able to do this automatically too, with varying degrees of success.
Luckily, AI upscaling looks to solve that problem. These models are trained on examples of low and high-resolution images that allow it to identify how common features should look on your screen. Instead of estimating each pixel, the AI is predicting what a sharper image will look like.
The result can be sharper and more convincing but, like interpolation, it won’t be an exact match for the real world. AI upscalers can also introduce unusual artifacts that interpolation doesn’t. AI models are constantly improving, however, so the quality and consistency you’ll see today might seem antiquated in just a few years’ time.
If you’re working with older video, you may also need to think about interlacing, where video frames were split into two halves by odd and even horizontal lines, with each line refreshing each time the screen refreshes. Modern displays don’t use interlacing, but older broadcasts meant for CRT-like screens would. Converting these kinds of videos will require you to de-interlace before upscaling, although how well you’ll be able to upscale a 480i NTSC video to 4K in a way that maintains a watchable video quality is questionable.
Upscaling tools often feature plenty of configuration to help you get the result you want, whether it’s using AI or interpolation. If a single pass through doesn’t get you the result you’re looking for, you can tweak the settings to have another go (as long as you’ve got the disk space).
Upscaling a 1080p video to 4K doesn’t automatically improve it
You can’t just whack a 1080p video into an upscaler and expect a perfect 4K video at the end. You can achieve it in the technical sense, by increasing the size of the video frame, but getting the video to scale up without losing quality is difficult. It may take several attempts to get the result to match up to your expectations.
It’s easier to achieve if you’ve got good source material to work from, and the smaller the leap in resolution, the better. Upscaling from 1440p to 4K, for instance, won’t require as many ‘fake’ pixels as 1080p to 4K, or worse, 480p to 4K. 4K upscaling software can only guess what the missing pieces, those extra pixels, should look like. AI is making the process easier, and potentially better, but a like-for-like match isn’t guaranteed.
Resolution isn’t the only factor at play here, though. To save on disk space, video files can be compressed with a lower bitrate, meaning the amount of data saved for each second of video is lower. Upscaling to 4K won’t undo that, and you can’t just lose common compression artifacts like blocks or banding if you’re working from a low bitrate file. It all comes down to the source, and if that’s good enough, upscaling becomes a whole lot easier to handle.

The SEC is investigating the near-collapse of AI-focused hedge fund Situational Awareness, sending subpoenas to major Wall Street banks for details about the fund’s trades, borrowing, and communications with lenders. The fund, founded by former OpenAI researcher Leopold Aschenbrenner, managed over $30 billion and borrowed tens of billions more before leveraged bets unraveled, forcing it to sell most of its stock portfolio to Citadel at a discount. The New York Times reports: The subpoenas asked for details on the timing of Situational Awareness’s trades and for its communications with lenders about the money it was borrowing, also known as “leverage,” two of those people said. The subpoenas additionally warned the banks to preserve any information regarding the San Francisco hedge fund. The S.E.C. oversees financial markets with an eye toward protecting small investors, and has brought civil cases regularly against investment firms that produced large losses. Any investigation into Situational Awareness would be at its earliest stages, and it’s no guarantee that it would lead to fines or other punishment. The hedge fund has not been accused of wrongdoing.
[…] Situational Awareness had a fast rise and an even quicker retreat. Founded just two years ago by Leopold Aschenbrenner, a former researcher at OpenAI, it rode the A.I. boom to soaring investment returns. To achieve those results, however, the fund relied on heavy borrowing, as well as complicated and expensive financial instruments that magnify gains — and losses. The latter piled up quickly last month when the stock prices of publicly traded, high-flying A.I. companies dipped. At the same time, shares in more traditional technology companies — which the hedge fund had been betting against — rose, compounding the problem. Situational Awareness was forced into a fire sale. It wound up selling most of its stock portfolio to a rival, Citadel, at a discount.


Read more of this story at Slashdot.

Immersive Gamebox, a global interactive group gaming company, is coming to the Seattle region with its first Pacific Northwest location opening this week at Westfield Southcenter mall.
Designed for groups of two to six players, the venue uses projection mapping, touch-sensitive walls, 3D motion tracking, and spatial audio to create controller-free, immersive gaming environments.
Players use their bodies and movements to interact directly with the room to play titles based on major media franchises, including Netflix’s “Squid Game,” “Batman,” “Angry Birds,” and “Floor Is Lava.”
@media (max-width: 600px) {
aside.callout { float:none !important; max-width:100% !important; margin-left:0 !important; margin-right:0 !important; }
aside.callout .callout-img { display:none !important; }
}
A grand opening celebration on Friday starts at 10 a.m. and includes a 2 p.m. ribbon cutting and giveaways. Bookings are currently open online, with limited availability for opening weekend.
The Tukwila location marks a strategic shift for the UK-founded company, which operates roughly 20 company-owned venues across the U.S. and more than 35 worldwide. The Southcenter space is its first step into U.S. franchising, partnering with local operators to scale the experiential tech concept across North America.
Founded in 2018 by Tough Mudder co-founder Will Dean, London-based Immersive Gamebox (formerly Electric Gamebox) was acquired and recapitalized by Harlan Capital Partners in early 2025. The company uses proprietary, patented LiDAR tracking tech in its “smart rooms” and counts Index Ventures among its early venture backers.
Pricing varies by game and time. An hour of “Squid Game” for one adult costs $31.99. Thirty minutes of “Floor Is Lava” for a child ages 3 to 11 is $23.99.
Immersive Gamebox will be open Monday through Saturday from 10 a.m. to 9 p.m. and Sunday from 11 a.m. to 7 p.m.
I’ve tested about a hundred laptops in my time as a reviewer. Seeing brands cram more powerful hardware into a small machine is always fun. Desktops, on the other hand, are a little different. My last experience with desktops was using one inside the computer lab at school. Sure, gamers still love building desktops, but getting all the components together and then trying to piece the puzzle together has never made me see the appeal. Given the huge increase in RAM prices in 2026, however, desktops make more sense than ever. You can configure them how you like and upgrade them later without replacing the entire machine.
If you’re in the market for a desktop for home use but don’t want the hassle of building it yourself, pre-built desktops are the way to go. And Asus has just released its new V500 SFF (V501SV) in India. You get Intel’s Core 5 210H processor, along with expandable 8GB of DDR5 RAM and a 512GB M.2 SSD. At ₹71,990, all of that could make it a decent option for home users and students alike. But should you buy? To answer that question, I’ve been using the V501MV for about two weeks and have made it my home computer.
ASUS V500 SFF (V501MV) Review
Summary
The Asus V500 SFF (V501MV) is a competent home desktop solution for parents and students alike. You don’t have to deal with the headache of assembling everything yourself, and you’re getting a capable machine without going too far up the price ladder. The design is unassuming, but I actually like the way it looks on a desk. You get a standard keyboard and mouse combo, and there are plenty of ports. Performance isn’t class-leading, especially with just 8GB of RAM, but it’s still good enough to handle all everyday tasks and some photo/video editing on the side.
Design & Hardware

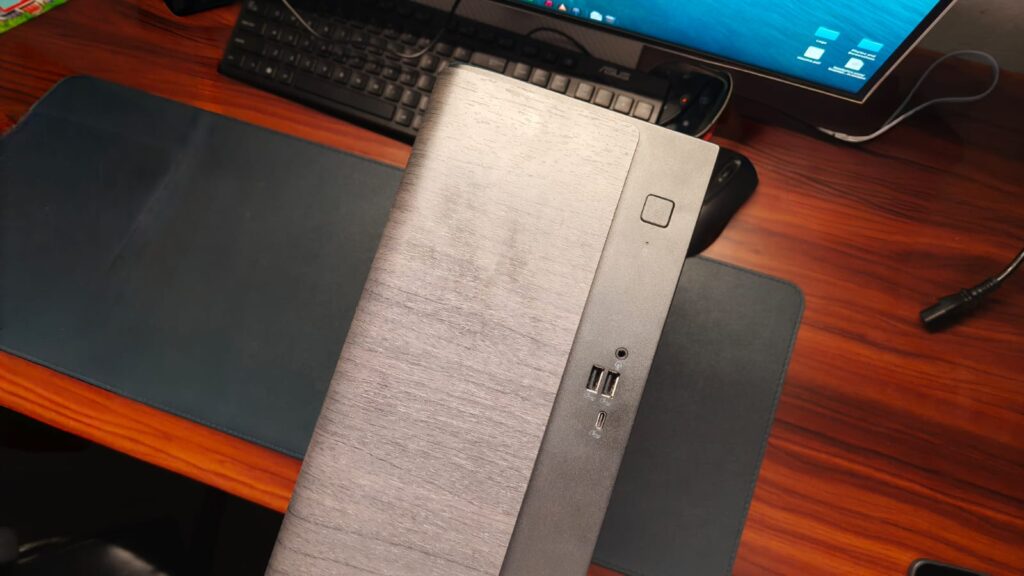
Usually, when reviewing a laptop, there’s a lot to talk about when it comes to design and hardware. But with desktops, there isn’t much. These towers will generally sit beneath your desk, so design isn’t much of a concern. Still, Asus has given it some sweet details. On the front, you get a wood-like panel in a dark brown finish that adds a sophisticated feel. You can also get the V501 in white to match your interiors, and it replaces the wood with a grey mesh. Whichever you go for, the desktop won’t look out of place in most homes. As for the dimensions, the V501 is 12.15 inches tall and 11.59 inches wide. I wouldn’t call it small. It’s more of a medium-sized desktop and did fit well on top of my desk against a 27-inch monitor.
At a time when almost every laptop is removing ports, desktops are the last saving grace. With the V501, you get two USB 3.2 Gen 1 Type-A ports, one USB 3.2 Gen 1 Type-C port, and a headphone jack, all on the front. At the back, there’s RJ45 Gigabit Ethernet, one HDMI 1.4, one DisplayPort 1.4, four USB 2.0 Type-A ports, and 7.1-channel audio. This should be plenty for most accessories, since I had no problems connecting everything I needed. Beyond that, there’s also a Wi-Fi 6 card and Bluetooth 5.4 support. I do have one problem with this port selection, though. That’s the lack of Thunderbolt ports, which limits your options for high-speed peripherals and external storage.
Keyboard & Mouse

Asus bundles a keyboard and mouse combo in the box to get you started. And that’s about all the praise I can give it. Don’t get me wrong, you can use the included keyboard for work, but it’s not my favorite thing. The keys have decent feedback, but are a little too noisy for my liking. They are also not that tactile, and the build quality is scratchy plastic. I’d recommend getting another decent keyboard for most office work.
The mouse, on the other hand, is okay to use. It’s wired, so latency isn’t an issue, and the tracking was pretty accurate in my experience. The buttons are also decent, and the scroll wheel was good for navigating long web pages and documents. The build quality is the same as the keyboard, but that wasn’t a big problem at all.
Performance

At the heart of the Asus V501 sits Intel’s Core 5 210H processor, which includes eight cores that can boost up to 4.8 GHz. It’s paired with 8GB of DDR5 RAM and a 512GB M.2 PCIe Gen 4 SSD, both of which are expandable. As expected, the everyday performance of the V500 is pretty good. For home use, that is, browsing the web, making presentations, and watching videos, it handled everything perfectly, without any slowdowns or hitches. I was out of the country for a while, so the desktop was my sister’s primary work machine. She’s a student and said the V500 was great for filling out college applications, researching new topics, taking notes, and so on.
Since this is a machine aimed at students, I also installed a few IDEs to test the programming performance. The Asus V501 handled a large Python project in VS Code without any noticeable slowdowns. It can also be used to edit some photos and light videos, but the lack of a dedicated GPU makes editing 4K videos a distant dream. Since this is a review, I also ran a series of benchmarks to test the V500’s raw performance. On Geekbench, it scored 2214 points in the single-core test and 9496 in the multi-core test. In 3DMark TimeSpy, the device reached about 1,150 points. This level of performance should be enough for most household tasks for years to come.
As far as gaming is concerned, you need to set your expectations. The V501 is not a gaming desktop. You don’t get a dedicated GPU, which limits the games you can play. However, it can run esports titles such as Rocket League, Valorant, and CS:GO. I got roughly 60 FPS in Rocket League at medium settings. Valorant delivered a similar experience, regularly hovering around 60 FPS, with 1% lows of around 50 FPS.
Verdict
At ₹71,990 for the unit I tested, the Asus V500 SFF (V501MV) is a competent home desktop solution for parents and students alike. You don’t have to deal with the headache of assembling everything yourself, and you’re getting a capable machine without going too far up the price ladder. The design is unassuming, but I actually like the way it looks on a desk. You get a standard keyboard and mouse combo, and there are plenty of ports. Performance isn’t class-leading, especially with just 8GB of RAM, but it’s still good enough to handle all everyday tasks and some photo/video editing on the side.

Situational Awareness, the AI focused hedge fund that was Wall Street’s fleeting obsession, is having a very bad month.
The company, led by twentysomething OpenAI alum Leopold Aschenbrenner, went all-in on a variety of AI investments and, for a period, enjoyed phenomenal growth. Then, at the end of July, a downturn in AI stocks erased billions of dollars in value at the firm. Now, federal regulators are reportedly probing the company as well.
The New York Times reports that the Securities and Exchange Commission has been subpoenaing banks that did business with the hedge fund. The subpoenas focus on the banks that supervised the fund’s trading and that channeled funding to support it, the outlet says.
The government reportedly warned the banks to “preserve any information” about the hedge fund, though it noted that Situational Awareness has not been accused of any wrongdoing.
Situational Awareness did not respond to TechCrunch’s request for comment but told the Times that scrutiny of high-profile funds is to be expected, and that it would “cooperate to the fullest extent with any regulatory request.”
The company, which very publicly hitched its wagon to AI’s star, may serve as a cautionary tale about the industry’s supposedly unstoppable trajectory.

It may finally be safe to eat lettuce again after June’s horrifying—and bagged-salad-trust-destroying—cyclospora outbreak. But the summer of ’26’s foodborne illness train rolls on with a new rash of recalls: for salmonella.
The FDA has reported multi-state salmonella bacteria outbreaks tied to jalapeños, granola, dog food, alfalfa sprouts (also featuring E. coli), and something most people probably have in their refrigerator at this very minute: eggs.
Though the eggs being recalled are only from one supplier, Midwest Poultry Services, they were sold under five brand names, including two distributed by one of the country’s largest grocery chains: Kroger and Simple Truth. While this July recall only concerned Kroger stores in Texas, why wait for the next one?
With the advice of two infectious disease experts, I tested what may be the easiest, most universally applicable way to ensure the eggs in your refrigerator are salmonella-free and safe to use—even in raw or near-raw preparations like Hollandaise and pasta carbonara. All it requires is an immersion circulator, a pot of water, and about an hour and a half of your day.

Anova
Sous Vide Precision Cooker 3.0 (1100 Watts)
Are All Eggs at Risk?
Salmonella, which can cause fever and severe diarrhea, is not a new problem for eggs.
In fact, “eggs remain the single food commodity most associated with outbreak illnesses,” says Alan Bulbin, director of infectious disease at Catholic Health’s St. Francis Hospital and Heart Center in Roslyn, New York.
Chickens and other poultry commonly carry Salmonella enteritidis, the bacterium most commonly responsible for salmonellosis in people, which can be transferred to the shell from contact with droppings or even deposited inside the egg itself from an infected chicken’s ovaries.
It’s difficult to tell just by looking if a chicken has salmonella, which is easily transmitted by rodents or wild birds. In fact, at one point, the USDA estimated that 1 out of every 20,000 eggs was thought to be contaminated with salmonella. That means out of the 67 billion eggs produced in the US each year, 3 million eggs could conceivably have dangerous bacteria in or on them. The USDA enacted a 72-page egg safety requirement in 2009 in hopes of eradicating contamination, but clearly, it hasn’t happened.
It’s good practice to always keep your eggs refrigerated at 42 degrees Fahrenheit or less and wash your hands before and after handling. It’s also worth noting that cooking eggs kills salmonella bacteria. As long as your eggs are “cooked thoroughly, with a firm yolk and white,” according to Bulbin, salmonella shouldn’t be a concern.
The Raw Truth
But what if you (like me) have kids who cook for themselves, who you know for a fact will never wash their hands after handling eggs? And more commonly, what if you’re not fully cooking the eggs? Many recipes, from mayonnaise and aiolis to eggnog and royal icing for cookies, call for eggs that will be consumed uncooked. How can you make sure they’re safe to use?

Photograph: Lisa Abelar
While in-shell eggs aren’t pasteurized, all liquid eggs are—the kind in the carton. However, these are just egg whites, not yolks, which means they won’t work for many of the above recipes.
If you want to be certain a whole, raw shell egg is free of bacteria, the only way to ensure this is to pasteurize it, which means heating the egg for a long period of time at 130 to 140 degrees Fahrenheit, but not cooking it. Because this is tricky, the vast majority of eggs sold in the US are not pasteurized—if they are, you’ll know it, as they’re more expensive and the carton will indicate as much.
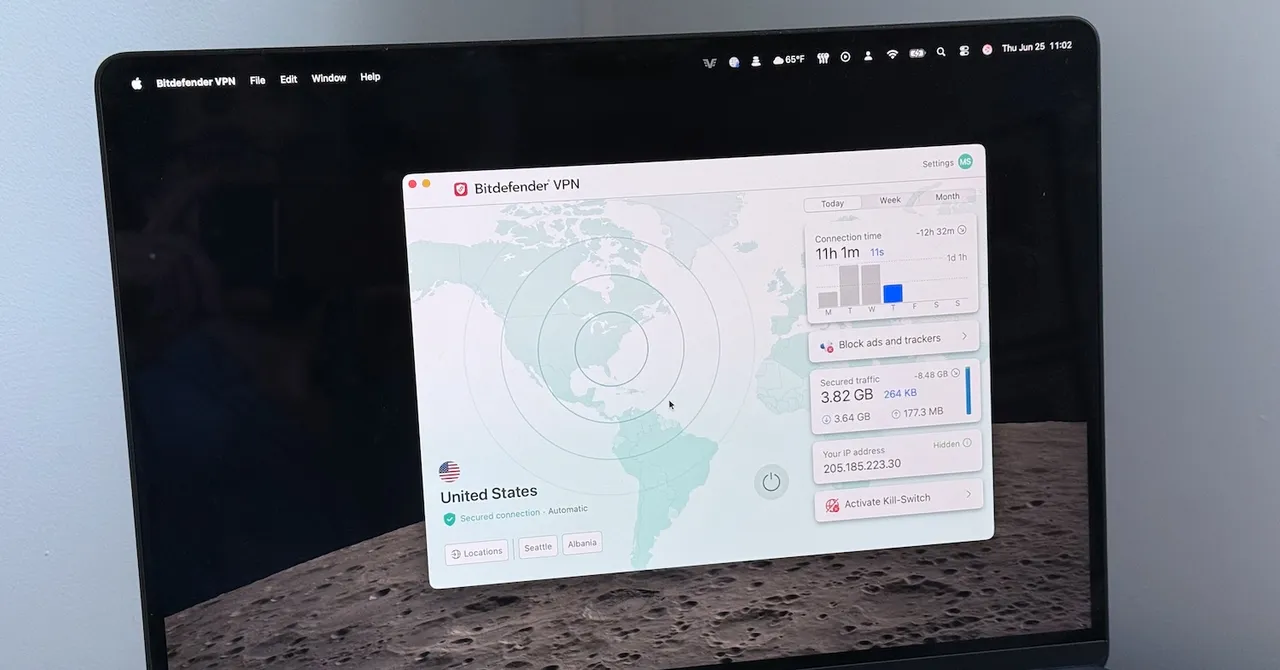
Bitdefender VPN was reliable in my time using it, as well. I didn’t experience any connection drop-outs or periods of unusually slow performance.
These are solid results, though not the best. For example, I saw slightly better speeds (up to 540 Mbps, the same as when not connected to the VPN) while using IVPN with the WireGuard protocol enabled, for example.
Still, Bitdefender is plenty fast, very reliable, and I can’t say I found the gap in performance noticeable outside of in particular testing. I expect that most people will find the data rates provided by Bitdefender VPN to be more than adequate.
Privacy Promises and Compromises
Unlike Mullvad, a privacy-pilled alternative that positions itself as a tool against mass surveillance, Bitdefender VPN focuses more on avoiding geo-restrictions, ads, cookies, tracking, and Wi-Fi sniffing. There’s nothing wrong with that approach, but if you want a service that puts the P in VPN, you should look elsewhere.
Bitdefender’s VPN is provided through a partnership with IPVanish. IPVanish provides the infrastructure, while Bitdefender provides the client software, branding, customer service, and so on. It’s worth mentioning, as IPVanish took a reputation hit back in 2018 when it handed user logs to the US Department of Homeland Security. This occurred in 2016 and happened despite having a no-logs policy.
However, IPVanish ownership has exchanged hands several times since then, and it’s now owned by media company Ziff Davis. IPVanish has undergone a number of successful independent, no-log audits, the most recent of which occurred in 2025. IPVanish also publishes a transparency report showing the volume of requests it has received from law enforcement and the data it has provided in response.
That’s good news, but wrinkles remain. IPVanish is a US company, and US law is pretty strict when it comes to law enforcement demands for data. IPVanish can’t provide what it doesn’t log, but privacy nerds often prefer VPN companies in less draconian jurisdictions.
It’s also unclear how Bitdefender’s service interact with IPVanish’s no-logs policy. Bitdefender obviously retains at least some information about the user, because a Bitdefender account is required to use the VPN, and users have to pay with a credit card. Bitdefender has some customer service information about its no-log policy, but the specific wording means this could be referring to the IPVanish audit.
Whether any of this matters depends on what privacy means to you. If you want an extra layer of network security to ward against trackers and prevent issues on compromised Wi-Fi connections, then Bitdefender VPN will do the job. However, Bitdefender VPN isn’t going to meet your needs if you’re worried about nation-state tracking or want to move across the web in near secrecy.
Conclusion
Bitdefender’s VPN is an easy-to-use service that works best for people with basic expectations for what a VPN should offer. It provides typical features and delivers solid network performance at a competitive price. It’s not the ultimate VPN for privacy and it’s lacking a few features some people will want, like Linux support and a static IP option.
Pricing might push you toward Bitdefender VPN—at least for the first year. The introductory offer of $35 for a year of service is an outstanding value. Just remember to check pricing again before it’s time to renew, as Bitdefender’s pricing after the first year is less enticing.
Pixel 11 Pro owners running the latest Gemini beta might notice a new option in the app’s plus menu.
The new tool reportedly lets Gemini troubleshoot your smartphone rather than just point you to the right settings menu and list a dozen options.
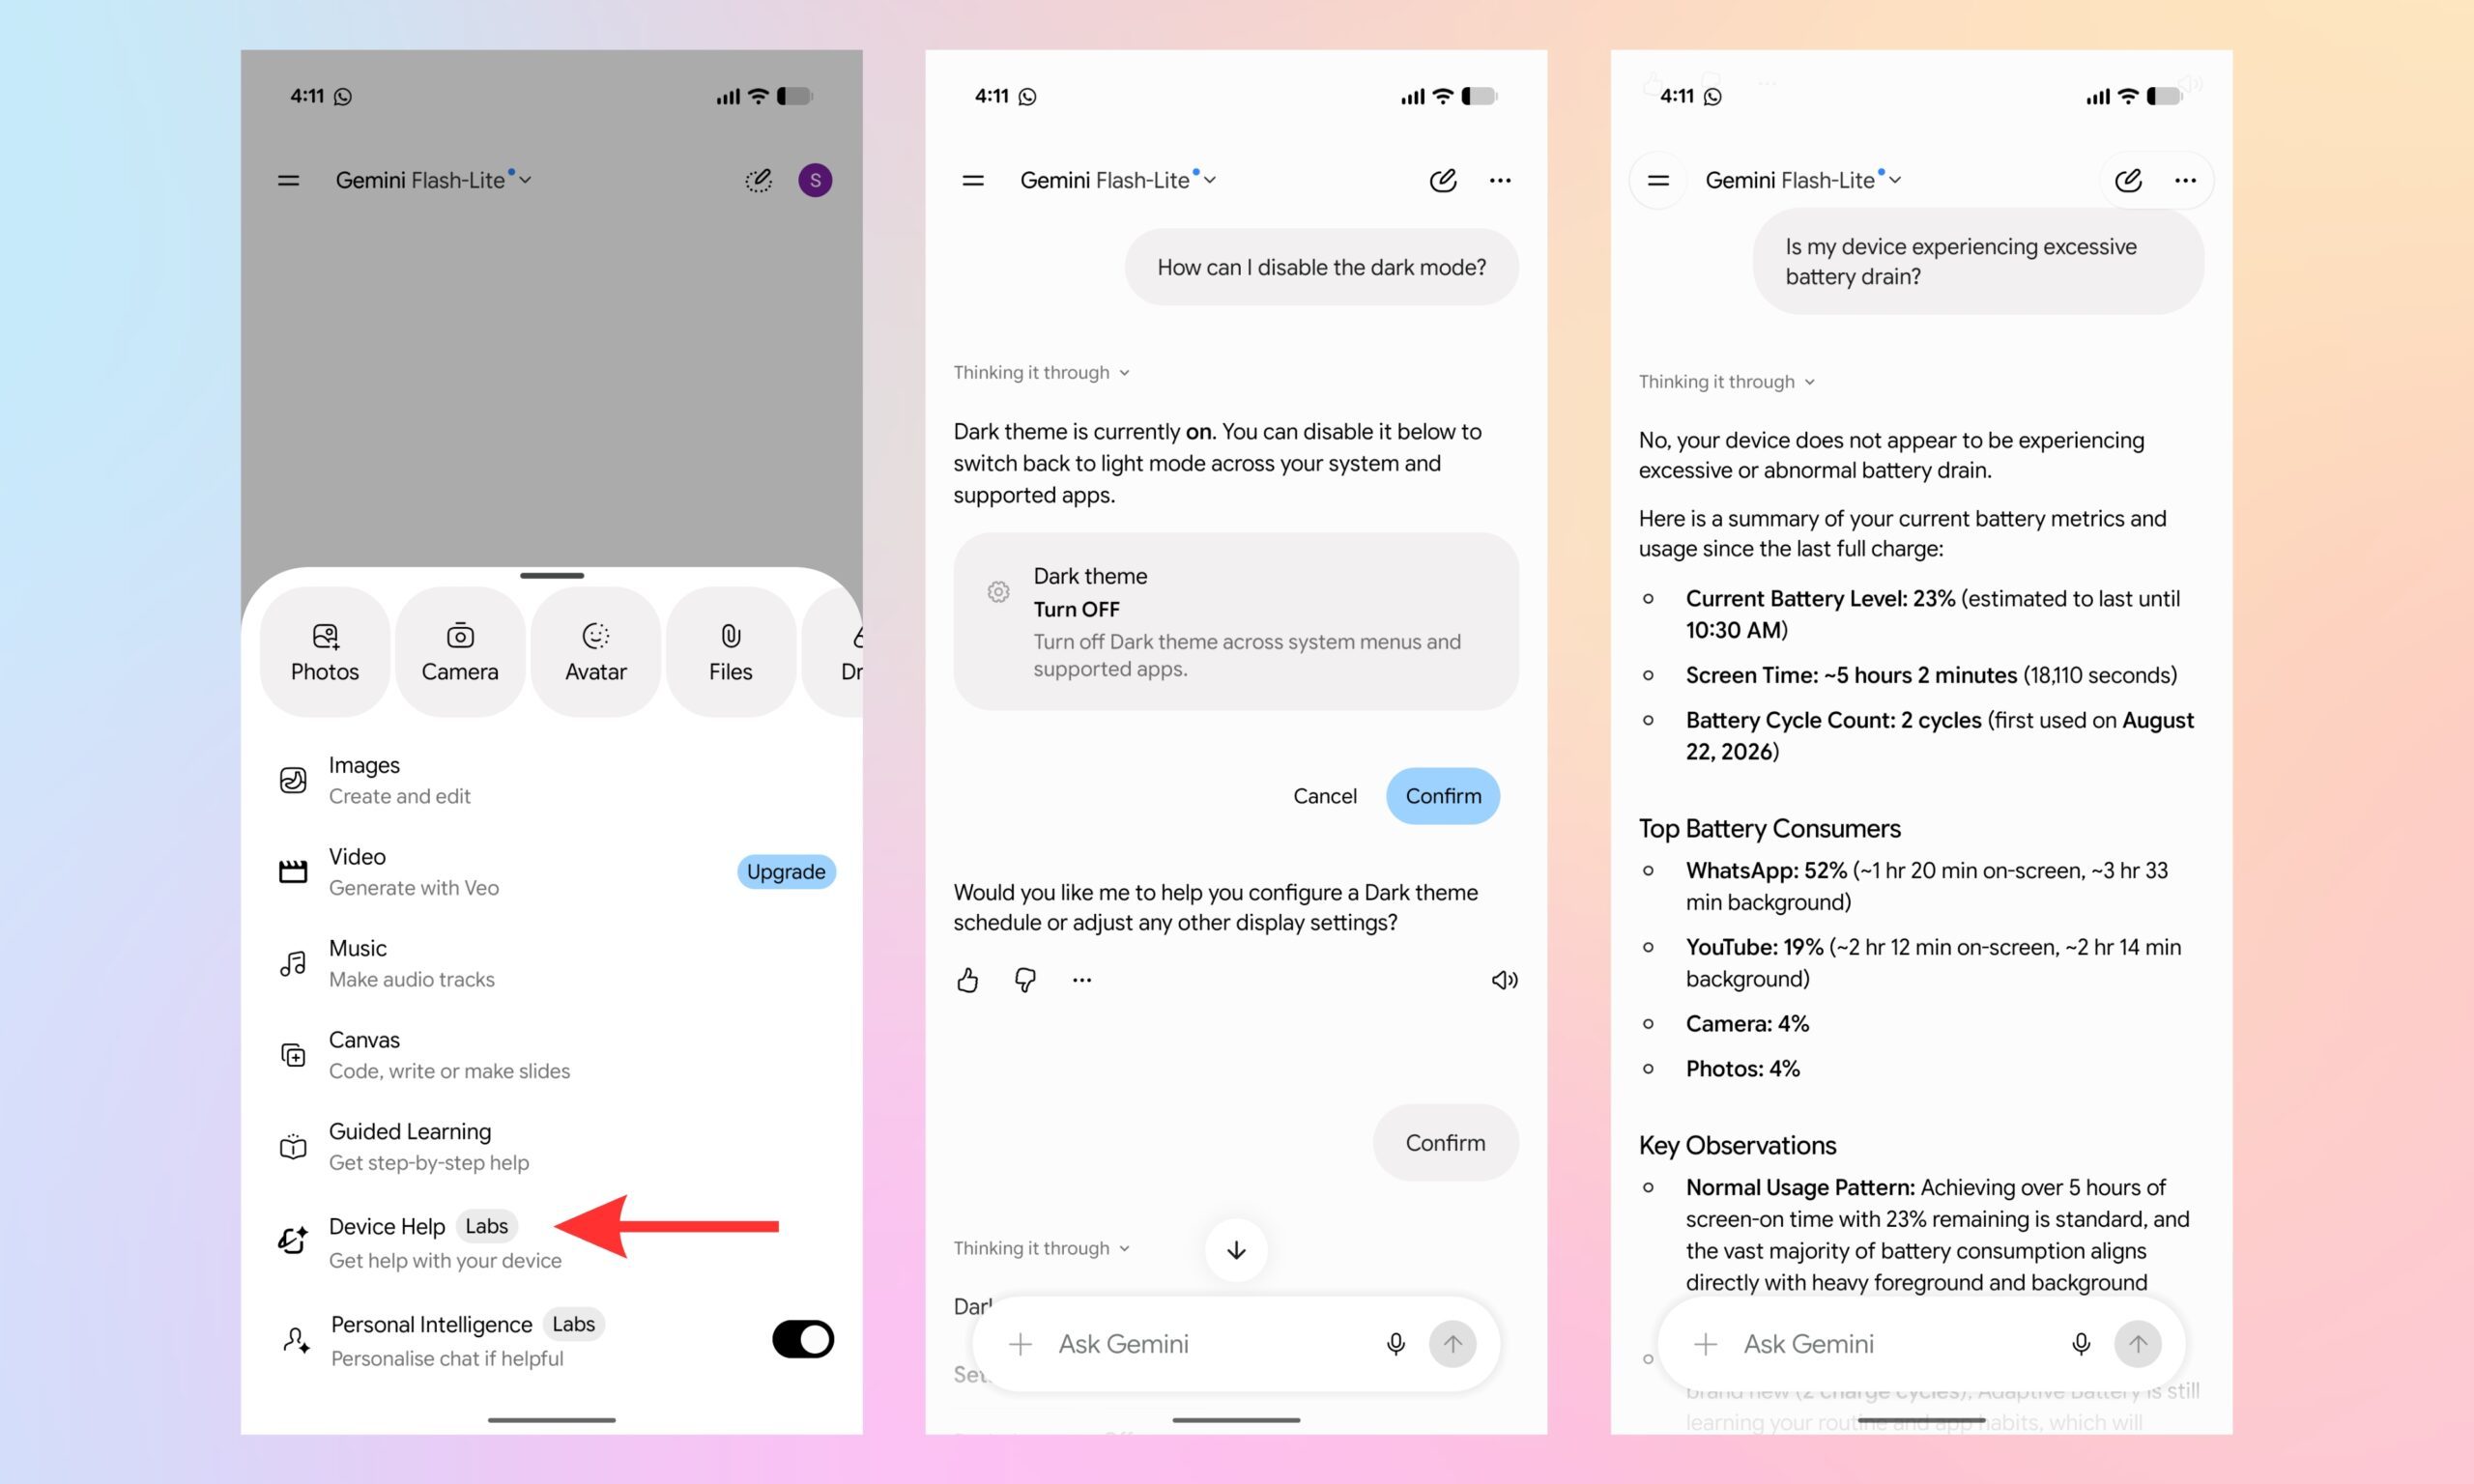
So what exactly does this new device help tool do?
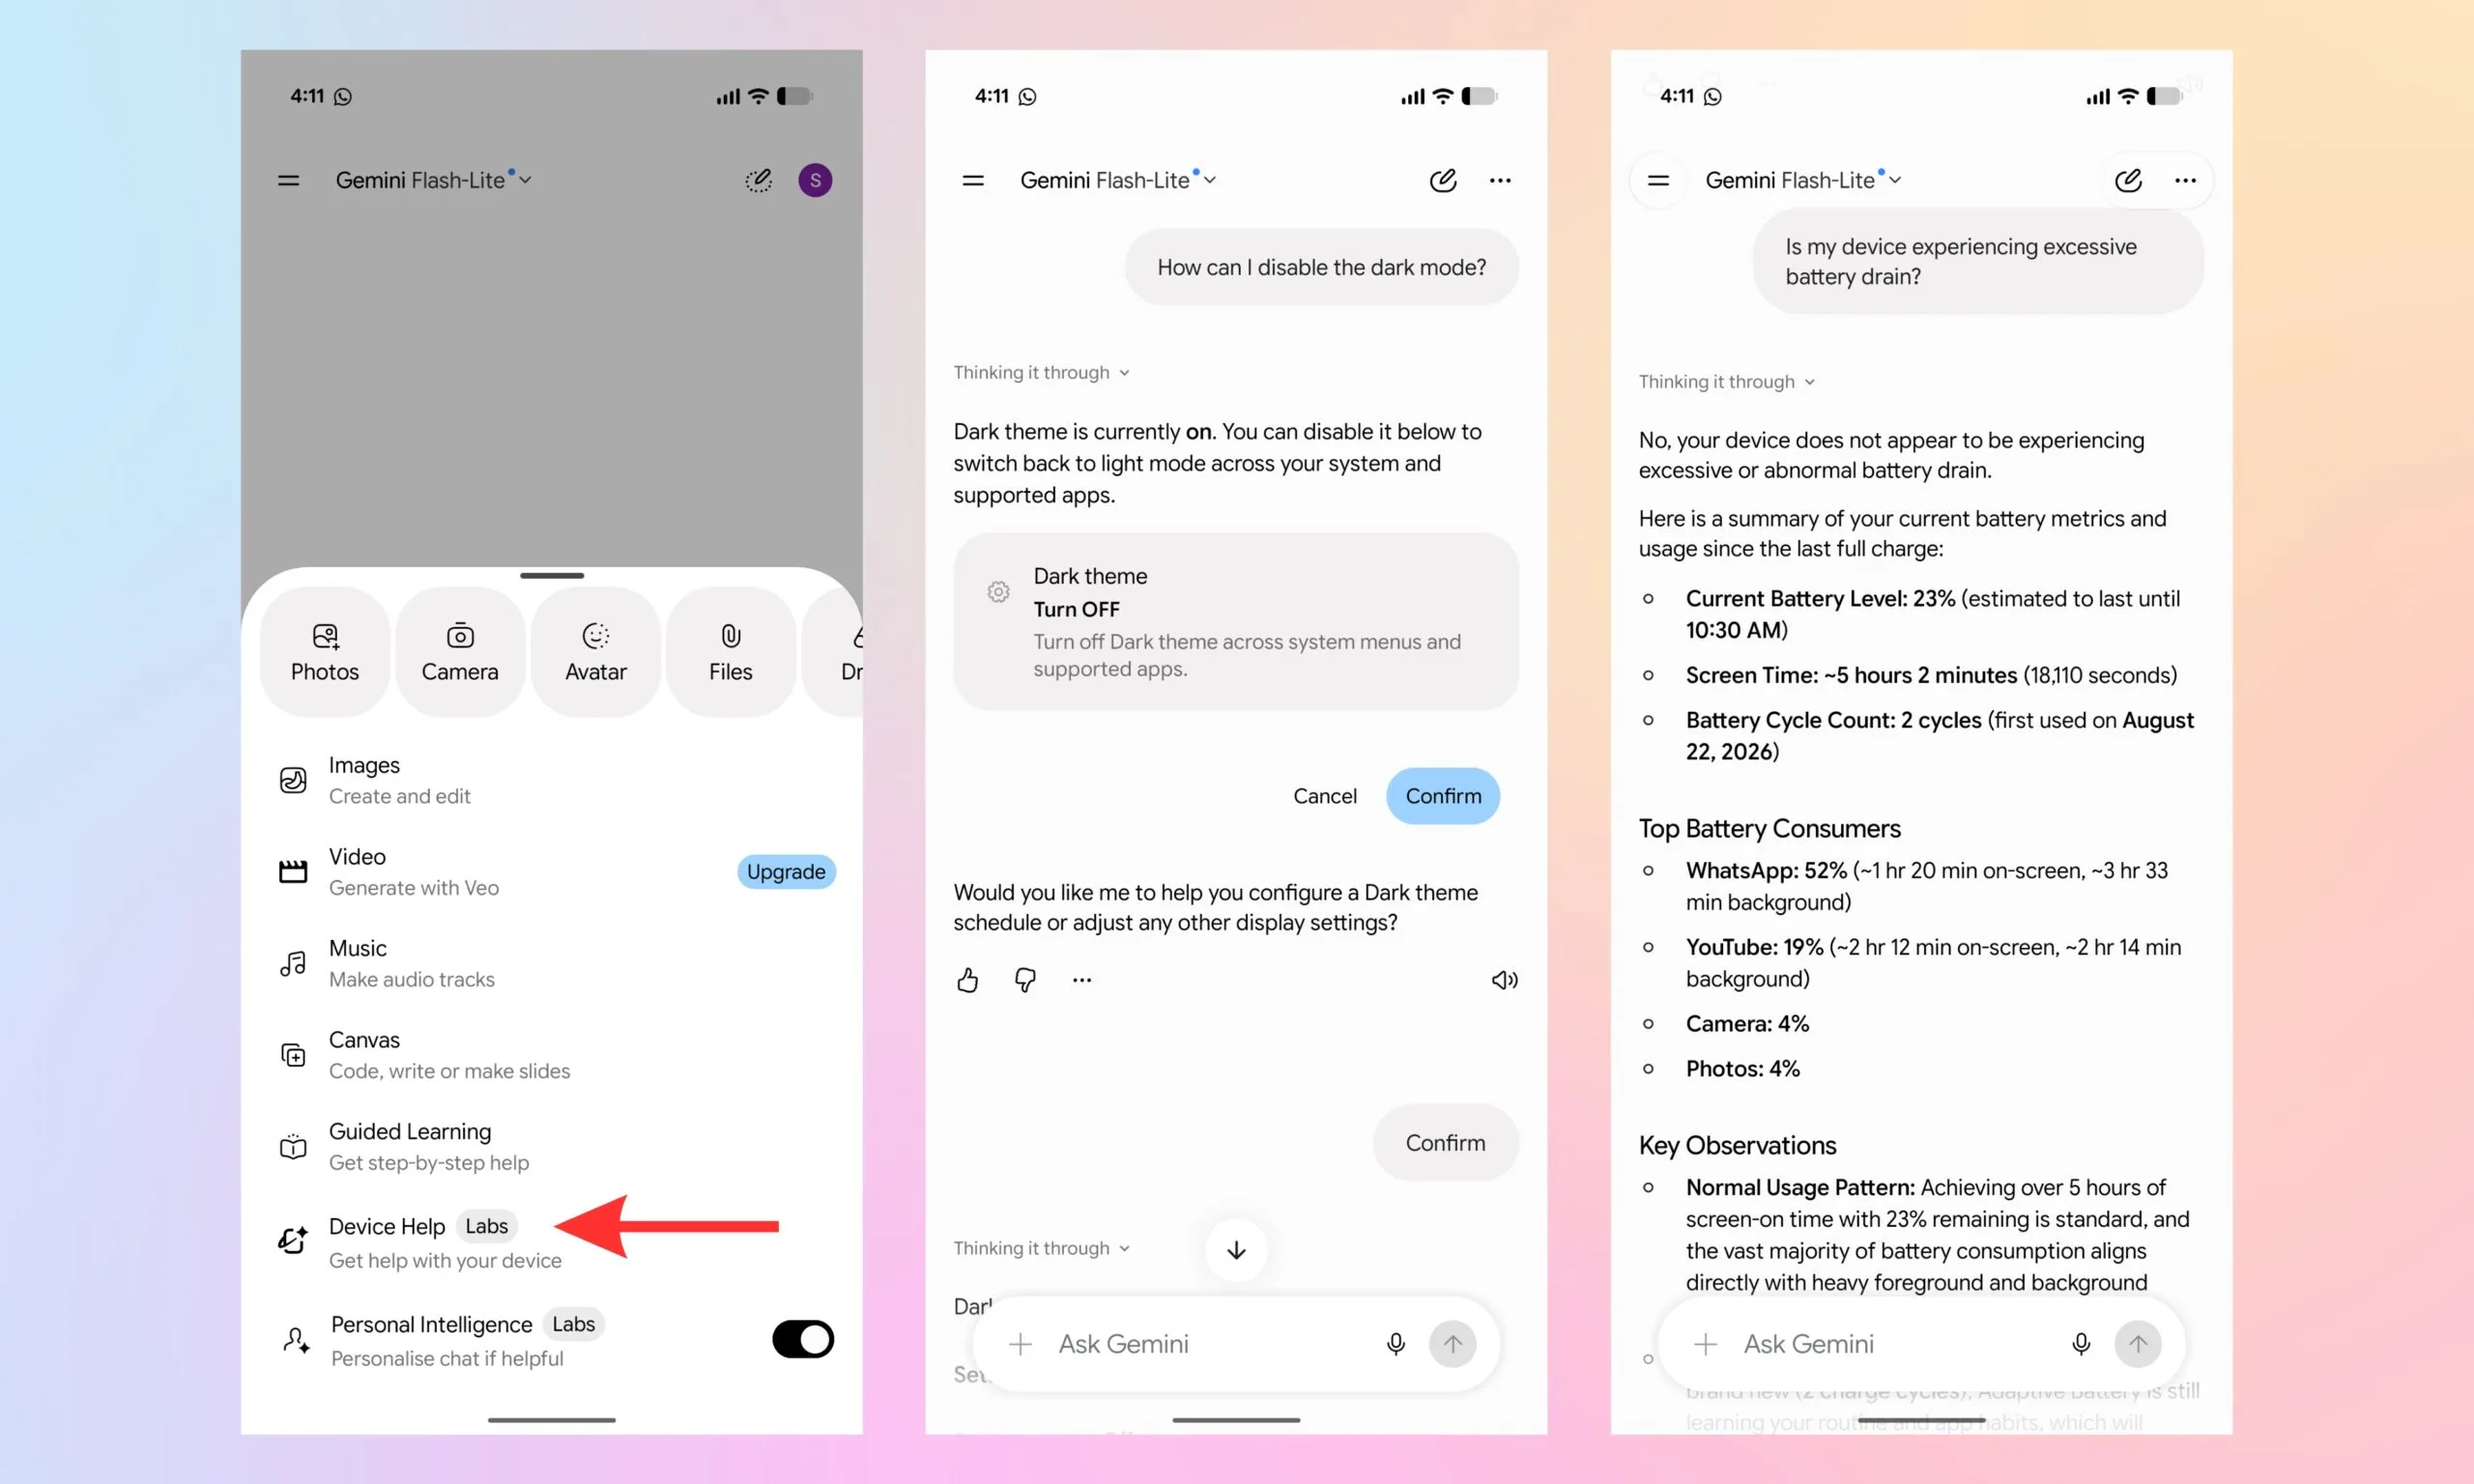
Tucked into the Gemini app’s plus menu or accessible through the overlay, the new option is called “Device help.” On the Pixel 11 Pro XL I’m currently using, it sits between Guided Learning and Personal Intelligence. It also carries a “Labs” label (similar to Personal Intelligence), indicating that Google is still testing the feature.
The description below the name reads “Get help with your device,” and that’s exactly what the tool does. With a Device Help Agent, the tool can perform tasks like adjusting system settings for dark theme, brightness, and Do Not Disturb. It can also troubleshoot Wi-Fi, Bluetooth, or battery drain, and break down your storage and battery usage.
In addition, the tool can also audit app permissions and walk you through Pixel-specific features and gestures in a step-by-step, easy-to-follow manner. In my opinion, that is a genuinely broad toolkit for something that lives and breathes inside a chat interface.

Is this actually new tech?
Under the hood, though, the Device help tool doesn’t appear to be entirely new. The functionality reportedly leans on Google’s existing Device Assistance connected app. It’s the same one previously known simply as Utilities, now repackaged behind a conversational Gemini front end rather than a standalone utility.
Regarding who can try the new tool, it is strictly a Pixel 11 Pro thing right now. It is available in the Google app beta version 17.52, and neither the baseline Pixel 11 nor older Pixel phones get it, at least not yet.
Given the Labs badge, I’d treat this as an early trial rather than a wider rollout. Google has a habit of testing features on one device before releasing it to others, and that’s if the feature works as intended.

Fulham vs Chelsea LIVE: Record signing Rogers and Palmer score in first win of Alonso era

What Is A Focusing Flashlight And How Does It Work?

Emmerdale’s Katie Hill feared being written out of ITV soap





-

 Fashion3 days ago
Weekend Open Thread: Madewell – Corporette.com
-

 Business3 days ago
Musk’s Tesla, SpaceX Confirm $16.8 Billion ‘Terafab’ Chip Plant as World’s Largest Building in Texas
-

 Crypto World3 days ago
anatomy of crypto’s biggest liquidation event since 2021
-

 Business7 days ago
SMA Solar Technology AG (SMTGY) Q2 2026 Earnings Call Transcript
-

 Tech7 days ago
Qwen3.8-27B runs frontier-class coding agents and reasoning locally, no cloud API required
-

 Politics3 days ago
6 months on, Irish renters crushed by effects of government housing bill
-
 NewsBeat3 days ago
The ‘Lucky Dip Gang’ causing carnage for clicks: After five thugs were killed speeding in the wrong direction on a motorway, GUY ADAMS investigates a sick new trend… and why police aren’t even allowed to pursue them
-

 Tech6 days ago
GLM-5.3 hits the API at $1.4/$4.4 per million tokens
-

 News Videos5 days ago
Don’t Leave Your Financial Future To Chance | August 19, 2026
-

 Business2 days ago
Mystery AI Model ‘Ox Alpha’ Draws Developers With Free Access as Chinese Lab Origins Remain Debated
-

 Tech7 days ago
Keychron K8 Ultra 8K review: a great value keyboard with comfort issues
-

 Business7 days ago
Stock Market Today: Tech Futures Slide As Treasury Yields Jump; Nvidia, Micron, Sandisk Sell Off
-

 Business5 days ago
Marvell Shares Jump 7% as Google Chip Deal Confirms Custom AI Silicon Partnership, Analysts
-

 Business4 days ago
Five Below: Kids Discount Retailer Reaps Rich Rewards
-

 Tech7 days ago
Ken Okuyama’s Kode89 Supercar Features Three Pedals and a Choice of V12s
-

 Politics7 days ago
The House Opinion Article | Security means more than military spending
-

 Fashion7 days ago
The Dressier Side of Shorts
-

 Business7 days ago
Nasdaq Ticks Higher as Wall Street Awaits Retail Earnings and Weighs Fed’s Next Move at Jackson Hole Meeting
-

 Crypto World7 days ago
Compound approves $52M institutional DeFi program
-

 Tech7 days ago
Payments giant Stripe is about to drop over $7 billion to become a gateway to AI token sales
You must be logged in to post a comment Login